Imagine the warm smile on someone’s face when they receive a gift that engages the sense of touch—it’s a small but powerful gesture of care and thoughtfulness. Touch gifts are incredibly popular because they create a tangible connection, offering comfort, relaxation, or a delightful sensory experience that words often can’t express.
In this article, you’ll find a diverse collection of touch gift ideas designed to suit every personality and occasion. From cozy blankets and plush toys to aromatic massage oils and soothing skincare, these ideas will inspire you to give meaningful gifts that truly resonate and bring joy to your loved ones.
1. Personalized Monogram Wall Hooks for a Stylish Entrance
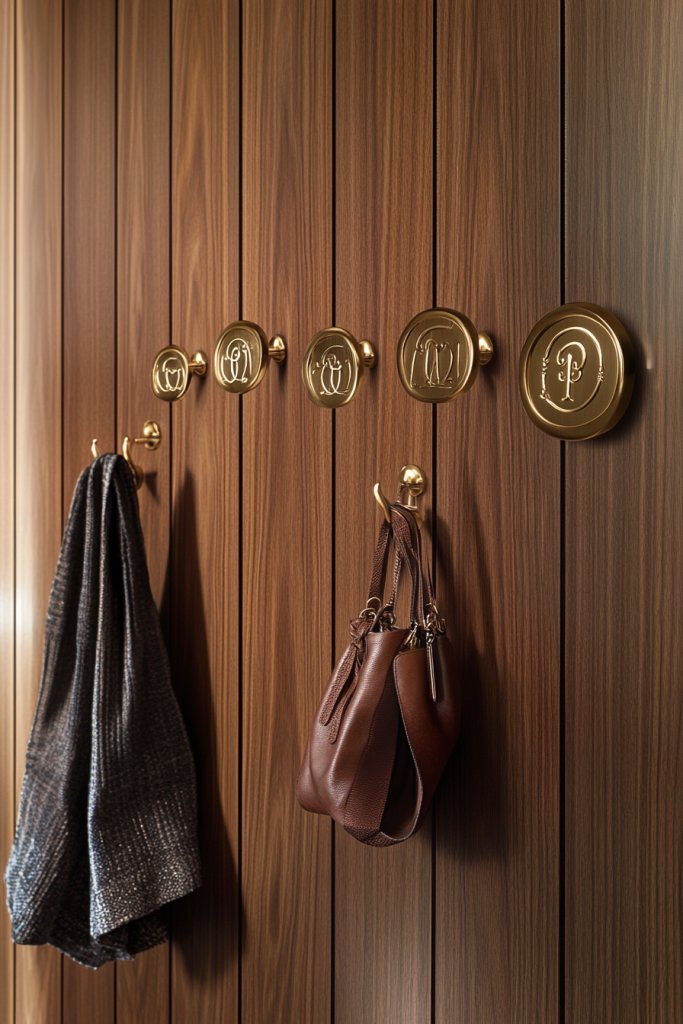
Ever walk into a home and feel that warm, personalized greeting? Generic hooks just don’t cut it anymore; everyone wants a little flair when they arrive. It’s about making your entrance memorable, not just functional. A personalized touch can turn an ordinary hallway into a welcoming space that reflects your style.
Imagine sleek wooden hooks engraved with initials or names, mounted neatly on a textured wall. Soft lighting highlights their natural grain, adding warmth to the entryway. Small decorative accents like a woven rug or a cozy bench complete the scene, creating an inviting atmosphere. It’s simple but makes a big statement.
Customize with different fonts, materials, or colors to match your decor. For a rustic vibe, opt for reclaimed wood and handwritten fonts. Modern homes might prefer metallic finishes with minimalist lettering. Seasonal variations could include adding hooks for holiday ornaments or scarves during winter. The key is balancing functionality with your aesthetic.
Start by selecting durable materials like hardwood or metal. Sketch your design and choose a font or monogram style. Use a level and measuring tape to ensure even spacing on your wall. Secure hooks with appropriate anchors, especially if mounting onto drywall. Finish with protective coatings if needed. Personalize further with paint or stain for a truly bespoke look.
Add small tags with family member names or special symbols to each hook. Incorporate a small shelf above for keys or mail. Choose hooks with unique shapes—like animal motifs or vintage-inspired designs. This elevates the everyday utility into a piece of art that tells a story about you.
Personalized monogram hooks transform a dull entry into a signature space. It’s a simple DIY project that adds personality and order. Plus, guests will always remember your home’s unique welcoming style. Ready to make your entrance unforgettable?
2. Hand-Painted Ceramic Coasters with Unique Designs
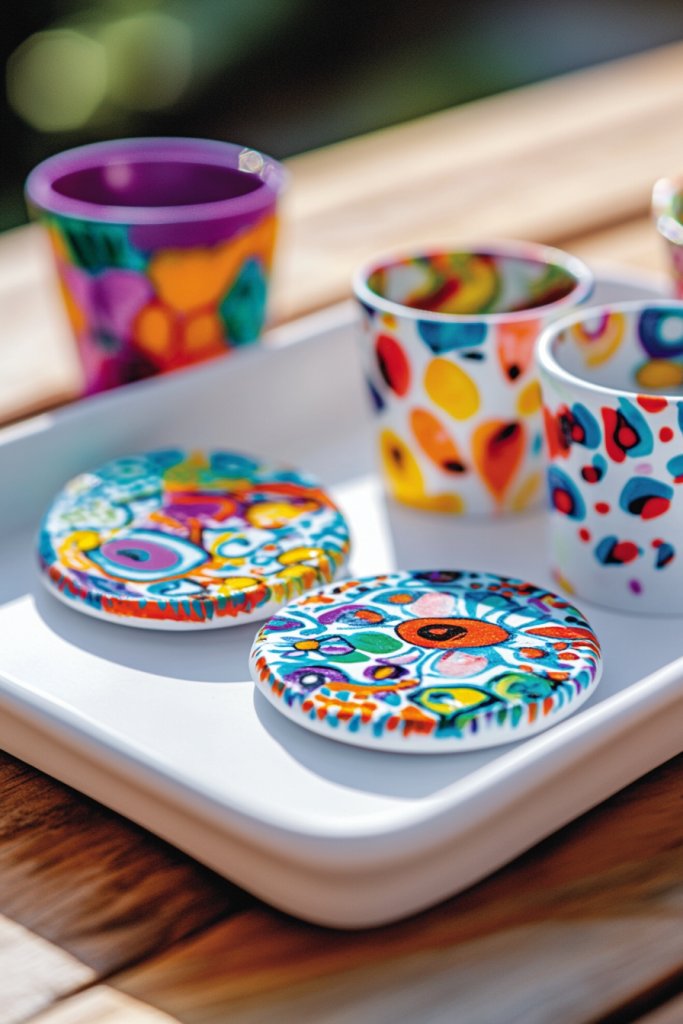
Tired of boring, generic coasters that don’t inspire? Hand-painted ceramic coasters bring personality to your table while protecting surfaces. They’re perfect for adding a pop of color or a quirky touch to your daily routine. Who says functional can’t be fabulous?
Picture a set of smooth ceramic discs, each with vibrant hand-painted patterns—floral, abstract, or whimsical motifs. The glossy finish catches the light, making each piece stand out. They sit neatly on a wooden tray or a marble surface, adding an artistic vibe to your coffee table. Every coaster feels like a mini canvas.
Choose designs to match your decor style—bold geometric patterns for modern spaces or delicate florals for vintage charm. Seasonal themes like snowflakes or autumn leaves can make them versatile. You could also customize with initials or meaningful symbols for a personal touch. Mixing and matching different styles keeps things fresh.
Start with plain ceramic tiles or discs, available at craft stores. Use waterproof ceramic paints or markers for durability. Plan your designs beforehand, sketch lightly if needed. After painting, seal with a clear waterproof varnish to prevent smudging. Let dry completely before using. For a professional finish, consider firing in a kiln or baking in the oven if using special paints.
Create themed sets—like a tropical beach scene or a city skyline—to match your personality. Add small embellishments like gold leaf accents or textured patterns. Personalize with initials or special dates for gifting or keepsakes. These custom touches turn simple coasters into cherished items.
Hand-painted coasters are a fun way to showcase your artistic side and add color to your home. They’re easy to customize and make great handmade gifts. Once you see your own designs come to life, you’ll feel inspired to explore other DIY decor projects. Ready to get painterly?
3. DIY Floating Shelf with Decorative Accents
Ever wish your walls could hold more than just paintings? Floating shelves are a sleek solution to maximize storage without cluttering your space. They add a modern touch while giving you a dedicated spot for your favorite decor or essentials. Who knew organization could look this good?
Envision a thin, sturdy wooden plank mounted seamlessly on the wall with hidden brackets. Decorate with curated items—like vintage books, candles, or small sculptures—that add personality. The floating effect creates a clean, airy feel, making your room look larger and more organized. It’s a minimalist’s dream come true.
Adjust the length, thickness, and finish of your shelf to suit your style. For a rustic look, choose reclaimed wood or distressed paint. Sleek lacquered finishes work well for contemporary spaces. You can also vary the height and grouping to create visual interest or fit different room functions, like a bathroom or kitchen.
Measure wall space carefully before selecting your shelf size. Use a stud finder to secure brackets into wall studs for strength. Drill holes with precision, then mount brackets using appropriate anchors if not hitting studs. Place the shelf on the brackets, ensuring it’s level. Finish by decorating with your chosen accents, keeping weight limits in mind. Basic DIY skills suffice here, but patience is key.
Paint or stain the shelf in your favorite color or finish for a custom look. Add decorative trim or carved details for extra flair. Change out the accents seasonally—like holiday ornaments or fresh flowers—without permanent changes. This flexibility makes your shelf a dynamic part of your decor.
Floating shelves blend function and style effortlessly, transforming blank walls into feature areas. They’re easy to install and modify, making them perfect for DIY beginners. Once completed, you’ll feel empowered to tackle other wall projects with confidence.
4. Cozy Faux Fur Throw Blanket in Neutral Tones
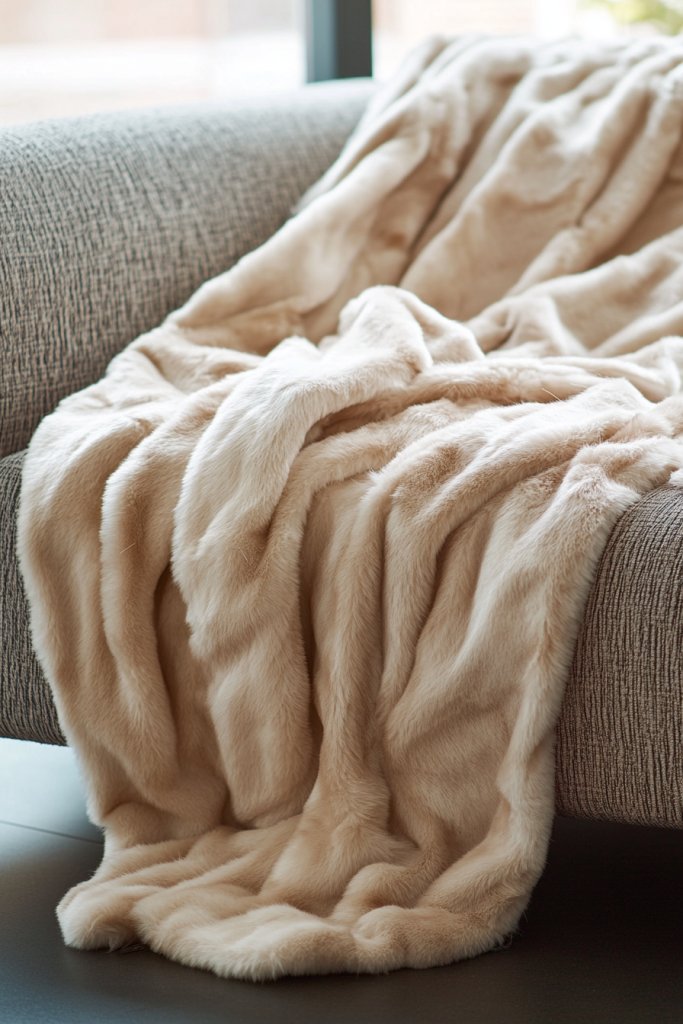
Who doesn’t love curling up under a warm blanket on chilly evenings? But many throws are boring or lack texture. A plush faux fur throw adds instant coziness and elevates your decor at the same time. Comfort meets style in the softest way possible.
Imagine a large, buttery-soft faux fur blanket draped over a sofa or bed. Its neutral tones—cream, taupe, or gray—blend seamlessly with various color schemes. The fluffy texture catches the light, creating a sense of depth and warmth. It invites you to sink in and relax, transforming your space into a cozy retreat.
Choose different textures such as shaggy, curly, or smooth faux fur for varied looks. Layering with other textiles—like chunky knit pillows or linen sheets—adds richness. During winter, pick warmer shades, while lighter hues work well in spring. Wrap yourself in it during movie nights or use it to add softness to your guest bed.
Select a high-quality faux fur fabric from fabric stores or online suppliers. Cut to your desired size, ensuring clean edges. Sew or glue the edges for a neat finish. For an easier approach, purchase pre-made throws in neutral tones. Keep it clean by shaking out dust and spot-cleaning with gentle detergent as needed. Avoid high heat, which can damage faux fur fibers.
Add embroidered initials or subtle patterns for a personal touch. Incorporate decorative tassels or fringes on the edges. Use different textures—like silky lining or contrasting fabrics—to create unique combinations. These small details turn a simple throw into a signature piece.
A faux fur throw elevates your space instantly, making it feel luxe and inviting. It’s a simple upgrade that pays off in comfort and style. Once you experience the plush softness, you’ll want to add more cozy touches everywhere. Ready to snuggle?
5. Elegant Diffuser with Custom Scent Blends
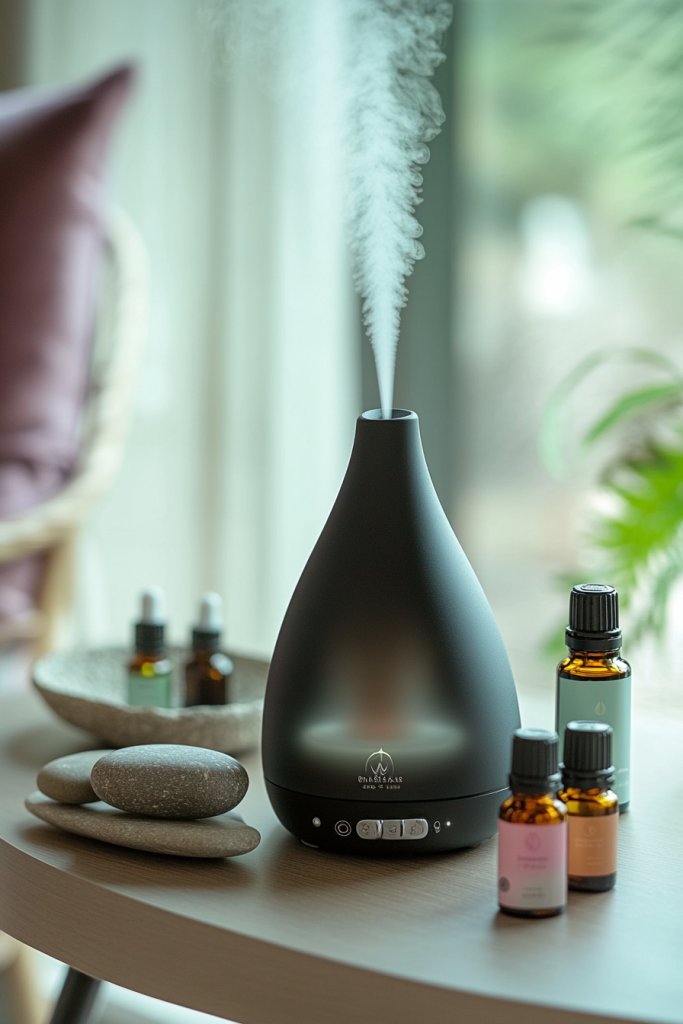
Ever wish your home could smell as good as it looks? A stylish diffuser paired with custom essential oil blends creates a welcoming aroma that’s personalized just for you. It’s an easy way to set a mood, whether relaxing or energizing, without the overpowering sprays. Scent can truly transform a space.
Picture a sleek ceramic or glass diffuser sitting on a coffee table or bookshelf. Wisps of fragrant vapor gently swirl upward, filling the room with a subtle, inviting scent. The diffuser’s minimalist design complements modern decor, while the soft glow from LED lights adds ambiance. It’s both functional and beautiful—a true decor staple.
Choose diffusers in different shapes—geometric, botanical, or abstract—to match your style. Pair with custom scent blends tailored to mood: calming lavender, invigorating citrus, or cozy vanilla. Seasonal blends can enhance festivities or create relaxing retreats. Some diffusers offer interchangeable covers or colors for added flexibility.
Pick a diffuser with a capacity suited to your space and usage frequency. Fill with high-quality essential oils—mixing your own blends can be fun and unique. Follow manufacturer instructions for filling and cleaning. Consider pairing with a few favorite scents stored nearby. Regular cleaning keeps the diffuser working smoothly and scents pure.
Create custom blends by mixing oils to suit your preferences—think spa-like serenity or citrus zest. Decorate the diffuser with a decorative stand or tray to match your decor theme. Keep a small notebook of your favorite recipes for consistent scenting. You can even gift personalized oil blends for special occasions.
A diffuser offers a simple yet impactful way to elevate your living space. It’s a subtle luxury that benefits your mood and well-being. Once you see how a good scent can influence your day, you’ll be hooked on creating personalized aroma experiences everywhere you go.
6. Personalized Photo Collage Wall Art in a Modern Frame
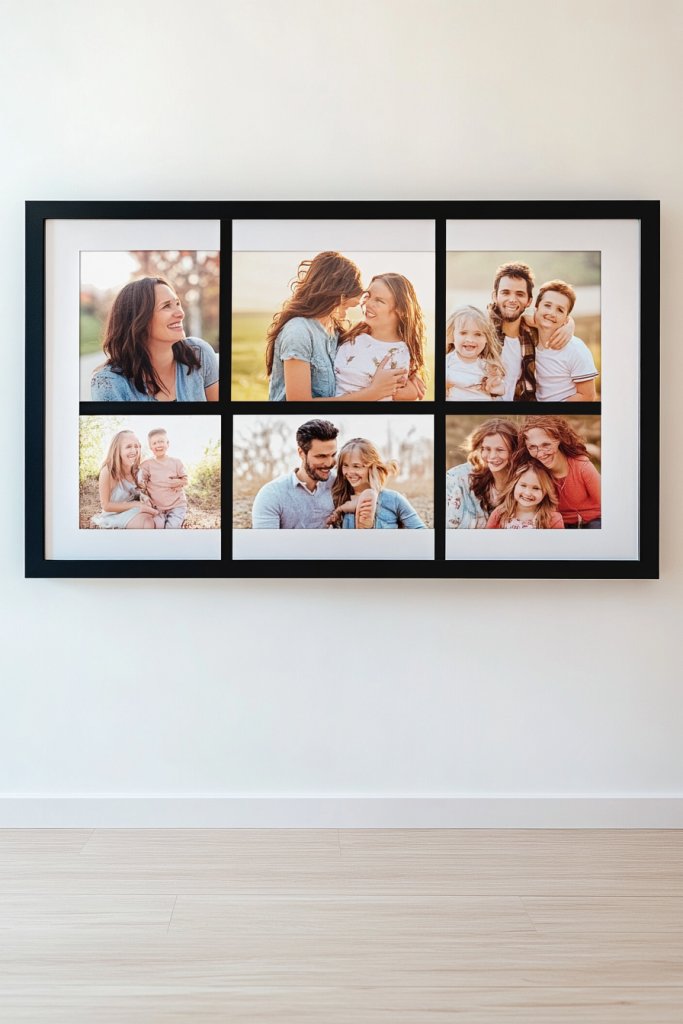
Looking for a way to showcase your favorite memories without cluttering your surfaces? A personalized photo collage in a sleek frame blends nostalgia with modern decor. It’s a heartfelt focal point that adds warmth and personality to any room. Who doesn’t love reliving special moments?
Visualize a large, contemporary frame filled with a carefully curated collection of photos—family, friends, travels, or milestones. The images are arranged in a dynamic, asymmetrical layout, adding visual interest. The clean lines of the frame complement minimalist interiors, making your memories the star. The collage becomes a conversation starter and a daily dose of happiness.
Mix black-and-white with color photos for a striking effect. Use themed collections—like a travel series or family generations. Switch out images seasonally or for special occasions. For smaller spaces, create a grid layout; for larger walls, opt for a sprawling, gallery-style display. Frame styles can range from sleek metal to rustic wood, depending on your vibe.
Gather your favorite high-resolution images and select a modern frame that fits your space. Use a photo editing app to crop and arrange images digitally beforehand. Print photos at a local shop or online, ensuring quality paper and color accuracy. Assemble the collage by arranging images on a flat surface before mounting, then secure in the frame. Consider adding a matte or border for extra polish.
Add small decorative elements like stickers or handwritten notes to some photos. Use themed backgrounds or borders to unify the collage. Incorporate other memorabilia—like ticket stubs or postcards—for a layered look. Personal touches make the collage uniquely yours and more meaningful.
Creating a personalized photo collage transforms your space into a gallery of memories. It’s a simple DIY project with a high impact, perfect for showcasing your story. Once done, you’ll feel more connected to your space—and maybe even inspired to document more moments.
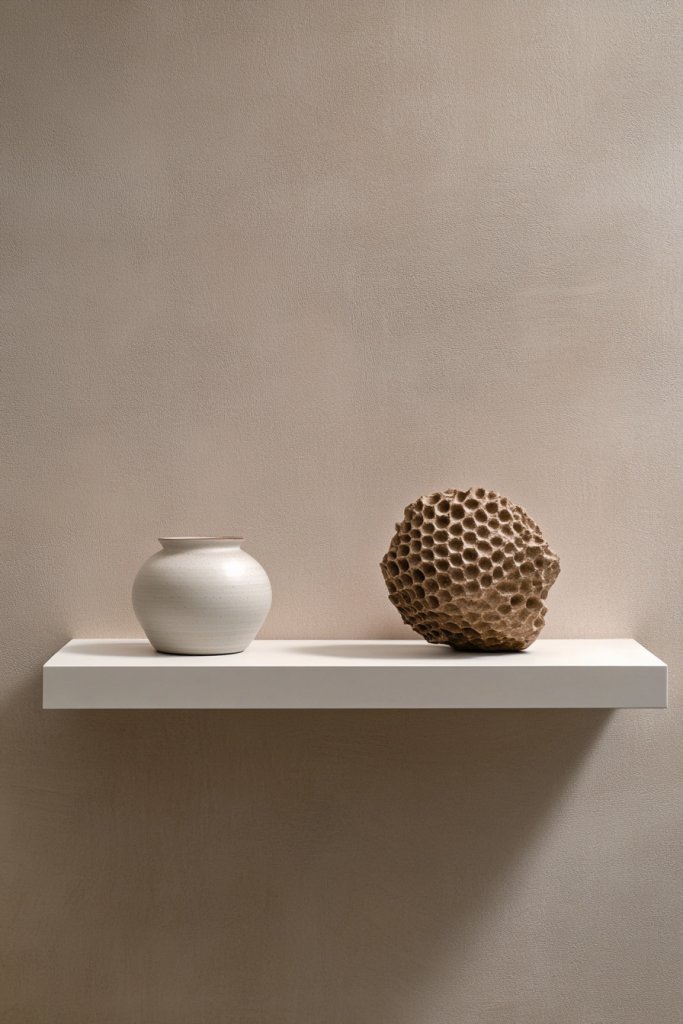
7. Rustic Wooden Plant Holder with Succulents (Non-plant)
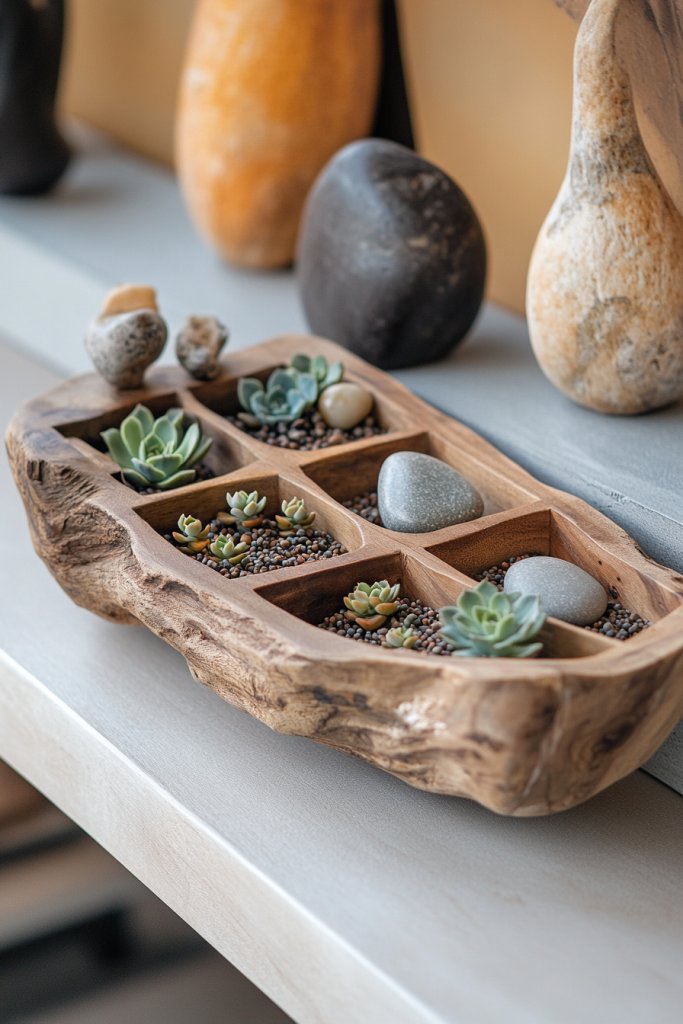
Who says you need green thumbs to enjoy the charm of plants? A rustic wooden holder for succulents offers a low-maintenance way to bring a touch of nature indoors. Plus, it adds a warm, natural vibe to your decor without the fuss. It’s perfect for those who love the look but not the upkeep.
Imagine a handcrafted wooden stand with compartments or a tray, filled with tiny succulents or decorative stones. The natural grain of the wood pairs beautifully with the textures of the stones or ceramics. The arrangement sits on a windowsill, coffee table, or shelf, adding a rustic yet modern feel. The contrast of textures draws the eye and invites touch.
Opt for different wood finishes—weathered, stained, or painted—to match your decor. Incorporate geometric shapes or vintage-inspired designs for a unique look. For a seasonal update, add fairy lights or decorative accents around the holder. You can also repurpose old crates or pallets for a DIY, budget-friendly option.
Select quality wood from a hardware store or salvage old pieces for authenticity. Cut and assemble the holder using basic tools—saw, nails, or wood glue. Sand surfaces smooth and treat with a protective finish or stain. Fill compartments with faux succulents or decorative stones if you prefer low-maintenance decor. Position on a flat surface, ensuring stability.
Personalize with engraved initials, quotes, or patterns on the wood. Use different stains or paints to create visual interest. Mix materials like metal or ceramic for added texture. These details turn a simple holder into a statement piece that reflects your style.
A rustic wooden holder is a versatile decor element that combines craftsmanship with natural beauty. It’s easy to customize and maintain, making it a perfect beginner project. Once finished, you’ll feel proud of your crafted piece and inspired to explore other woodworking ideas.
8. Minimalist Magnetic Knife or Utensil Strip for Kitchen Organization
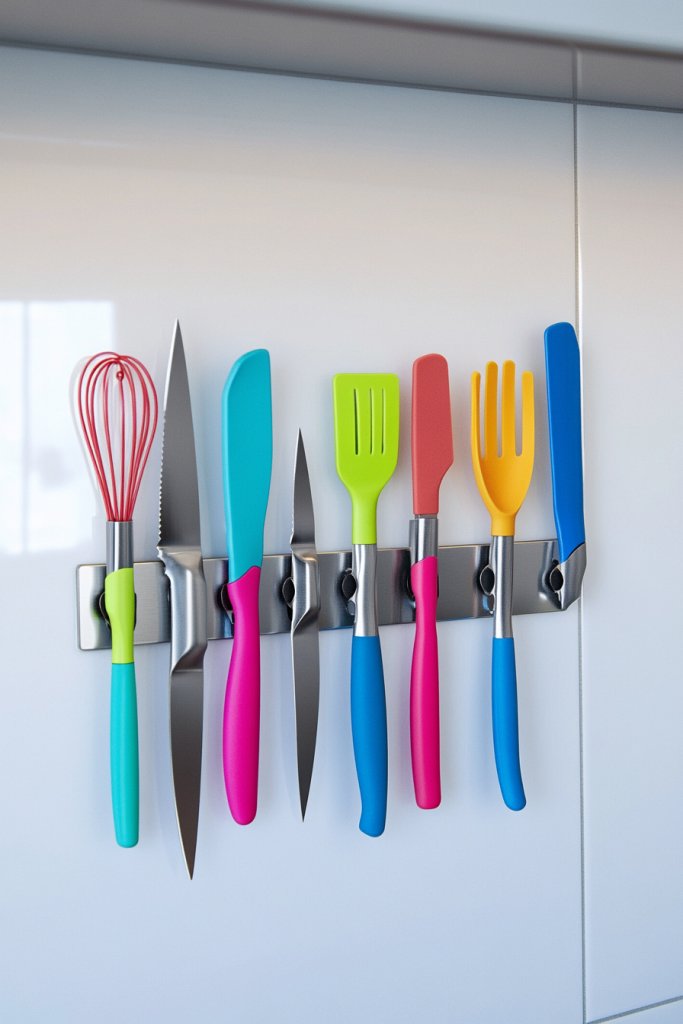
Cluttered kitchen drawers and counters can make cooking feel chaotic. A sleek magnetic strip keeps knives or utensils within arm’s reach while clearing your workspace. It’s a simple upgrade that boosts efficiency and style. Who knew organization could look this good?
Visualize a slim, metallic strip mounted horizontally on a clean backsplash wall. Sharp knives hang securely, their blades protected and accessible. Nearby, colorful utensils—like spatulas and whisks—stick magnetically to the strip, adding pops of color. The setup looks modern and minimalist, emphasizing clean lines and clutter-free surfaces.
Choose finishes—brushed stainless, matte black, or colorful powder coating—to match your kitchen aesthetic. Install at different heights for ergonomic convenience. Use multiple strips for different tools—knives, spices, or utensils—creating a customizable organization system. Seasonal or themed accessories can add a playful touch.
Measure the space carefully before mounting. Use a level to ensure straight installation. Attach with screws or strong adhesive, depending on your wall type. Clear the area and mount the strip securely, then organize your tools. Regularly check for stability and clean the strip to prevent dust buildup. Basic DIY skills will get this done quickly.
Add decorative elements like a patterned backing panel or colored magnets. Label sections with small tags or paint for quick identification. Incorporate a small chalkboard or memo clip nearby for notes or recipes. Personal touches keep the space functional and fun.
This minimal setup makes your kitchen look sleek and professional, inspiring you to cook more. It’s a quick, affordable upgrade with great impact. Once you see how much easier cooking becomes, you’ll wonder why you waited so long.
9. Handcrafted Mason Jar Sconce with LED Fairy Lights
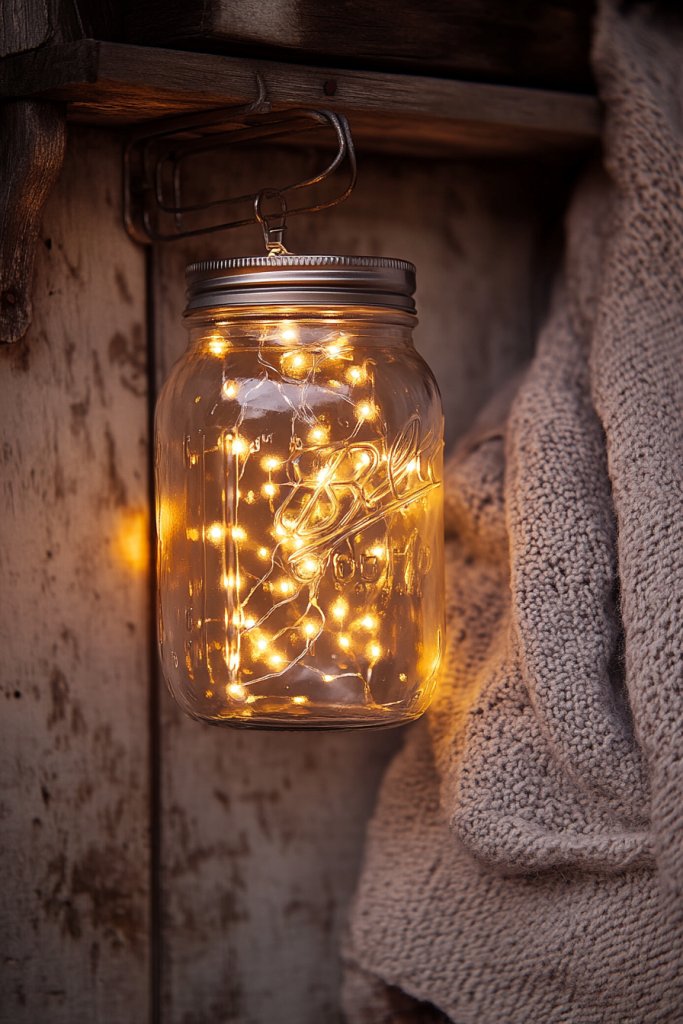
Looking for cozy ambient lighting without the fuss of complicated fixtures? Mason jar sconces filled with LED fairy lights create a warm glow perfect for relaxing nights or outdoor patios. They add a rustic charm and a personal touch to your space. Who needs fancy chandeliers when you have these?
Picture a clear mason jar hung on a wall or porch with a sturdy rope or metal bracket. Inside, tiny LED fairy lights twinkle softly, casting a gentle light across the room. The jar’s textured glass reflects the warm glow, creating a magical atmosphere. Surrounding decor includes vintage wood accents or soft textiles for extra coziness.
Use different jar shapes—wide-mouth, antique, or colored glass—to match your theme. Wrap the jar with twine, lace, or fabric for added decoration. Hang multiple jars at varying heights for visual interest or cluster them for a statement piece. Seasonal touches like faux snow or floral accents can change the mood.
Gather mason jars, LED fairy lights, and mounting hardware. Wrap the lights around the inside or outside of the jar, securing the battery pack outside for easy access. Attach the jars to walls using hooks or brackets, ensuring stability. Test the lights before mounting to avoid surprises. For outdoor use, ensure the lights are weatherproof.
Decorate the jars with painted patterns, labels, or charms. Use colored lights for different moods—warm white for cozy, multicolor for festive. Add small decorative elements inside, like faux flowers or seasonal figurines, for extra charm. These personalized sconces elevate any space and make great DIY gifts.
Mason jar sconces are a charming, budget-friendly way to add soft lighting. They’re easy to make and customize, giving your space a handcrafted, cozy vibe. Once lit, you’ll be inspired to create more DIY lighting projects that wow your guests.
10. Customizable Dry-Erase or Chalkboard Wall Panel
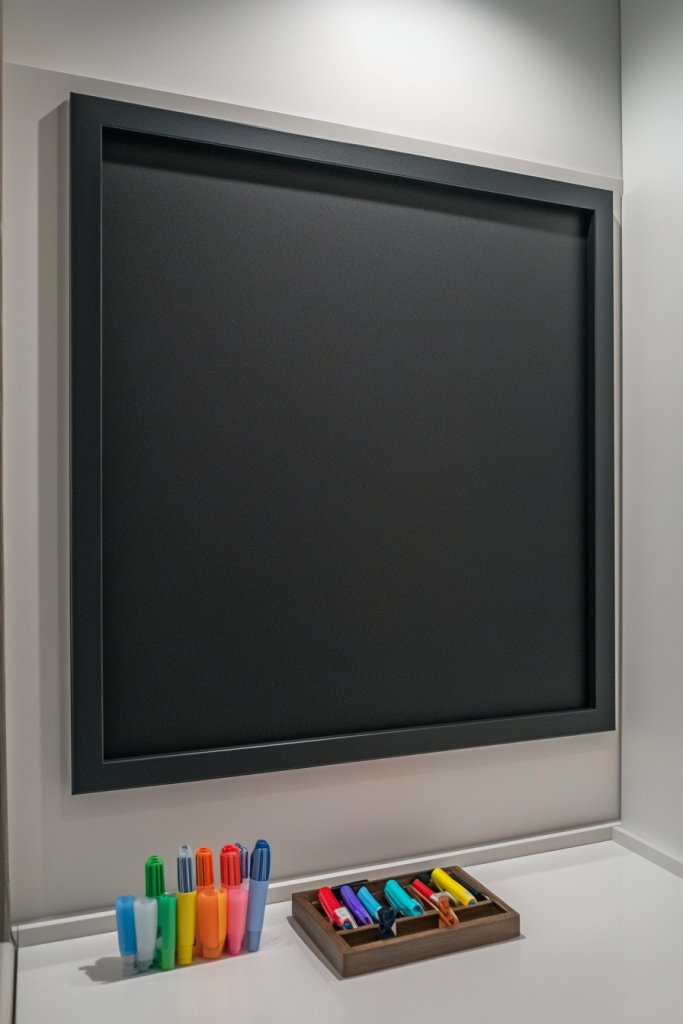
Do you ever wish your wall could serve as a giant notepad? A customizable dry-erase or chalkboard panel turns any wall into a functional, stylish message board. It’s perfect for reminders, doodles, or inspirational quotes. Plus, it adds a modern touch to your decor.
Imagine a sleek framed panel mounted in your kitchen or office corner. With a swipe, it transforms into a space for notes or sketches. The surface can be erased or wiped clean, maintaining a fresh look. Surrounding decor includes a few colorful markers, magnets, or a small tray for accessories—making it both practical and attractive.
Choose frames in metal, wood, or painted finishes to match your style. Size options range from small to wall-spanning panels. You can add decorative elements like washi tape borders or printed quotes. Seasonal themes or motivational phrases can keep the panel engaging and inspiring.
Select a durable dry-erase or chalkboard surface and a stylish frame. Measure your wall space carefully before mounting. Use anchors and screws for a secure fit, and ensure the panel is level. Keep markers or chalk nearby for convenience. Regular cleaning maintains the surface’s appearance and usability.
Decorate the frame with paint or decals for a custom look. Use colorful pens or chalk for visual interest. Incorporate magnetic accessories or clips for additional functionality. Personal touches like handwritten quotes or daily goals make it uniquely yours.
A wall panel for notes and inspiration is a versatile addition that keeps your space organized and lively. It’s a simple DIY upgrade with high impact. Once you start using it, you’ll wonder how you ever managed without it.
11. Modern Geometric Patterned Area Rug
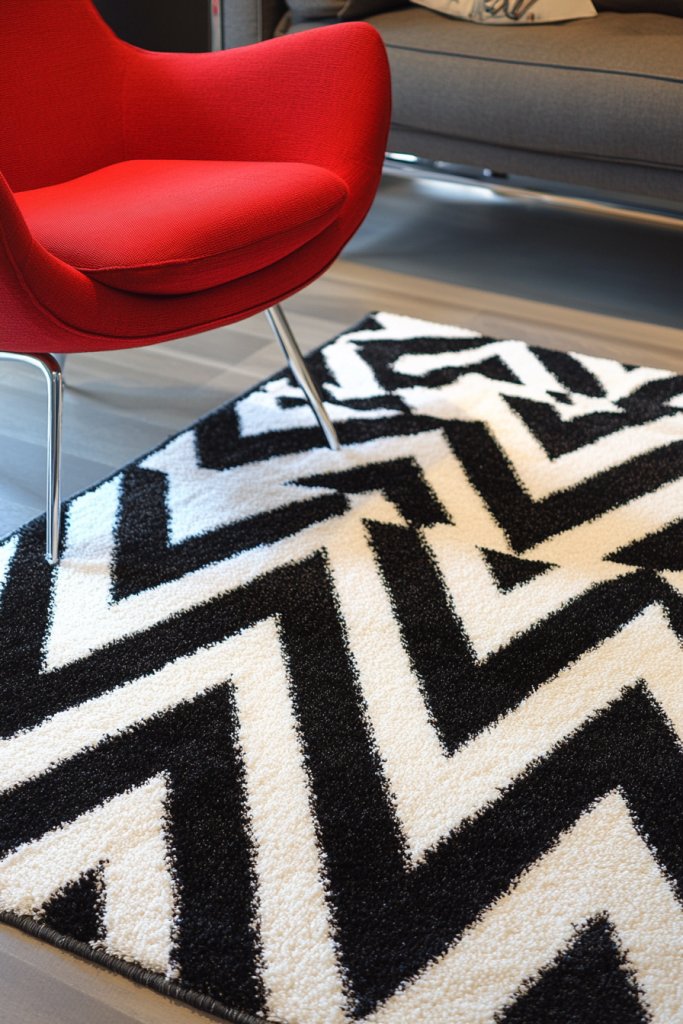
Blank floors can feel uninspired and dull. A geometric patterned area rug injects energy and style into any room. It’s a quick way to anchor your furniture and add visual interest. Who knew a simple rug could change the entire vibe?
Visualize a bold rug with sharp lines, triangles, or chevrons in contrasting colors—black and white, jewel tones, or muted pastels. The pattern creates a dynamic focal point, drawing the eye and balancing the space. Soft textures underfoot make it inviting, while the pattern keeps things lively. It complements modern, boho, or eclectic decor styles.
Choose a rug size that fits your space—large for under the sofa or a smaller accent for entryways. Mix patterns with solid colors or other textures like woven baskets or plush cushions. Seasonal color swaps can refresh your decor—think warm tones in fall or cool hues in summer.
Measure your space accurately before purchasing. Look for rugs with non-slip backing or add a rug pad underneath for safety. Vacuum regularly and spot clean as needed to maintain vibrancy. Layer with other textiles, like throws or pillows, to create a cozy, layered look. For easy updates, choose machine-washable options.
Add decorative fringes or trim to customize the edges. Use the rug as a base to build your decor around, matching cushions or curtains. Incorporate metallic or textured accents to elevate the design. Personal touches help make the space uniquely yours.
A geometric area rug can completely transform a room’s personality. It’s an easy DIY upgrade that adds both style and comfort. Once you see how it pulls everything together, you’ll be motivated to experiment with different patterns and textures.
12. DIY Macramé Wall Hanging in Neutral or Vibrant Colors
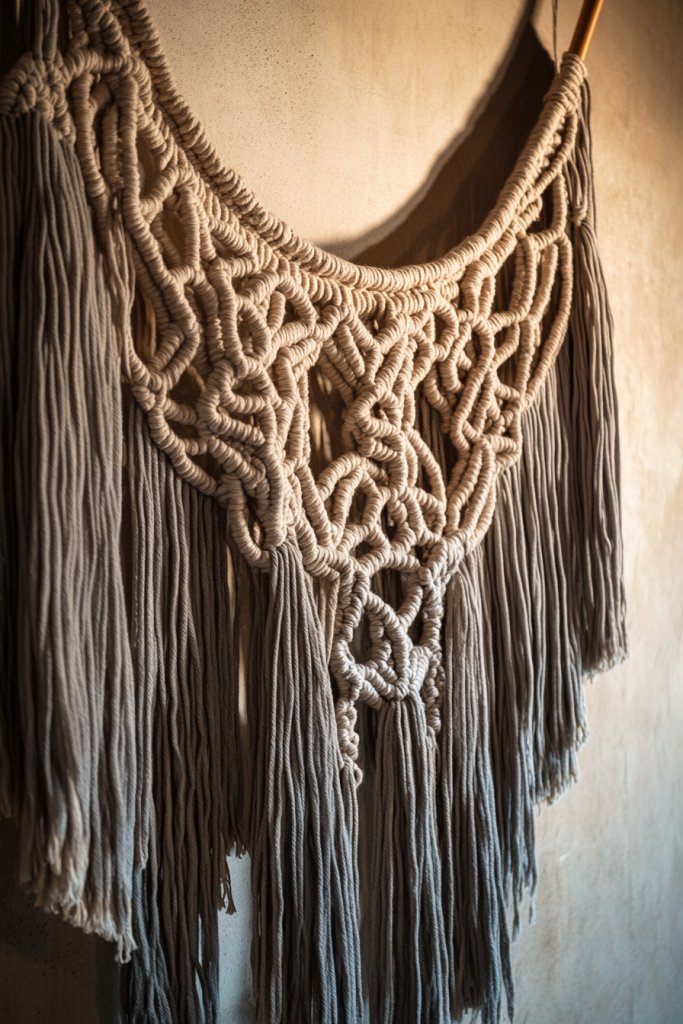
Looking to add texture and boho flair to your walls? A DIY macramé wall hanging is an easy, stylish way to do it. It’s a creative project that results in a piece of art, not just decoration. Plus, it’s a fun craft that anyone can try, even if you’re a beginner.
Picture a large, intricate knot pattern hanging from a wooden dowel, draped over a plain wall. The soft, knotted cords create a layered, textured effect that adds depth. Neutral tones like beige or gray blend seamlessly into modern interiors, while vibrant colors inject energy. It transforms a blank wall into a cozy, artistic space.
Experiment with different knot patterns, cord thicknesses, and lengths. Use natural fibers for a rustic look or synthetic cords for brighter colors. Incorporate beads or metallic accents for personalization. Hang multiple pieces in a gallery wall for a dramatic effect or keep it simple for subtle elegance.
Cut cords to your desired lengths, then follow tutorials for various macramé knots. Attach cords to a sturdy dowel or branch, spacing evenly. Use hooks or nails to hang the piece at eye level. Maintain even tension during knotting to ensure a neat appearance. It’s a relaxing project with a high-end look.
Add small decorative elements like shells or charms. Customize with different colored cords or metallic threads. Incorporate themes—like boho, coastal, or minimalist—to match your decor. Personal touches make your wall hanging a reflection of your style.
Macramé wall hangings combine craftiness with chic decor. Once you master basic knots, you can create endless designs. It’s an affordable, creative way to add personality to your home. Ready to knot your way to a stylish wall?
13. Chic Metal or Wooden Trays for Serving or Decor
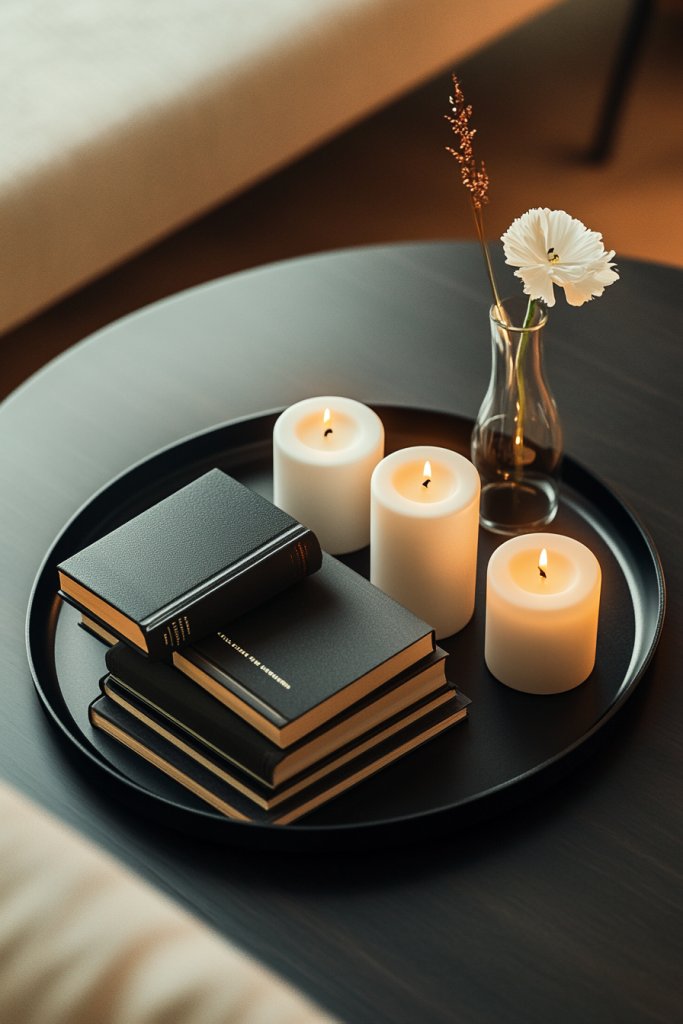
Tired of cluttered countertops or tables? A stylish tray organizes your essentials while adding a decorative touch. Whether serving breakfast in bed or displaying candles, trays are versatile and chic. They turn everyday items into eye-catching decor—who knew?
Imagine a sleek black metal tray with raised edges, holding a collection of neatly arranged candles, books, or flowers. Alternatively, a rustic wooden tray with carved handles brings warmth and texture to a coffee table. The tray’s material and design set the tone—industrial, farmhouse, or modern minimalism. It’s both functional and eye-catching.
Mix materials—metal, wood, or acrylic—for different aesthetics. Use trays to corral remotes, keys, or jewelry on a dresser or entryway table. For seasonal decor, swap out contents—think pinecones for winter or fresh fruit for summer. Vary sizes and shapes to suit different spaces and needs.
Choose a sturdy tray with features that match your style. Arrange your items aesthetically—grouping similar colors or objects. Clean regularly to prevent dust buildup, especially if used for food or drink. Use non-slip pads underneath for stability. For DIY projects, customize with paint or decals for a personal touch.
Add decorative handles or embellishments to make it stand out. Personalize with engraved initials or painted patterns. Use it as a base for layered decor—candles, flowers, or small sculptures. This elevates the tray from simple to statement piece.
A well-chosen tray simplifies organization and enhances decor. It’s an easy project with high impact, perfect for beginners. Once you see how it pulls your space together, you’ll want to create a collection for every room.
14. Hand-Decorated Candle Holders with Pillar or Taper Candles
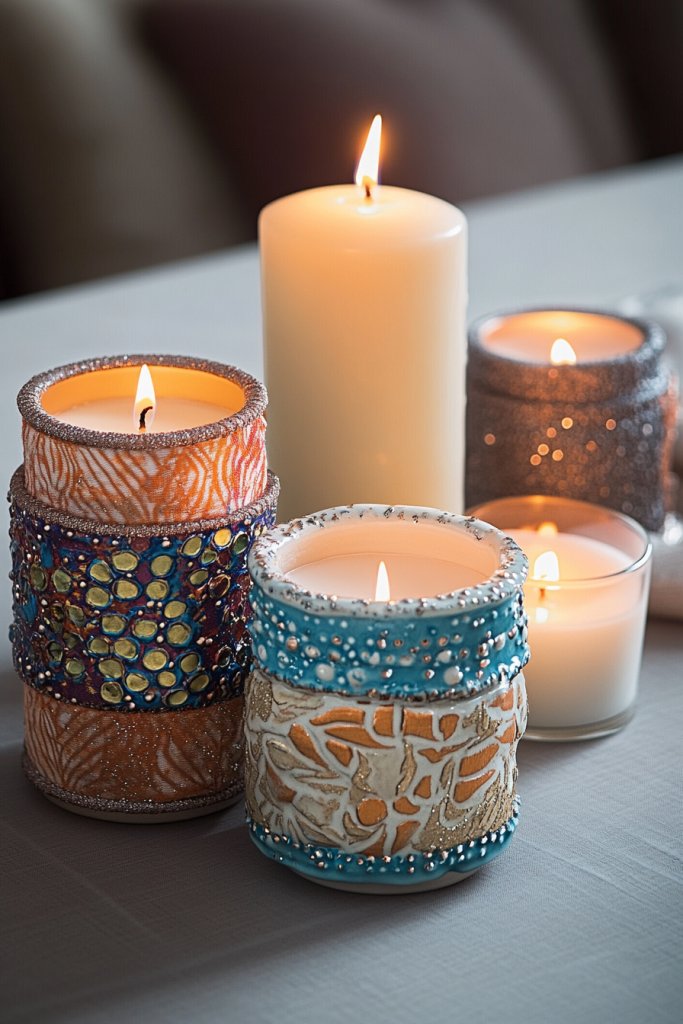
Want to add a cozy, personal glow to your space without buying overpriced decor? Hand-decorated candle holders combine simplicity with personality. They’re perfect for intimate dinners or relaxing evenings. Plus, crafting your own adds a fun, creative twist to home ambiance.
Picture plain ceramic or glass candle holders transformed with paint, fabric, or embellishments—think metallic accents, hand-painted patterns, or fabric wraps. Pillar or taper candles sit comfortably, casting flickering light that dances across textured surfaces. Arranged on a dining table or mantel, they create a warm, inviting atmosphere. The customization makes each piece uniquely yours.
Decorate with themes—rustic, boho, luxe—or match your color palette. Use metallic paints for a modern look or pastel shades for softness. Add small charms or beads for extra detail. Combine different heights and styles for an eclectic display or keep it uniform for elegance.
Start with plain candle holders made of glass, ceramic, or metal. Decorate with paint, washi tape, fabric, or adhesive embellishments. Seal with a clear varnish for durability. Insert your candles carefully, ensuring stability. For a DIY touch, you can also mold or carve your own holders from wax or clay, then decorate once hardened. Always burn candles safely, away from flammable materials.
Add monograms, initials, or meaningful symbols with paint or decals. Use metallic or glitter accents for a festive touch. You can also create themed sets—like beach, winter, or garden—to suit different occasions. These personal touches turn simple holders into treasured decor or gifts.
Decorated candle holders are a quick way to elevate your ambiance and showcase your style. They’re easy to customize and maintain, making them perfect for spontaneous DIY projects. Once you see the warm glow, you’ll be inspired to craft more personalized lighting accents.
15. Custom Fabric Banners or Garlands with Inspirational Quotes
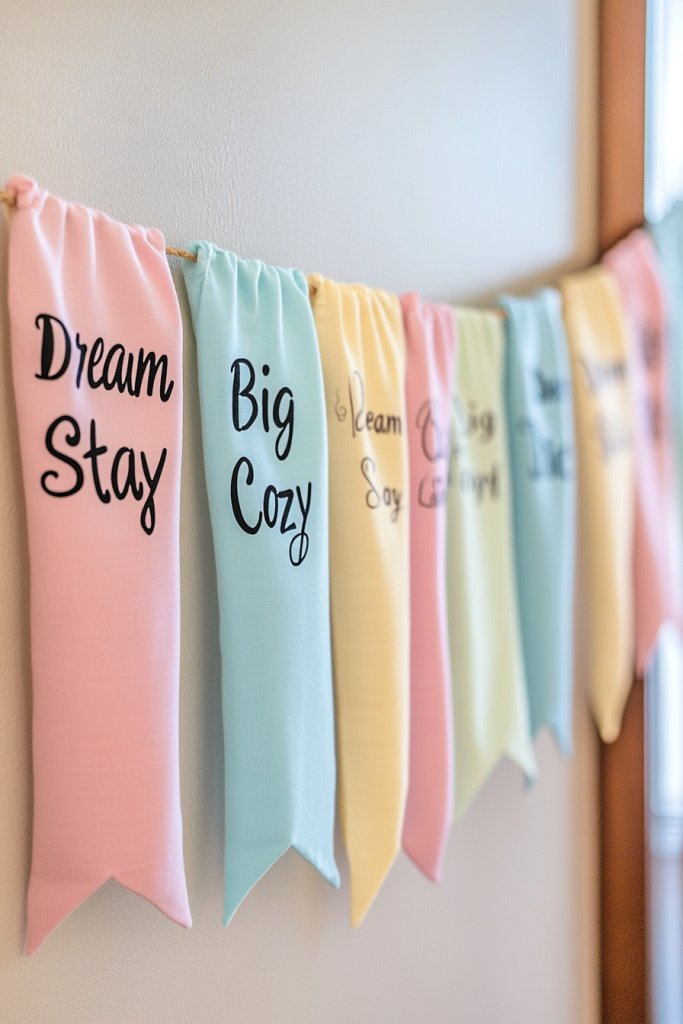
Looking for a simple way to add a splash of personality to your space? Custom fabric banners or garlands with inspiring quotes or words can brighten up any wall or nook. They’re inexpensive, easy to make, and instantly lift the atmosphere. Who says decor can’t motivate?
Visualize colorful fabric strips or pennants strung along a wall or above a doorway. Printed or handwritten quotes like ‘Dream Big’ or ‘Stay Cozy’ add a personal touch. The soft fabrics and playful arrangement create a cheerful, welcoming vibe. Drape the garland over a mantel, bed, or window for an effortless upgrade.
Mix fabrics—cotton, burlap, or silk—for texture and contrast. Use bold fonts or handwritten styles, depending on your decor theme. Change quotes seasonally or for special occasions. Incorporate decorative elements like tassels, pom-poms, or small charms to enhance visual interest.
Cut fabric into shapes—banners, pennants, or rectangles—and paint or print your quotes. Sew or glue onto a sturdy string or ribbon. Hang with clips or knots at intervals. Adjust spacing for balance and visual appeal. Keep it lightweight for easy hanging and removal. This project requires minimal sewing skills and basic crafting supplies.
Personalize with initials or family names. Use favorite colors or patterns to match your decor. Add embellishments like buttons or embroidery for a handcrafted feel. These banners become meaningful decor pieces or thoughtful gifts for loved ones.
A fabric banner with an inspiring message can motivate you daily and add a personal touch to your home. It’s an affordable DIY that sparks creativity and positivity. Once you see the impact, you’ll be eager to create more uplifting decor.
16. Stylish Magnetic Spice Jars with Clear Lids for Kitchen

Cooking can be chaotic when spices are buried in cabinets or cluttered in drawers. Magnetic spice jars offer a sleek, space-saving solution that makes everything accessible. Plus, they add a modern, organized look to your kitchen. Who knew storage could be so stylish?
Imagine a magnetic strip mounted on your backsplash or inside a cabinet door, holding uniform glass jars with clear lids. The transparent containers let you see contents instantly, saving time and frustration. Grouped by type or color, they create a colorful, orderly display that’s both functional and attractive. It’s a small change that makes a big difference.
Choose jars in different sizes or shapes for variety. Use color-coded labels or chalkboard surfaces for easy identification. Install multiple strips for spices, herbs, or oils, creating a customized organization system. Seasonal or themed labels can add fun and personality.
Measure your space to determine how many jars fit comfortably. Purchase magnetic strips or create custom ones with adhesive magnets. Fill jars with your favorite spices, sealing tightly. Mount the strip at a convenient height, then arrange the jars in a way that’s easy to access. Regularly check for spills or dust buildup and clean as needed.
Decorate jars with painted initials or colorful labels. Swap out contents seasonally or for special recipes. Use decorative tags or ribbons for a personalized touch. This system makes your spice rack both functional and a charming focal point.
A magnetic spice storage setup streamlines your cooking process and looks stunning. It’s an easy upgrade that makes your kitchen more inviting. Once you see how much easier cooking becomes, you’ll want to organize everything with style.
17. DIY Wooden Coaster Sets with Engraved Quotes or Designs
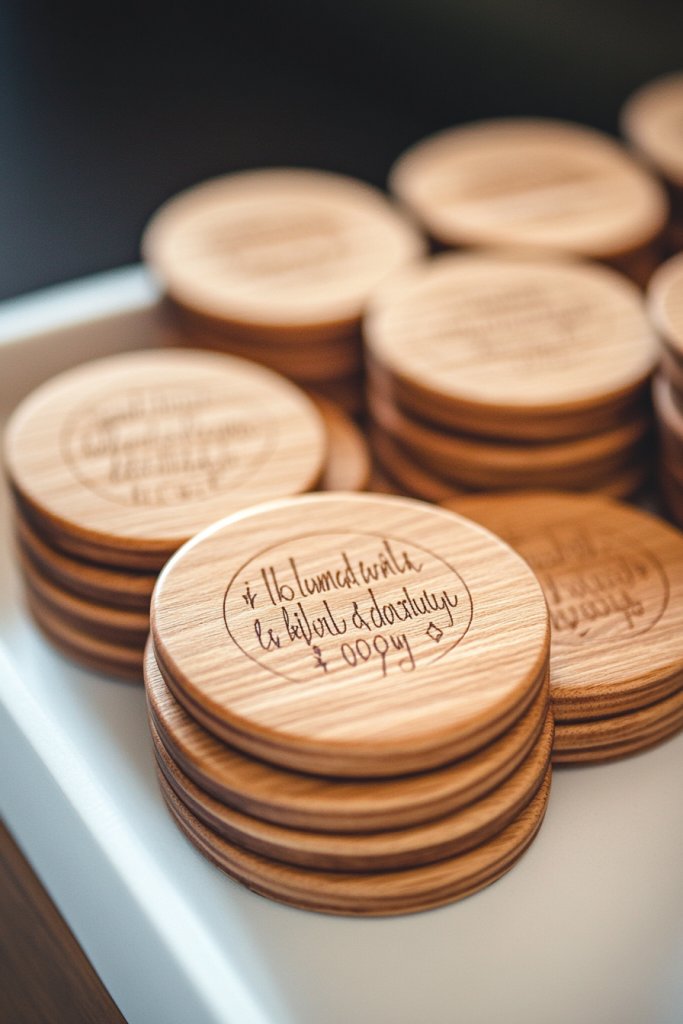
Looking for a practical yet personal gift or decor piece? Handmade wooden coasters with engraved quotes or patterns combine durability with sentimentality. They’re perfect for protecting surfaces and adding a touch of elegance. Who knew a simple coaster could be so meaningful?
Picture a set of smooth, round wooden coasters engraved with inspiring words or intricate designs. The natural grain of the wood adds warmth and texture, while the engravings create a sophisticated look. Arranged neatly on a tray or stacked in a holder, they elevate your table setting and showcase your craftsmanship.
Choose different wood types—oak, walnut, or maple—for varied color tones. Experiment with shapes—square, round, or custom-cut designs. Personalize with quotes, initials, or decorative patterns. Pair with matching placemats or trivets for a coordinated look. Seasonal or themed engravings keep the set fresh.
Cut wood into uniform pieces using a saw. Sand edges smooth and prepare the surface for engraving. Use a laser engraver or wood-burning tool to etch your designs. Seal with a food-safe finish or oil for durability. Package in a nice box for gifting or keep for your own table. Basic tools and patience are all you need.
Add custom quotes or initials that hold special meaning. Use contrasting wood stains or paint to highlight engravings. Incorporate decorative borders or motifs for extra flair. These personalized coasters make thoughtful gifts or unique additions to your home.
Wooden coasters with engraved quotes are both functional and stylish, showcasing your DIY skills. They’re a timeless gift idea that adds personality to any space. Once you craft your first set, you’ll be inspired to create more personalized home accessories.
Conclusion
Exploring these touch gift ideas reveals a world of thoughtful gestures that can comfort, relax, and delight. Whether you choose a soft throw blanket, a calming aromatherapy set, or a luxurious skincare item, these gifts have the power to create memorable moments. Don’t hesitate to try these ideas at home and share the joy of giving. Embrace the art of thoughtful gifting and make every gesture count!
Leave a Reply