Pressed pennies have captivated collectors and craft enthusiasts alike for generations, turning simple coins into charming keepsakes and colorful displays. Their nostalgic charm and the fun of creating them make pressed penny collection and display a beloved hobby for many.
In this article, you’ll uncover creative and unique ways to showcase your pressed pennies, from personalized frames to themed displays. Whether you’re a seasoned collector or just starting out, these ideas will inspire you to turn your collection into stunning visual stories that add personality and whimsy to your home décor.
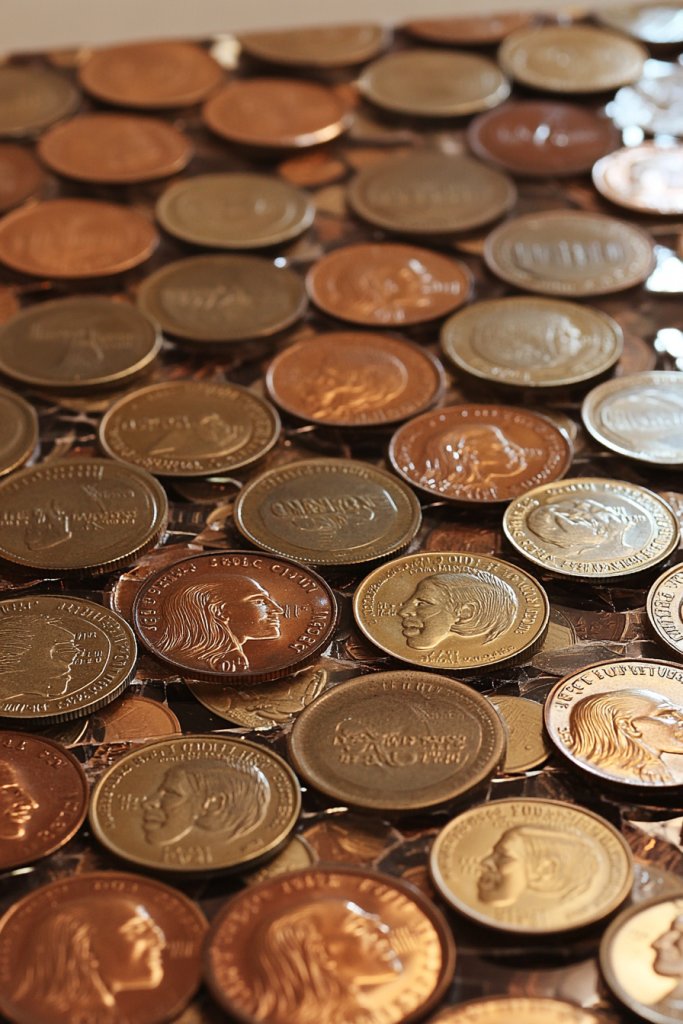
1. Framed Coin Collage Wall Art for Vintage Charm
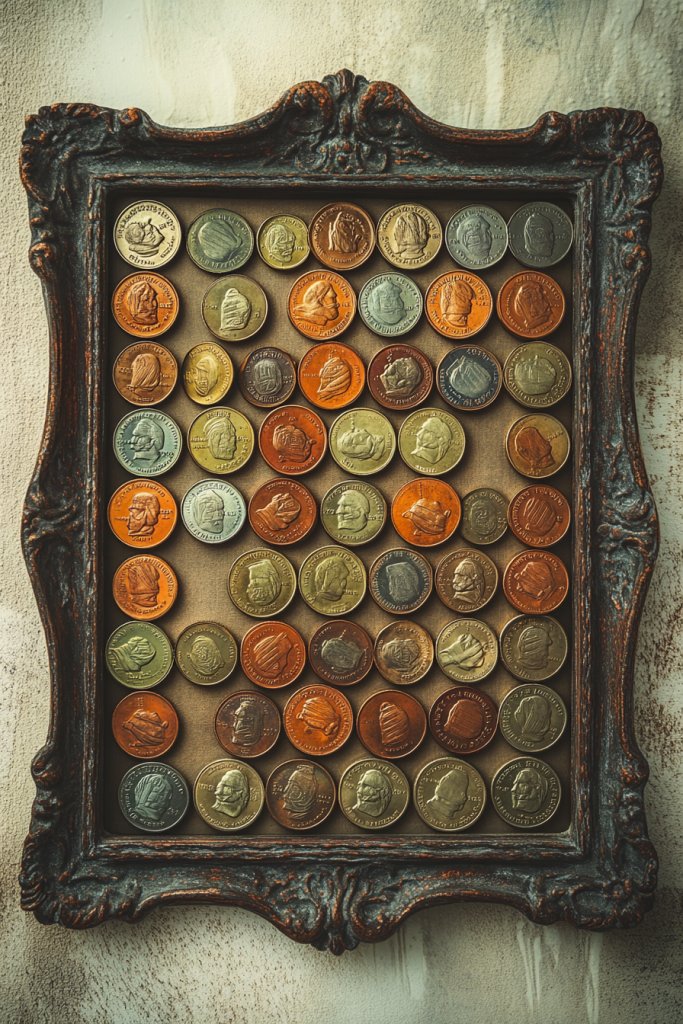
Ever wanted to turn your collection of pressed pennies into a statement piece? Maybe your display just sits in a shoebox, gathering dust, and you wish it had more flair. Or perhaps you’re craving that vintage vibe that makes your space feel nostalgic yet stylish. The idea is to showcase your coins in a way that captures attention and adds character.
Imagine a wall adorned with a colorful mosaic of pressed pennies neatly arranged in matching antique frames. The coins glisten subtly under soft lighting, each one telling a story of travel or memories. The eclectic mix of sizes and designs creates a lively, textured backdrop that invites close inspection. It’s like having a mini museum right in your living room.
You can opt for uniform frames for a clean, modern look or go for mismatched vintage frames for a boho charm. Changing the color palette or arranging coins in a specific shape, like a heart or star, can add a personalized touch. Seasonal themes, like holiday colors or special event motifs, also work beautifully. Adjust the layout to fit your wall space and personal style.
Start by selecting a sturdy backing board and frames that match your decor. Carefully arrange the coins in a pleasing pattern before securing them with a clear adhesive or mounting putty. Use tweezers for precision placement and ensure each coin is level. Hang your completed collage on the wall using appropriate hardware for weight. Consider adding a protective glass or acrylic cover to preserve the display.
Add labels or small plaques with the story behind each coin for an educational twist. Incorporate decorative elements like vintage keys or small trinkets alongside the coins for added texture. Personalize the arrangement with a mix of rare and favorite pressed pennies. You could also replace coins seasonally or to mark special trips.
Transforming your pressed pennies into wall art elevates your collection from simple souvenirs to cherished decor. It creates a conversation starter and adds a nostalgic charm to your space. Plus, this project is adaptable and easy to update—perfect for any DIY enthusiast. Ready to turn those coins into a vintage masterpiece?
2. Mason Jar Display with Pressed Pennies and Fairy Lights
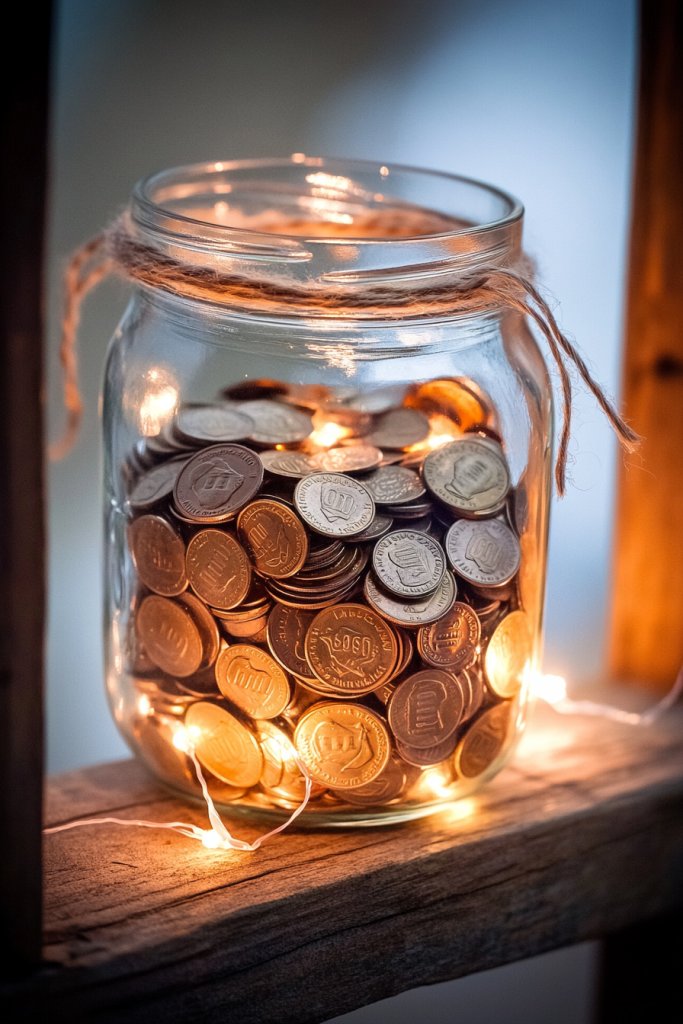
Looking for a charming way to showcase your pressed pennies without cluttering your shelves? Maybe you want a display that’s both cute and practical, adding a soft glow to your room. Mason jars offer a simple yet stylish solution that transforms your collection into a cozy, eye-catching feature. Sound appealing?
Picture clear glass mason jars filled with a variety of pressed pennies, their metallic surfaces catching the light. Twinkling fairy lights are woven around the coins or tucked inside the jar, casting a warm, inviting glow. When lit, the coins seem to shimmer, creating a magical effect. Place the jars on a shelf or mantel, and watch your space come alive.
Use different jar sizes for visual interest or cluster multiple jars together for a gallery effect. Change the color of fairy lights for different moods—warm white for cozy nights or colorful LEDs for festive vibes. For a rustic look, tie burlap or twine around the jars’ necks, or add decorative labels. You can also switch out the coins seasonally or based on themes.
Gather a variety of clean mason jars and fill them with your pressed pennies, arranging them by color or size for aesthetic appeal. Wrap battery-operated fairy lights around the coins or inside the jars, securing the battery pack discreetly at the back or bottom. Place the jars in a location with outlet access if using plug-in lights, or opt for battery-powered options. Power on and adjust the lights for the perfect glow.
Decorate the jars’ lids with fabric, paint, or labels that reflect your personality or theme. Add small charms or decorative tags to the jars for a personalized touch. Create themed sets—like travel destinations or holiday symbols—for a cohesive display. Change the coins inside periodically to keep the display fresh.
This idea turns a simple collection into a luminous art piece that adds warmth and character. It’s easy to do, inexpensive, and endlessly customizable. Plus, the glow from the fairy lights creates a cozy ambiance perfect for relaxing evenings. Ready to light up your collection?
3. Magnetic Pressed Penny Board for Easy Swap-Ins
Are you tired of your pressed pennies sitting in a box, never seen or appreciated? Want a simple way to display and update your collection without hassle? A magnetic board offers an easy, stylish solution to showcase your coins while allowing quick swaps. It’s perfect for those who love changing things up frequently.
Imagine a sleek metal or painted board mounted on your wall, dotted with tiny magnets holding pressed pennies in place. You can arrange the coins in a pattern, alphabetically, or by theme—whatever suits your mood. It becomes a dynamic display that you can effortlessly update, creating a lively, interactive focal point. Coins can be rearranged in seconds, making it fun and engaging.
Choose a magnetic board with a bold color or a metallic finish to match your decor. Incorporate small decorative elements like hooks or clips for additional display options. For a more minimalist look, stick to a monochrome palette; for a playful vibe, add colorful magnets. Use different-sized magnets to create layered or textured arrangements. You can also add labels or captions for storytelling.
Select a magnetic board that fits your space and style. Attach small, strong magnets to the back of each pressed penny, or use magnetic strips or discs. Arrange the coins in desired patterns on the board, then hang it securely on the wall. For easy updates, keep extra coins nearby to swap in during your decorating sessions. Ensure the magnets are strong enough to hold the coins firmly.
Personalize by adding themed sections, like travel destinations or years. Mix in small decorative items like miniature souvenirs or travel tickets attached with magnets. Use different magnet colors to categorize or highlight special coins. Change the arrangement seasonally or whenever you find a new pressed penny to keep the display fresh and exciting.
This setup turns your pressed pennies into a playful, constantly evolving piece of wall art. It’s super easy to maintain and update, making it ideal for busy collectors. Plus, it sparks joy every time you rearrange or add new coins. Ready to make your collection interactive?
4. Customized Shadow Box Displays with Memorabilia
Have a collection of pressed pennies and small souvenirs but no idea how to display them meaningfully? Want a personalized way to preserve memories and create a keepsake? Shadow boxes offer a perfect solution, allowing you to combine coins with tickets, photos, or mementos. It’s about turning your collection into a story.
Envision a deep shadow box filled with your pressed pennies arranged alongside travel tickets, small postcards, or vintage memorabilia. The layered display creates depth and invites viewers to explore each element. Soft lighting or fabric backing enhances the visual appeal, highlighting the personal history behind each item. The result is a captivating, multi-dimensional showcase.
Customize your shadow box with themed backgrounds—vintage maps, fabric patterns, or solid colors—that complement your collection. You can create sections for different trips or themes, or mix everything for an eclectic look. For a more modern aesthetic, opt for clean lines and minimal embellishments. Seasonal or holiday themes can also add variety.
Choose a shadow box that fits your collection size and style. Secure your pressed pennies inside using small mounts or adhesive dots, then arrange accompanying memorabilia artistically around them. Use background paper or fabric to add color and texture. Incorporate small hooks or pins if you want to swap items regularly. Mount the shadow box securely on your wall for display.
Add engraved tags or handwritten notes to tell the story of each coin or item. Incorporate small, meaningful souvenirs like shells, charms, or miniatures. Rotate items seasonally or for special occasions to keep the display fresh. Consider adding a glass front for protection and a polished look.
This personalized display transforms your collection into an artful narrative, making it more meaningful. It’s a beautiful way to commemorate trips or milestones while keeping everything safe. Plus, it encourages ongoing collection and storytelling. Ready to craft your own keepsake?
5. Repurposed Picture Frame with a Grid of Pressed Coins
Tired of hiding your pressed pennies in a drawer? Want a simple, stylish way to display a large number of coins without clutter? A repurposed picture frame with multiple panes turns a basic frame into a colorful mosaic of memories. It’s a quick DIY project that adds personality to any space.
Imagine a large frame subdivided into a grid of small glass or acrylic panes, each holding a pressed penny. The coins form a vibrant pattern of colors and designs, filling the frame with visual interest. The uniformity of the grid creates a modern, organized look, perfect for a feature wall. Light passing through the panes highlights the shiny surfaces and intricate details.
Use a frame with black or white borders for a sleek, minimalist vibe, or go for distressed wood for rustic charm. Change the grid size based on your collection—larger panes for bigger coins or smaller for more detail. Incorporate themed arrangements, like travel destinations or years, for a personalized touch. You can also add labels or small tags on the frame edges.
Select a large multi-pane frame, removing any unnecessary backing or glass. Attach each pressed penny inside a pane using a small amount of glue or double-sided tape, ensuring they stay flat and centered. Seal the coins with a clear adhesive or insert protective sheets if available. Hang the frame securely on the wall, and arrange the coins in a pleasing pattern.
Create themed collections—like a rainbow of coins or a chronological timeline. Incorporate small decorative elements like miniature flags or symbols to mark different trips. Rotate coins periodically to showcase new additions. Add a custom title or label underneath for context.
This mosaic frame elevates your collection into a piece of wall art that’s both functional and fun. It’s easy to update as your collection grows, making it a versatile project. Your friends will love seeing your coins displayed so artistically. Ready to craft your own mosaic?
6. DIY Coin Coasters with Decorative Borders
Want to protect your furniture while showcasing your pressed pennies? Looking for a functional piece that’s also decorative? DIY coin coasters are a fun project that turns your collection into conversation starters. Plus, they’re practical and almost too cute to hide away.
Picture colorful pressed coins embedded in a smooth resin or mounted on a sturdy base, surrounded by decorative borders like metallic trim, painted designs, or textured edges. The coasters have a glossy finish that highlights the coins’ details. When placed on a table, they instantly add personality and a touch of nostalgia.
Use different border styles—metallic, painted, or textured—to match your decor. Incorporate themed coins, such as travel or year-specific pieces, for added interest. You can also add personal touches like initials or symbols with paint or decals. For seasonal flair, customize borders with holiday colors or motifs.
Arrange your pressed pennies on a flat surface, then seal them into a mold or onto a wooden or cork base using strong adhesive or resin. Decorate the border with metallic strips, beads, or painted patterns. Pour a layer of resin over the coins for a glossy, durable finish, or leave them exposed if preferred. Allow curing time as recommended. Seal the edges for a clean look.
Personalize by adding monograms, small charms, or decorative stickers around the coins. Use different background colors or patterns on each coaster to suit different rooms or themes. Swap out coins periodically to refresh the look. Keep a set for special occasions or gifts.
These coasters combine functionality with a personal touch, making your pressed pennies both useful and display-worthy. They’re easy to customize and make great handmade gifts. Plus, they protect your surfaces while showcasing your collection creatively. Ready to craft your own set?
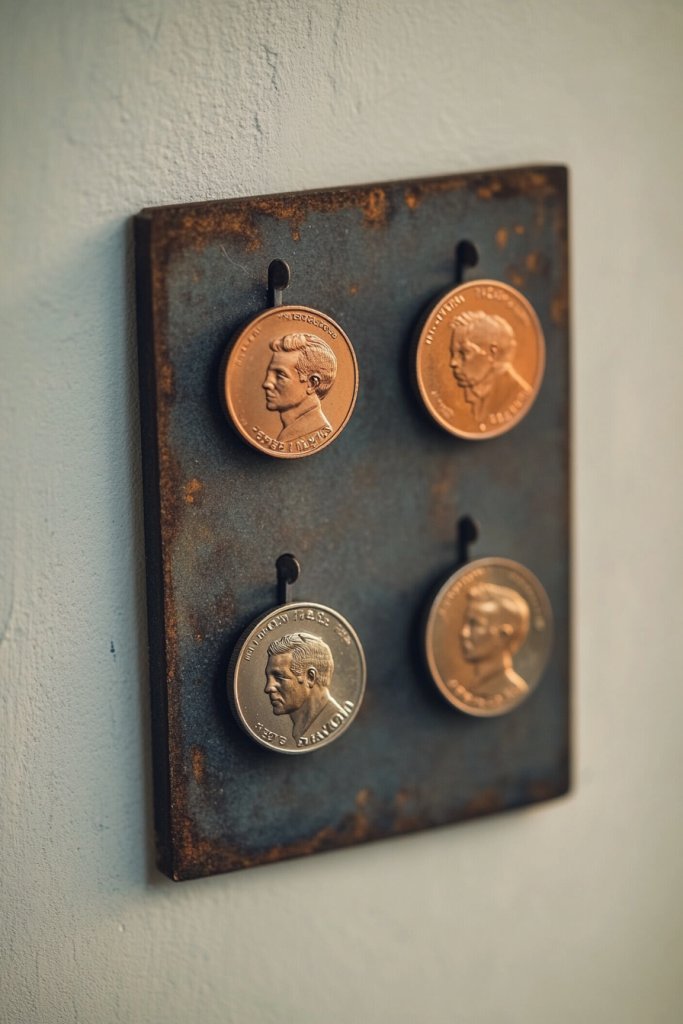
7. Pressed Penny Key Holder with Small Hooks
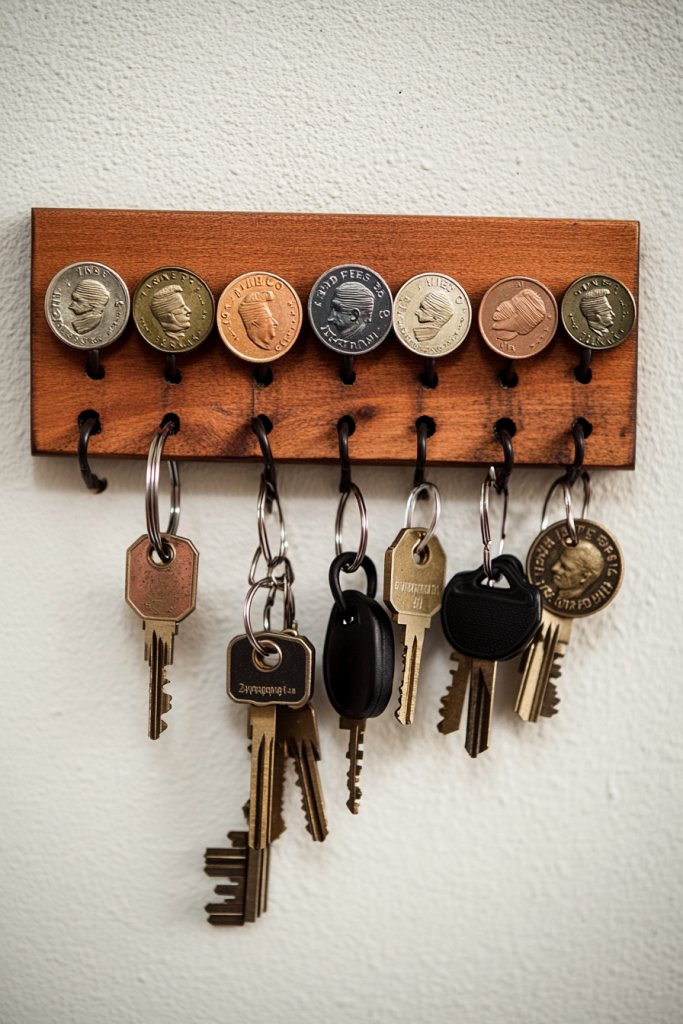
Ever lose your keys in a chaotic drawer or mess? Want a practical and personalized solution? A pressed penny key holder with hooks offers an easy way to keep your keys, small accessories, or even jewelry organized. Plus, it adds a charming touch to your entryway or hallway.
Visualize a wooden or metal board mounted on the wall, with pressed pennies glued in a decorative pattern or grid. Small hooks are attached below the coins, ready to hold keys or charms. The shiny coins add a playful, nostalgic element, making the everyday task of finding keys more delightful. It’s both functional and fun.
Customize the board with painted backgrounds, stenciled designs, or themed arrangements—like travel motifs or initials. Use vintage, modern, or rustic frames depending on your decor style. For a larger family, add multiple rows or sections. Incorporate small decorative elements like miniature signs or labels.
Choose a sturdy backing, such as a reclaimed wood plank or metal sheet. Attach pressed pennies with strong adhesive or epoxy, arranging them artistically. Install small hooks directly below each coin or in a grid pattern. Secure the board to the wall with appropriate hardware, ensuring stability for daily use. Keep extra hooks and coins nearby for updates.
Add engraved tags with names or special dates. Incorporate themed coins matching your hobbies or travels. Change the arrangement seasonally or for holidays. Personalize with small charms or mini souvenirs attached with hooks or glue.
This simple project keeps your keys organized while turning your collection into a daily decor piece. It’s a quick, customizable craft that adds personality to your space. Plus, it’s a perfect gift idea for loved ones who collect souvenirs. Ready to hang your own?
8. Vintage Suitcase Display with Coin Collection Layers
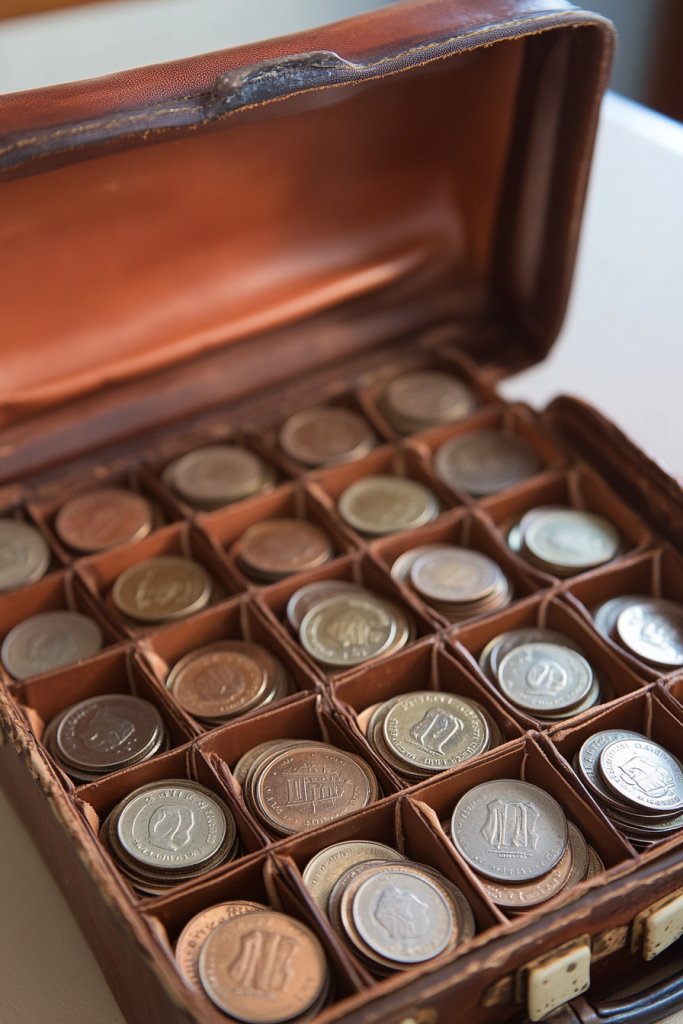
Looking for a portable yet stylish way to showcase your pressed pennies? Want a display that’s both decorative and functional, perhaps for a travel-themed room? Vintage suitcases offer a charming solution, turning a simple case into a layered, nostalgic display. It’s perfect for collectors who love a touch of old-world charm.
Picture an open vintage suitcase, lined with fabric or paper, filled with rows of pressed pennies arranged in patterns or by trip. The case’s rustic leather and metal accents add character, while coins shimmer inside. When displayed on a stand or table, it creates a mini exhibit with a sense of adventure and history. The layered arrangement makes it inviting to explore.
Decorate the suitcase’s interior with themed fabrics, maps, or vintage paper to enhance the travel vibe. Arrange the coins in grids, circles, or scattered patterns. Use small compartments or trays inside for different categories. For seasonal or holiday displays, add themed trinkets or miniature souvenirs.
Clean and line your vintage suitcase with fabric or paper for a polished look. Secure pressed pennies inside using adhesive, or arrange them on foam or cork boards placed inside. Organize by color, destination, or date for visual appeal. Keep the suitcase in a prominent spot, or rotate it for different rooms. Consider adding a lock or latch for authenticity.
Label different sections or add handwritten tags with trip details. Incorporate small travel-related charms or miniatures alongside coins. Refresh the display with new coins or themed arrangements. Use decorative ribbons or tags to mark special collections.
This setup combines practical storage with a unique display, making your collection portable and attractive. It sparks conversations and inspires others to start their own collection. Plus, it’s a nostalgic nod to travel adventures and memories. Ready to pack your own?
9. Miniature Pressed Penny Book or Album
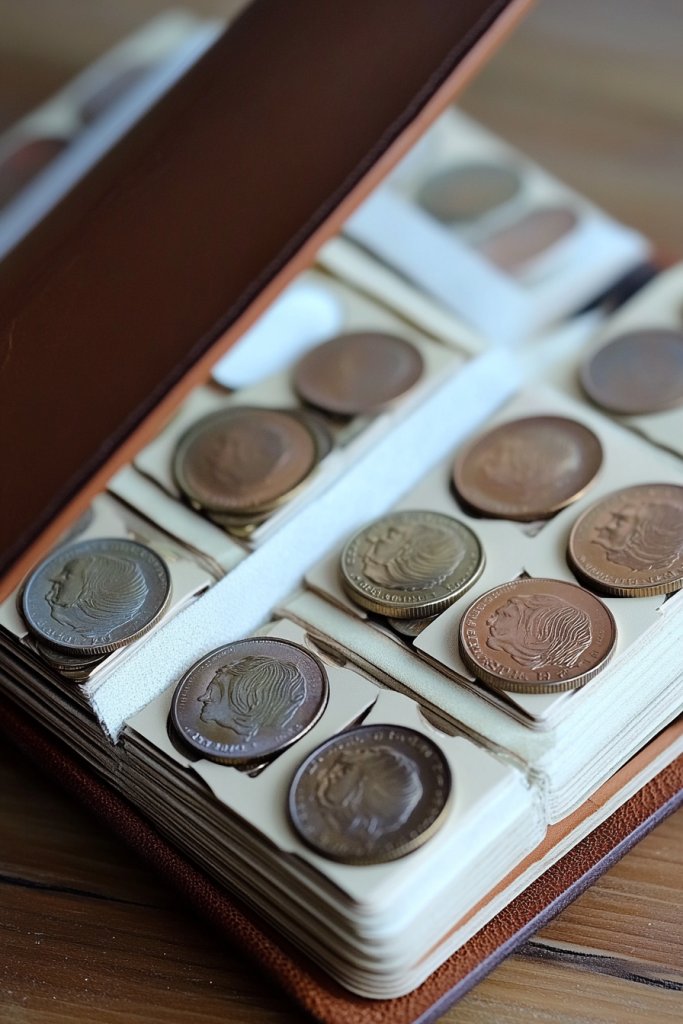
Tired of your pressed pennies cluttering drawers or shoeboxes? Want a sleek way to organize and enjoy your collection? A miniature book or album provides a fun, portable solution, turning your coins into a storybook of travels and memories. It’s perfect for collectors on the go.
Envision a small, beautifully crafted scrapbook or photo album with dedicated pages for each pressed penny. The coins are mounted in clear pockets or glued onto pages with captions or stories. The album’s cover reflects your travel theme, and flipping through it feels like revisiting your adventures. It’s a charming, personal keepsake.
Choose themed covers—vintage, modern, travel-inspired—and decorate with stickers or labels. Organize coins chronologically, by destination, or by year. Add extra pages for photos, tickets, or notes. For a minimalist approach, use clean pockets and simple captions. Seasonal or holiday-themed albums can also add variety.
Select a sturdy, acid-free album or create your own with a binder and clear plastic sleeves. Secure each pressed penny with a small dot of adhesive or insert into the sleeves. Write captions or stories alongside each coin for context. Decorate the pages with stickers, washi tape, or drawings. Keep the album in a safe place or carry it easily for display.
Add handwritten notes, travel details, or humorous anecdotes. Incorporate small mementos like ticket stubs or mini postcards. Personalize the cover with your name or a custom title. Update it periodically as your collection grows or as new trips occur.
This mini album makes your collection easily accessible and enjoyable, turning it into a story worth sharing. It encourages ongoing collecting and storytelling, fostering a deeper connection to your travels. Ready to create your own travel journal?
10. Shadow Box with Layered 3D Penny Arrangements
Want to add depth and dimension to your pressed penny display? Looking to create a striking piece of wall art that captures attention? A layered shadow box offers a 3D effect, turning your collection into an eye-catching focal point. It’s a perfect way to showcase your coins with style.
Imagine a deep shadow box with coins arranged at various depths, creating a sense of movement or shape. Some coins form patterns, while others stand out with 3D embellishments. Backlighting or subtle spotlights enhance the layered effect, making each coin pop. The display feels dynamic and alive, inviting viewers to explore every detail.
Create abstract shapes, scenic scenes, or themed compositions like maps or landmarks. Use foam or mounting putty to position coins at different heights. Incorporate decorative elements like miniature flags or symbols for storytelling. For a modern look, use sleek glass or acrylic cases; for rustic charm, opt for wood frames.
Design your layout on paper before assembly. Secure coins with small mounts or adhesive foam dots at varying depths inside the shadow box. Consider adding LED strips or small lights for extra visual impact. Seal the box to keep dust out, and hang it securely on the wall. Adjust the lighting to highlight the layered effect.
Add small tags or engraved plaques describing each scene or pattern. Incorporate mini souvenirs or themed tokens to enrich the story. Change the arrangement for different seasons or themes. Use a protective coating or glass for longevity.
This 3D display turns your collection into a piece of art that’s both personal and captivating. It’s an impressive conversation starter and showcases your creativity. Perfect for adding depth to your decor and celebrating your travels.
11. Framed Heart or Star-Shaped Coin Art for Special Occasions
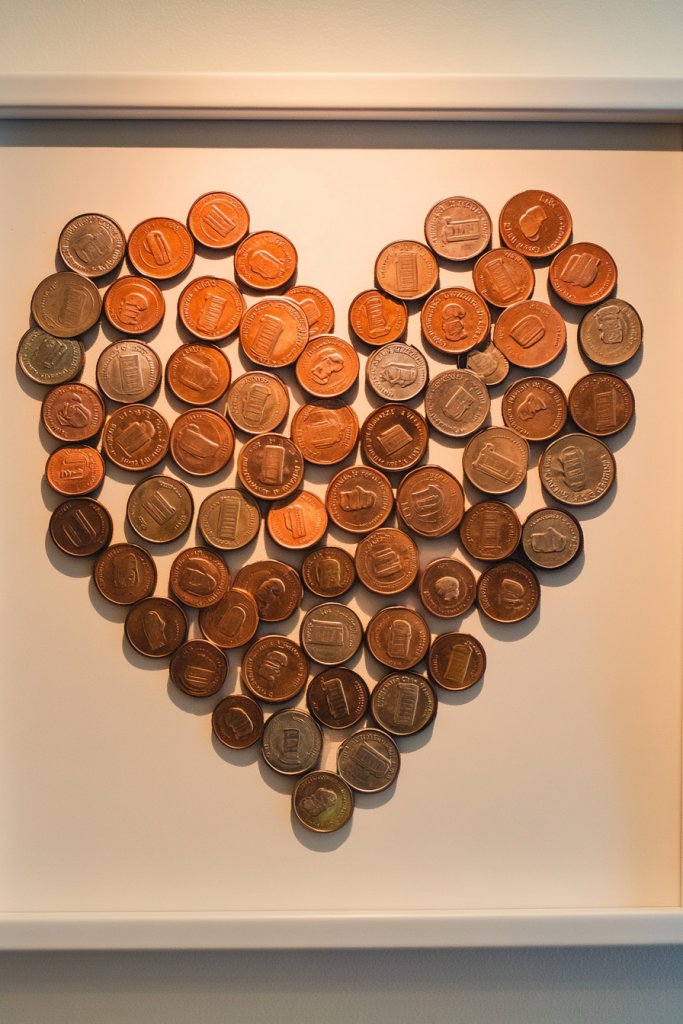
Looking for a sentimental way to display your pressed pennies for special occasions? Want a heartfelt gift or decoration that captures love or celebration? Arranging coins into heart or star shapes inside a frame creates a meaningful, eye-catching piece. It’s a simple yet powerful way to showcase your collection.
Visualize a framed piece with pressed pennies meticulously arranged into a heart or star. The coins’ shiny surfaces reflect light, emphasizing their shapes and details. The shape adds a personal touch, perfect for anniversaries, Valentine’s Day, or birthdays. A clean or ornate frame can enhance the theme, making it a memorable keepsake.
Use different sizes of coins to fill the shape, creating a textured or layered effect. For a rustic look, opt for distressed wood frames; for elegance, choose sleek metallic or black frames. Incorporate themed coins—holidays, travel, or personal milestones—for added significance. You can also create custom shapes like initials or symbols.
Arrange your coins on a flat surface, forming the desired shape. Secure them with a strong adhesive or small mounting putty. Place the coins carefully into a frame with a backing or glass cover, ensuring the shape remains intact. Hang the finished piece on a wall, making sure it’s level. Consider adding a small plaque or message.
Add handwritten notes or engraved messages inside the frame. Use themed coins to match the occasion or recipient. Change or add coins for different celebrations, or create a series for various milestones. Decorate the frame with ribbons or embellishments suited to the event.
Transforming pressed pennies into shapes makes them more than souvenirs—they become symbols of love and celebration. It’s a heartfelt gift idea or decor piece that’s both personal and artistic. This project lets you celebrate special moments with creativity.
12. Wall-Mounted Coin Ladder for a Vertical Display
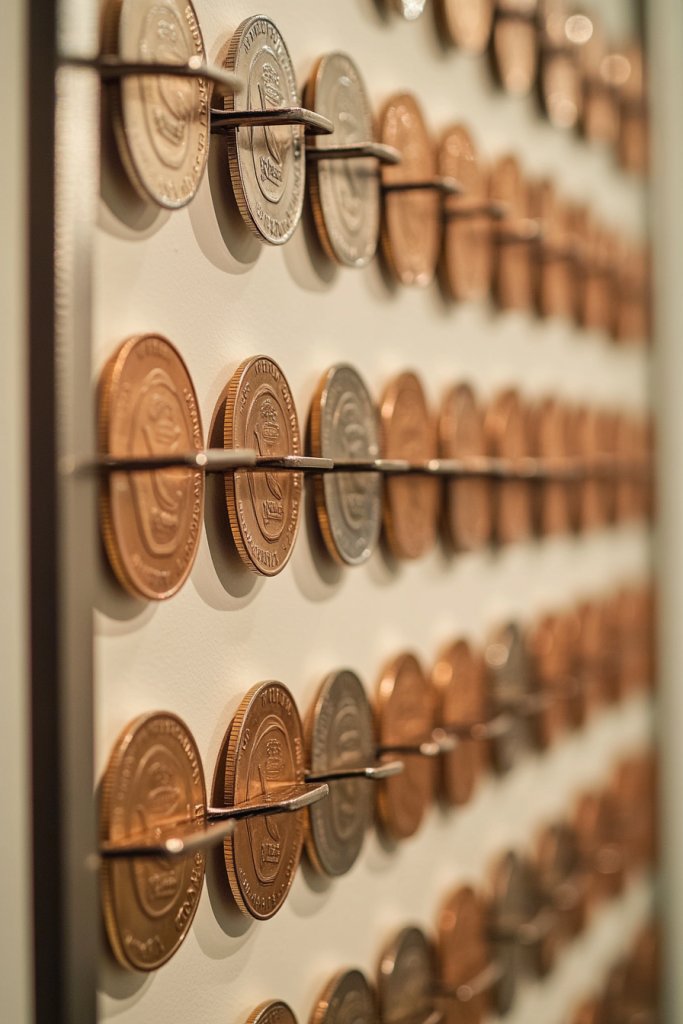
Want to display your pressed pennies in a way that’s both space-efficient and visually striking? Looking for a method that’s easy to update as your collection grows? A wall-mounted coin ladder or rail system lets you hang and swap coins quickly, turning your collection into a dynamic vertical feature. It’s perfect for small spaces.
Imagine a sleek metal or wooden rail fixed vertically on your wall, with small clips or hooks holding pressed coins. The coins hang in a neat line, ready to be displayed or swapped out. This setup creates a modern, minimalist aesthetic that emphasizes the collection’s variety. The vertical arrangement draws the eye upward and saves space.
Choose a metal rail with a matte or shiny finish, or a reclaimed wood piece for rustic charm. Use clips, hooks, or small chains to attach coins, allowing easy repositioning. Incorporate decorative elements like labels or tags to categorize or highlight certain coins. Adjust the spacing and number of clips based on your collection size.
Securely mount the rail on the wall with appropriate anchors or screws. Attach each pressed penny to a clip or hook, and hang along the length of the rail. Keep extra clips or hooks nearby for quick updates. Ensure the system is sturdy enough to handle frequent changes. Regularly check the hardware for stability.
Personalize with engraved tags, different clip colors, or themed sections. Use the top of the rail for additional small memorabilia or signage. Change the display based on seasons, travels, or new additions. It’s a flexible setup that grows with your collection.
This vertical display makes your pressed pennies accessible and adaptable, perfect for busy collectors. It’s a sleek, modern way to showcase your journey and collection evolution. Plus, it encourages frequent updates and adds a personalized touch to your decor.
13. Pressed Penny Mosaic Tabletop Overlay
Looking for a unique way to incorporate your pressed pennies into functional decor? Want a conversation-starting piece that combines art and utility? A mosaic tabletop overlay turns your coins into a vibrant surface, making everyday furniture a personal statement. It’s DIY decor at its finest.
Imagine a glass or wooden tabletop covered with a colorful mosaic of pressed pennies arranged in a pattern or random design. The shiny surfaces catch light, creating a lively, textured surface. When you place objects on it, the coins shimmer beneath, adding depth and character. It’s a functional art piece that invites admiration.
Create geometric patterns, themed designs, or a random collage for variety. Use different coin sizes and colors for visual interest. Seal the mosaic with a clear resin or varnish for durability. This surface can be applied to coffee tables, side tables, or even countertops, adapting to your space.
Arrange pressed coins on a sturdy surface, then secure them with a strong adhesive or pour resin over the entire surface for a glossy finish. If using resin, follow manufacturer instructions for mixing and curing. Ensure the coins are evenly spaced and level. Allow ample drying time before using the table. Seal the edges for a clean look.
Customize by adding special coins or themed designs for holidays or milestones. Incorporate small decorative elements like beads or mini charms for extra flair. Change or add coins over time to refresh the look. Use protective coatings to maintain the mosaic’s shine.
This project transforms your collection into a functional centerpiece that’s both personal and artistic. It’s a durable, conversation-worthy addition to your home. Plus, it’s a fulfilling DIY that showcases your creativity and collection pride.
14. Eco-Friendly Pressed Penny Garland for Wall Decor
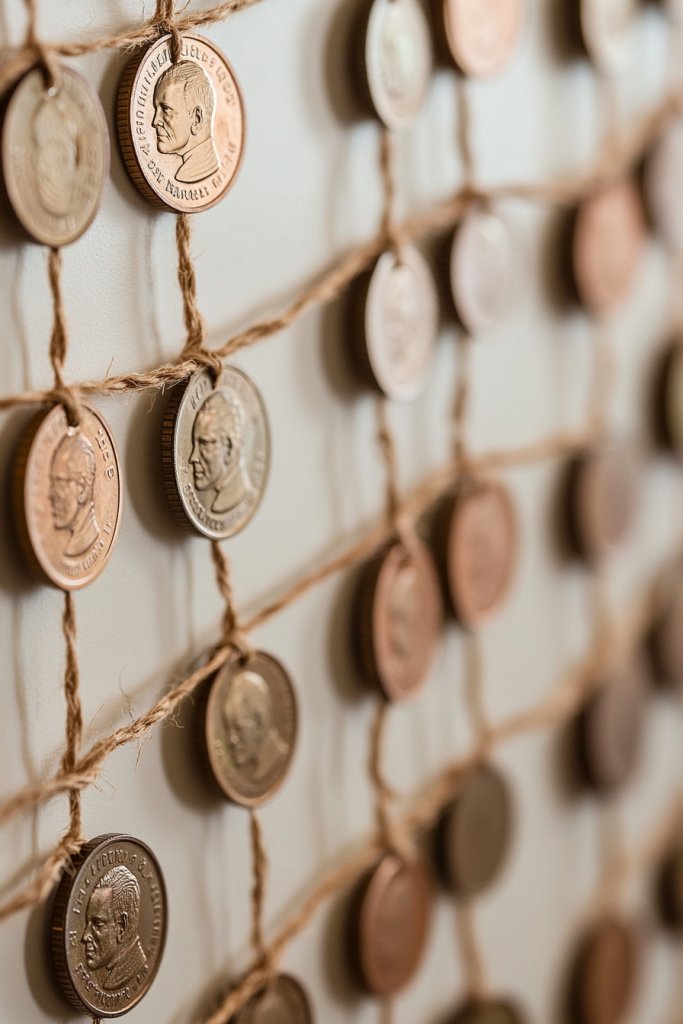
Want a sustainable and stylish way to display your pressed pennies? Looking for an easy, eco-friendly project that adds charm to any room? A garland made of coins strung on twine or wire creates a lightweight, decorative feature that’s perfect for seasonal or everyday decor. It’s simple, fun, and environmentally conscious.
Picture a string of pressed pennies hanging across a window or wall, with the coins gently swaying in the breeze. The metallic shine catches light, creating a shimmering effect. The irregular spacing adds a playful, handcrafted vibe. It’s like a mini mobile of memories, bringing movement and sparkle to your space.
Use colorful or patterned twine for added visual interest. Incorporate beads, fabric strips, or small charms between coins for variety. Adjust the length based on your space; create themed banners for holidays or trips. For a rustic look, use natural fibers; for a modern touch, opt for sleek wire.
Thread each pressed penny onto the twine or wire, spacing them evenly or randomly for a casual look. Secure each coin with a knot or small bead to prevent slipping. Attach the garland to walls, ceilings, or doorways with hooks or clips. For outdoor use, choose weather-resistant materials. Keep extra coins handy for future updates.
Add personalized tags or small labels with stories or dates behind each coin. Change the garland seasonally or for special occasions. Incorporate themed decorations like holiday ornaments or travel symbols. Keep the display fresh by swapping coins or rearranging.
This eco-friendly garland is a cheerful, meaningful way to celebrate your collection. It’s easy to make, versatile, and perfect for any space. Plus, it’s a fun craft that brings your memories to life while respecting the environment.
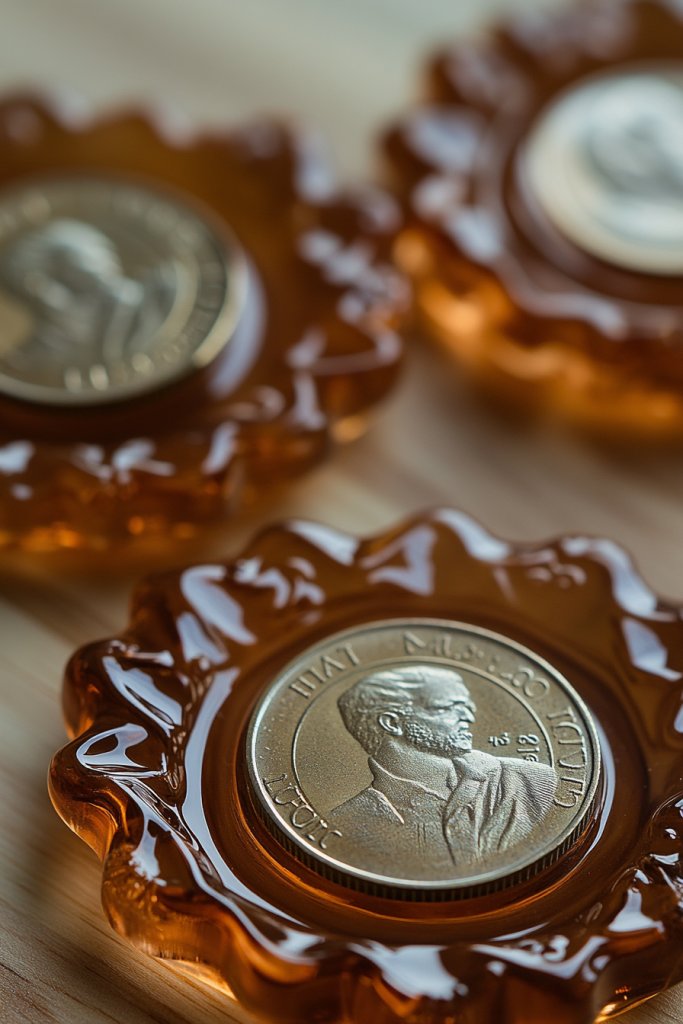
15. Decorative Pressed Penny Coasters with Resin Coating
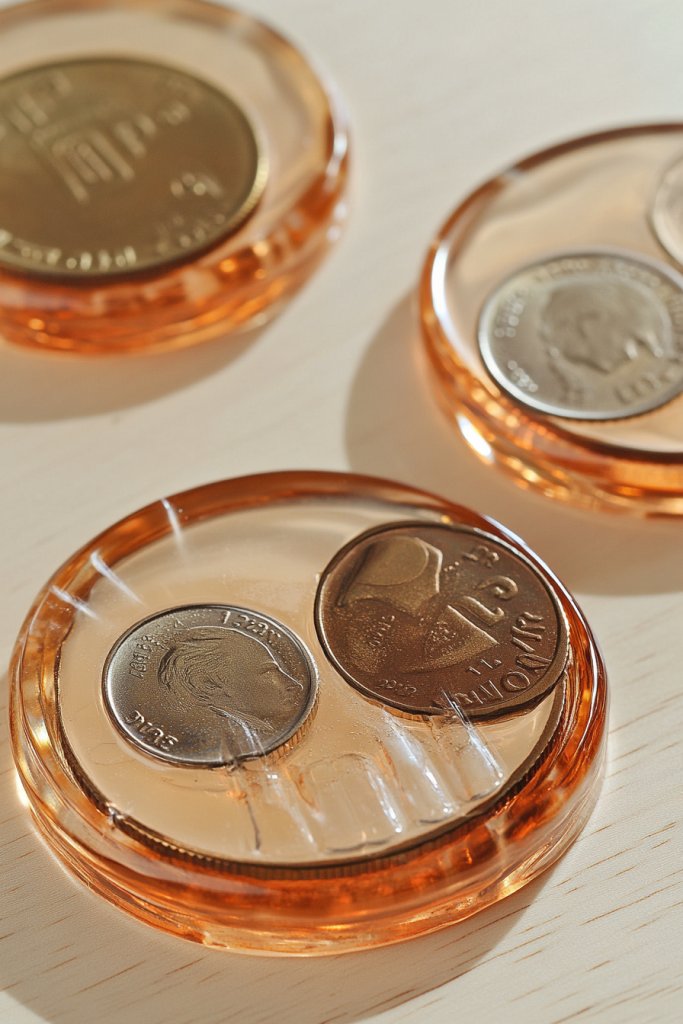
Looking to protect your furniture while showcasing your pressed pennies? Want a durable, glossy coaster that’s both functional and decorative? Embedding coins in resin creates a high-quality finish that preserves your collection and adds a professional touch. It’s a practical craft with a wow factor.
Envision a smooth, shiny resin surface with pressed pennies embedded neatly in the center. The coins’ shiny surfaces are magnified, creating a jewel-like effect. The clear resin encapsulates each coin, highlighting their details and colors. These coasters can be customized with borders, colors, or additional embellishments for extra flair.
Use different shapes—round, square, or custom-cut—to match your decor. Add decorative borders with metallic paint, glitter, or embedded objects like beads or shells. Personalize with initials or themed designs. For holiday or special occasion sets, incorporate seasonal colors or motifs.
Arrange coins on a mold or surface suitable for resin pouring. Mix and pour the resin carefully, ensuring no bubbles remain. Embed the coins at the desired depth, then cure according to the resin manufacturer’s instructions. Sand or polish the edges for a smooth finish. Apply a sealant if needed for extra protection.
Add engraved or painted details on the resin surface for a custom look. Use colored resin or tint to match your color scheme. Create sets for different rooms or themes, or gift personalized coasters. Change the coins periodically to keep your collection fresh.
These resin coasters turn your collection into durable, eye-catching accessories. They offer a sleek, modern way to display and protect your coins. Plus, they make thoughtful handmade gifts that everyone will love. Ready to craft your own?
16. Pressed Penny Magnets for Fridge or Whiteboard Displays

Want to keep your pressed pennies visible and handy without cluttering your space? Looking for a simple, practical way to display your collection daily? Magnets are an easy solution that turns coins into functional art. Plus, they’re super easy to make and update.
Imagine small pressed pennies attached to strong magnets, stuck on your fridge, whiteboard, or metal cabinet. The coins add a quirky, nostalgic touch to your kitchen or workspace. They sparkle when light hits their surfaces, making your collection part of your everyday environment. It’s a fun, low-effort display.
Use colorful or themed magnets to match your decor or collection theme. Mix sizes and arrange coins in patterns or random placements. Create sets for different categories—travel destinations, years, or trips. For a more polished look, use uniform magnets and align the coins neatly.
Attach small, strong magnets to the back of each pressed penny using glue or adhesive strips. Ensure the magnets are centered and secure. Place the coins on your preferred metal surface, arranging them as desired. Keep extra magnets and coins nearby for future updates or new additions. Regularly check the magnet strength.
Label sections or coins with small tags or stickers for context. Rotate coins seasonally or for special occasions. Incorporate themed magnets—like travel icons, holiday symbols, or favorite colors. Make it interactive and fun by changing the layout often.
Magnets turn your collection into a practical display that’s always in view. It’s an effortless way to enjoy your coins daily and share your passion. Plus, it’s a great conversation starter and easy to update over time. Ready to magnetize your collection?
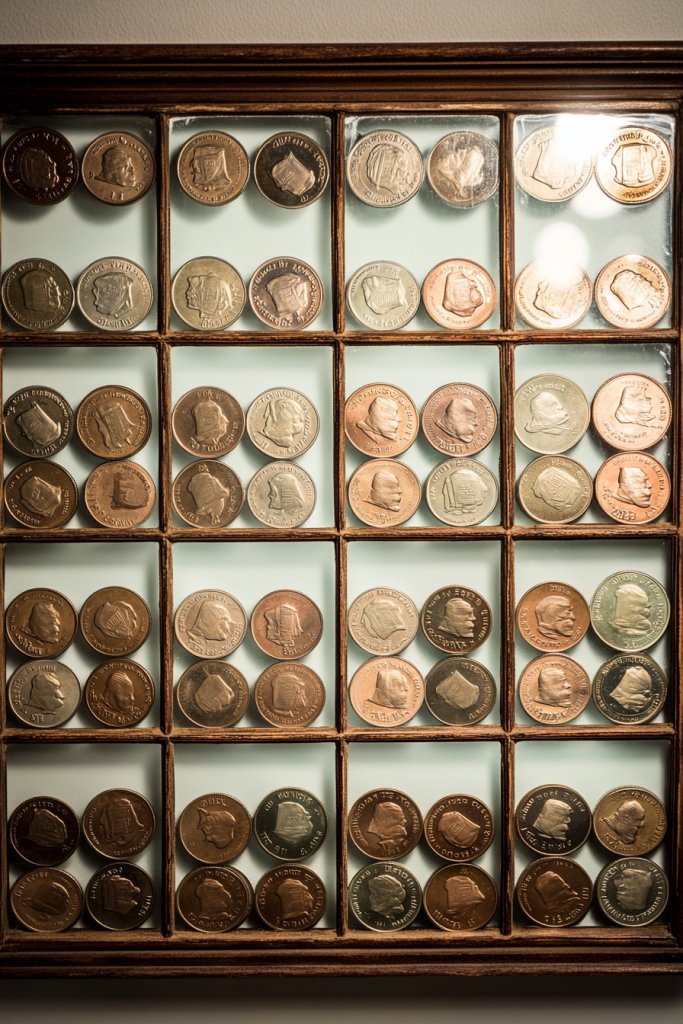
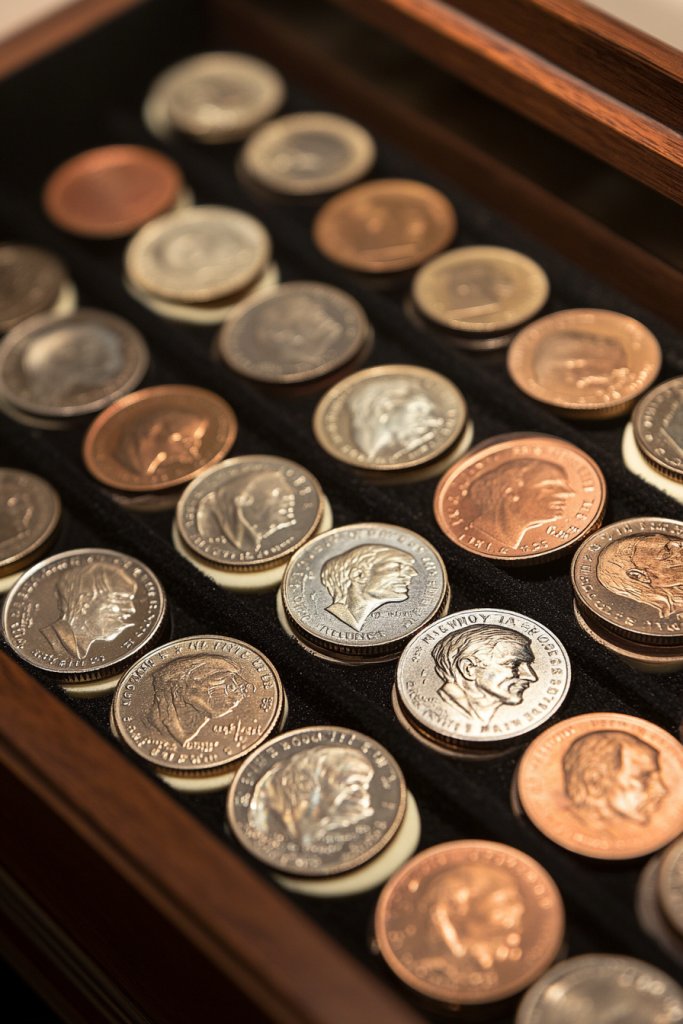
17. Wall-Mounted Frame with Multiple Coin Compartments
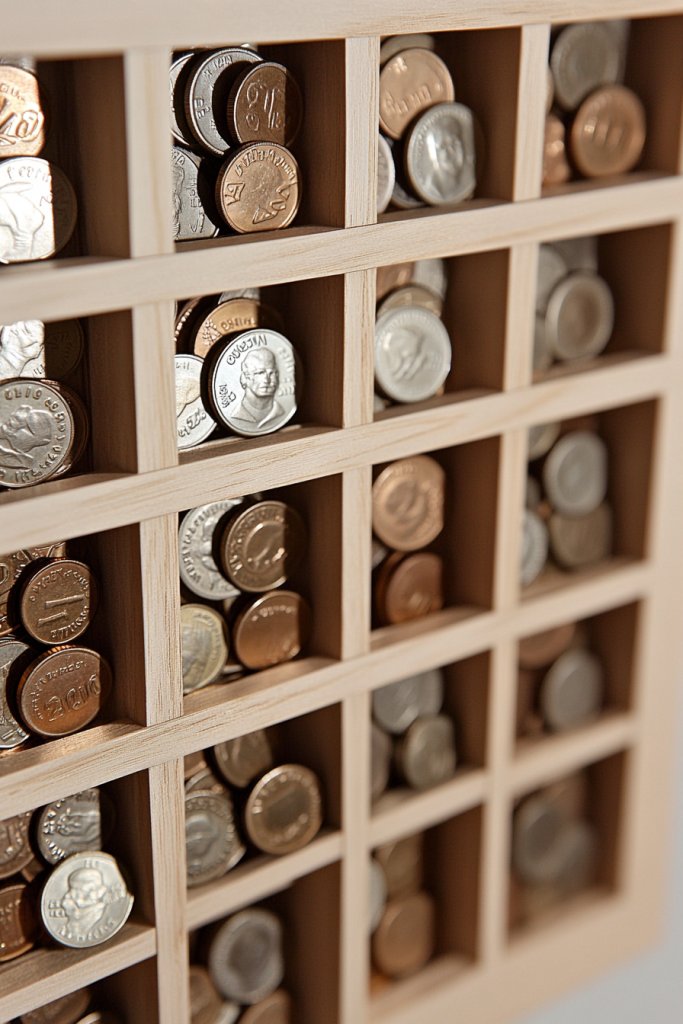
Tired of your pressed pennies being disorganized? Want a display that keeps everything neat and accessible? A wall-mounted frame with compartments offers a tidy, attractive way to organize your collection. It’s perfect for collectors who want a clear overview and easy access.
Picture a large frame divided into several small compartments or pockets, each holding individual coins. The coins are arranged by theme, trip, or size, creating an orderly mosaic. The frame’s design showcases each coin distinctly, making it easy to browse and admire. It’s like a mini exhibit on your wall.
Choose a frame with clear pockets, fabric-lined compartments, or custom dividers. Opt for a sleek, modern look with acrylic pockets or a rustic vibe with wooden compartments. Label each section with tags or small plaques for context. Adjust the layout for your collection’s size and diversity.
Securely mount the frame on your wall, making sure it’s level. Insert pressed pennies into individual compartments, ensuring they’re secure and visible. Organize them by theme, date, or location for storytelling. Use durable materials and hardware to support frequent updates. Keep extra coins and labels nearby for easy switching.
Add small engraved tags or handwritten labels for each coin. Incorporate decorative elements like small flags or symbols to mark special trips. Change the arrangement for seasons or new acquisitions. Keep the display fresh and engaging by updating periodically.
This organized display not only protects your coins but also turns your collection into a curated exhibit. It’s a simple, elegant way to celebrate your travels and memories. Perfect for a dedicated collector or a family project. Ready to organize your collection?
18. Rustic Wooden Board with Pressed Penny Embellishments
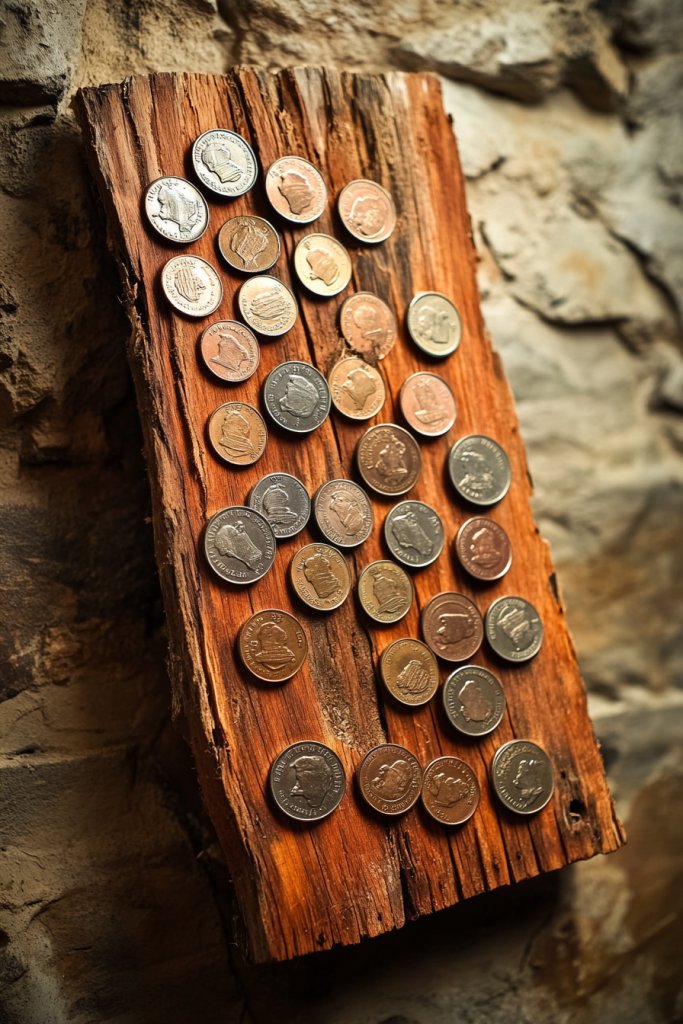
Want a rustic, handcrafted way to showcase your pressed pennies? Looking for a decor piece that combines natural charm and personalization? A reclaimed wood board decorated with coins creates a warm, inviting display. It’s perfect for adding a farmhouse or vintage touch to your space.
Visualize a weathered wooden plank, with pressed pennies glued or embedded in artistic patterns or clusters. The natural grain and imperfections of the wood contrast beautifully with the shiny coins, creating a tactile, textured look. You can arrange coins in a shape, like a heart or a scene, or in a random pattern for a rustic feel.
Use a wide, flat wooden board or a narrow plank, depending on your space. Decorate with paint, stencils, or carvings to enhance the rustic charm. Incorporate additional elements like small metal accents, leather straps, or fabric for extra texture. Change the arrangement seasonally or for special themes.
Clean and sand the wooden board for a smooth surface. Secure the pressed pennies using strong glue or epoxy, positioning them in your chosen pattern. Seal the entire piece with a clear matte or satin finish to protect against wear. Mount it on your wall with sturdy hardware, ensuring it’s level and stable. Consider adding a small shelf or hooks for extra display options.
Personalize with engraved or painted initials, dates, or symbols related to your travels. Incorporate small decorative accents like metal charms or vintage hardware. Rotate coins or add new ones to keep the display evolving. Use weatherproof finishes if you plan to place it outdoors.
This rustic display makes your collection a focal point with authentic charm. It’s a creative way to celebrate your adventures and add warmth to your decor. Plus, it’s a fulfilling DIY project that combines craftsmanship with personal storytelling. Ready to craft your rustic wall?
19. Pressed Penny Art Panels for Modern Minimalist Decor
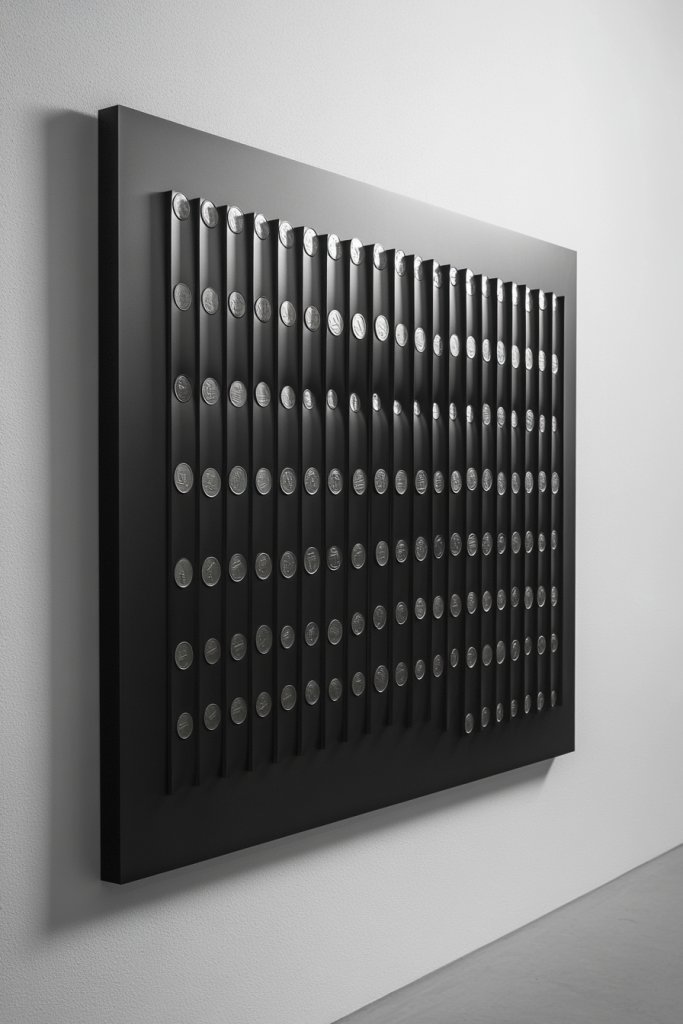
Craving a sleek, modern way to display your pressed pennies? Want a minimalist piece that’s both stylish and meaningful? Art panels with pressed coins mounted on monochrome backgrounds create a clean, contemporary look that complements modern decor. It’s a subtle yet striking way to showcase your collection.
Imagine a large, flat panel with a geometric or abstract arrangement of coins mounted on a black or white matte surface. The shiny surfaces contrast sharply with the background, emphasizing the coins’ details. The design is simple but impactful, adding a touch of sophistication to your wall. It’s like wearable art, but for your home.
Use a grid layout for a uniform, orderly appearance or an asymmetrical pattern for visual interest. Choose a monochrome background to keep the focus on the coins or add subtle textures for depth. Incorporate themed coins for a personal touch, or create a pattern based on color or size. Frame the panel with thin, sleek borders for a polished finish.
Arrange your pressed coins on the panel surface, ensuring even spacing and alignment. Secure them with a strong adhesive or mounting putty suitable for flat surfaces. Seal with a clear matte or gloss finish to protect. Mount the panel securely on your wall, using hardware that supports its weight. Ensure it’s level and stable.
Create multiple panels for a larger art installation, or vary the patterns for different themes. Incorporate engraved or painted details directly on the panel for added personalization. Change the coins over time or add new themes as your collection grows. Keep the design simple, elegant, and cohesive.
This modern minimalist display elevates your collection to art, blending function with style. It’s a versatile project that can be customized endlessly, fitting seamlessly into contemporary spaces. Perfect for the design-conscious collector who loves clean lines and subtle details.
20. Vintage Key Rack with Coin Accents

Ever struggle to keep your keys organized and easy to find? Want a functional piece that also showcases your love for travel or collections? A vintage-style key rack decorated with pressed pennies combines practicality with personal flair. It makes everyday routines a little more charming.
Picture a rustic wooden or metal key rack, with pressed pennies glued or embedded around the frame or hooks. The coins add a nostalgic, travel-inspired touch, making the rack more than just a utility. When hanging near your door, it’s a conversation starter and a reminder of adventures past. The coins catch the light, adding sparkle.
Choose a distressed wood finish for rustic charm or a sleek metal for a more industrial look. Arrange coins in a pattern, or randomly for a more eclectic vibe. Add small charms, tags, or labels to indicate key categories or destinations. Incorporate hooks for keys, small bags, or accessories.
Securely mount the key rack on your wall at an accessible height. Attach pressed pennies to the frame using strong adhesive or small screws, ensuring they’re evenly spaced. Install hooks or pegs for keys and other items. Use hardware that supports daily use and weight. Keep extra coins and hooks nearby for future customization.
Add engraved tags or small labels with names or locations. Incorporate themed coins that match your travel or interests. Change the arrangement or add new coins for variety. For special occasions, decorate with ribbons or seasonal motifs.
This functional decor piece keeps your keys organized while celebrating your collection. It’s a fun, creative project that adds personality to your entryway. Plus, it’s a practical way to preserve and display your travel memories. Ready to hang your own?
Conclusion
With a variety of pressed penny display ideas explored, you now have plenty of inspiration to create your own captivating showcases. From vintage-inspired frames to themed shadow boxes, there’s a perfect idea for every collection. Don’t hesitate to get creative and transform your pressed pennies into cherished works of art—your unique display awaits to brighten up your space!
Leave a Reply