A charming farmhouse kitchen instantly captures hearts with its warm, inviting atmosphere, and one of the easiest ways to achieve that rustic charm is through a beautifully crafted backsplash. These ideas are popular because they effortlessly combine vintage appeal with practicality, adding character and personality to your cooking space.
In this article, you’ll explore a variety of farmhouse backsplash ideas that cater to different styles and preferences. From classic subway tiles to reclaimed wood accents, you’ll find inspiration to transform your kitchen into a cozy, rustic haven that feels both timeless and uniquely yours.
1. Classic White Subway Tile with Weathered Grout
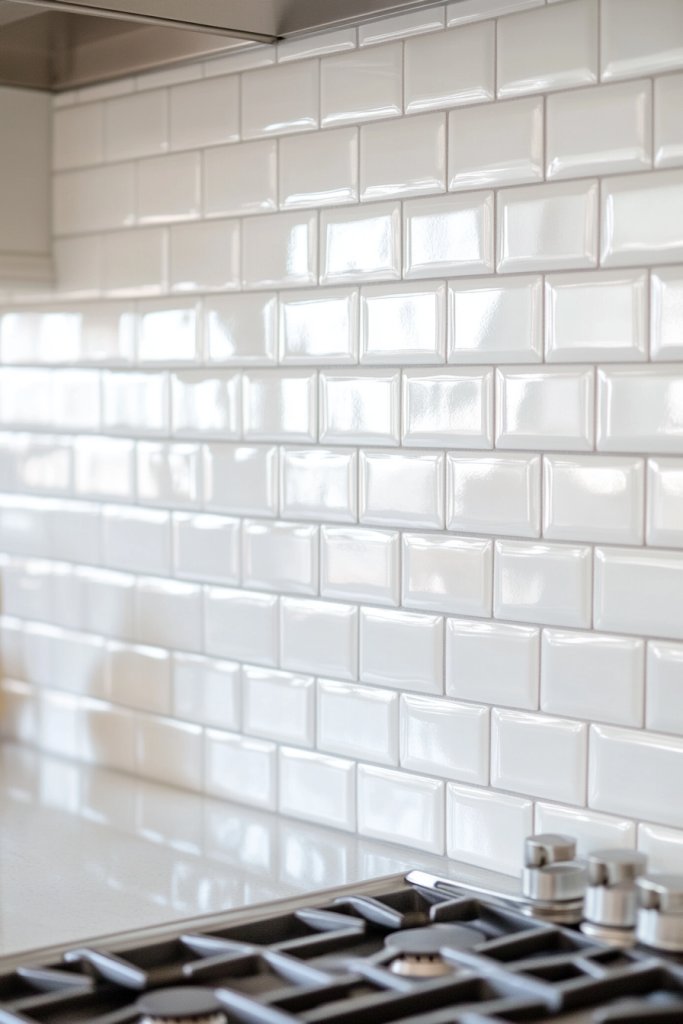
Ever wish your kitchen could feel timeless and fresh without looking like it’s stuck in a museum? Classic white subway tiles are the answer, giving you that clean, bright backdrop that works with almost any style. But what truly elevates this look is choosing a weathered grout, adding a touch of rustic charm that prevents the space from feeling sterile or overly polished. It’s about balancing modern simplicity with cozy farmhouse warmth.
Imagine glossy white tiles laid out in a perfect brick pattern, with a slightly distressed, grayish grout that hints at age and character. The texture of the grout contrasts beautifully with the smooth surface of the tiles, creating a subtle visual interest. Light reflects softly off the tiles, making the space feel open and inviting. The weathered grout adds an imperfect, handcrafted vibe, as if the kitchen has stories to tell.
You can keep it classic with bright white tiles and dark weathered grout for a striking contrast. Alternatively, opt for softer shades like cream or off-white tiles with lighter, more subdued grout for a subtle rustic feel. Seasonal accents, such as warm-colored textiles or vintage accessories, can complement this look. If your kitchen is small, this neutral backdrop helps make the space seem larger and more airy.
Start by selecting high-quality white subway tiles and a grout color with a weathered finish—think shades of gray or taupe. Use a tile adhesive and apply the tiles in a staggered brick pattern for a classic look. When grouting, choose a slightly darker, distressed hue and apply it with a rubber float, pressing into the joints. Wipe off excess grout with a damp sponge before it dries for a clean finish. Seal the grout for added durability and rustic charm.
Add personal touches by incorporating vintage hardware or distressed wooden shelves that match the rustic grout’s vibe. Consider using textured or patterned textiles in nearby accessories to enhance the farmhouse feel. You can also introduce small, weathered decorative accents like antique jars or cast iron hooks. For a modern twist, play with contrasting matte black fixtures or bright accessories that pop against the white and weathered grout.
This classic tile with weathered grout creates a versatile backdrop that blends timelessness with rustic charm. It’s a DIY-friendly project that transforms your kitchen into a cozy, welcoming space. Don’t worry about perfection—embrace the imperfections that make it uniquely yours. Ready to add a touch of vintage elegance to your farmhouse kitchen?
2. Reclaimed Barn Wood Plank Backsplash
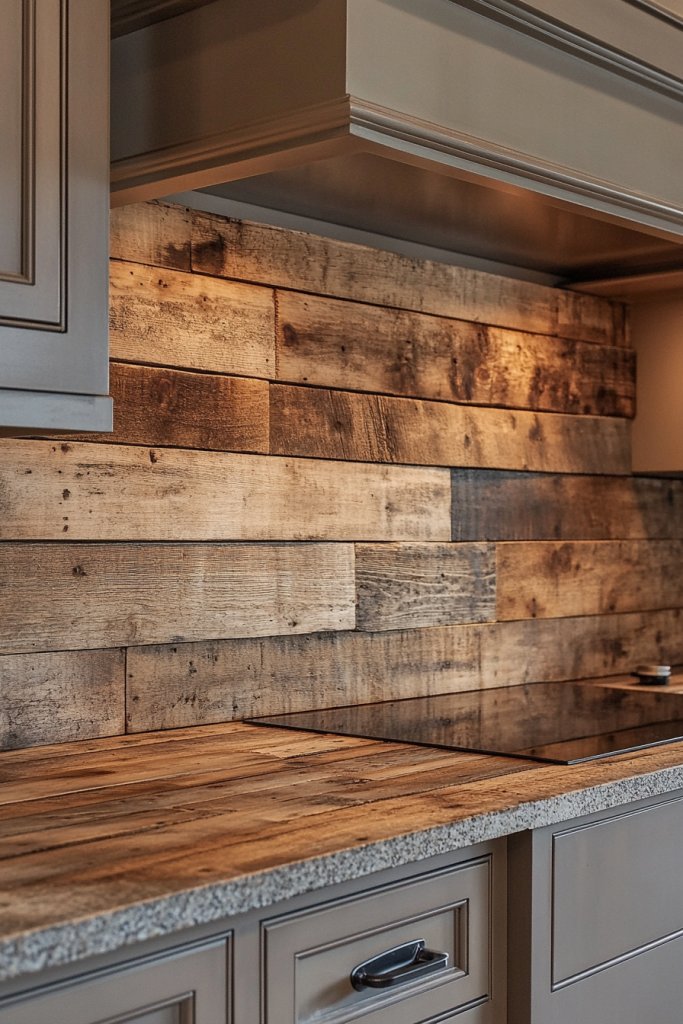
Craving a kitchen that feels warm, authentic, and full of history? Reclaimed barn wood is the perfect material to bring genuine rustic charm into your space. It’s an easy way to incorporate natural textures and tones that make your kitchen stand out. Plus, using salvaged wood is eco-friendly—hello, sustainability!
Picture weathered, multi-toned planks installed horizontally across your wall, their rough edges and knots adding character. The wood’s natural grain and imperfections tell stories of farms and barns from years gone by. When sunlight hits the surface, it creates a warm glow that makes the room feel cozy and lived-in. This backdrop pairs beautifully with vintage metal fixtures and ceramic accents.
You can choose lighter, bleached wood for a more subdued, Scandinavian farmhouse look or go for darker, richer tones for a more dramatic effect. Mixing reclaimed wood with modern elements like sleek countertops or hardware creates a balanced aesthetic. For seasonal updates, add colorful textiles or decorative items that complement the wood’s natural hues. Small, movable shelves or hooks can provide functional storage without disrupting the rustic vibe.
Begin by sourcing reclaimed barn wood from reputable suppliers or salvage yards, ensuring it’s properly cleaned and treated. Cut the planks to fit your wall space, then install them horizontally using a strong adhesive or nails designed for wood. For a seamless look, sand the edges lightly and seal the surface with a matte finish to preserve the aged appearance. Consider adding a protective clear coat to withstand humidity and kitchen splashes. Mounting hardware should be minimal to keep the focus on the wood’s natural beauty.
Enhance the rustic feel by adding vintage hooks or shelves made from reclaimed wood for extra storage. Incorporate handmade pottery or ceramic containers to hold utensils or spices. For a personal touch, install a reclaimed metal sign or a chalkboard for notes. You could also paint a subtle border or pattern to add visual interest while maintaining the rustic charm.
Reclaimed barn wood is more than just a backsplash—it’s a statement of history and sustainability. It instantly warms up your kitchen and creates an inviting atmosphere. No need for perfection—each plank’s unique character adds to the authenticity. Ready to transform your kitchen into a storybook setting?
3. White Beadboard Paneling
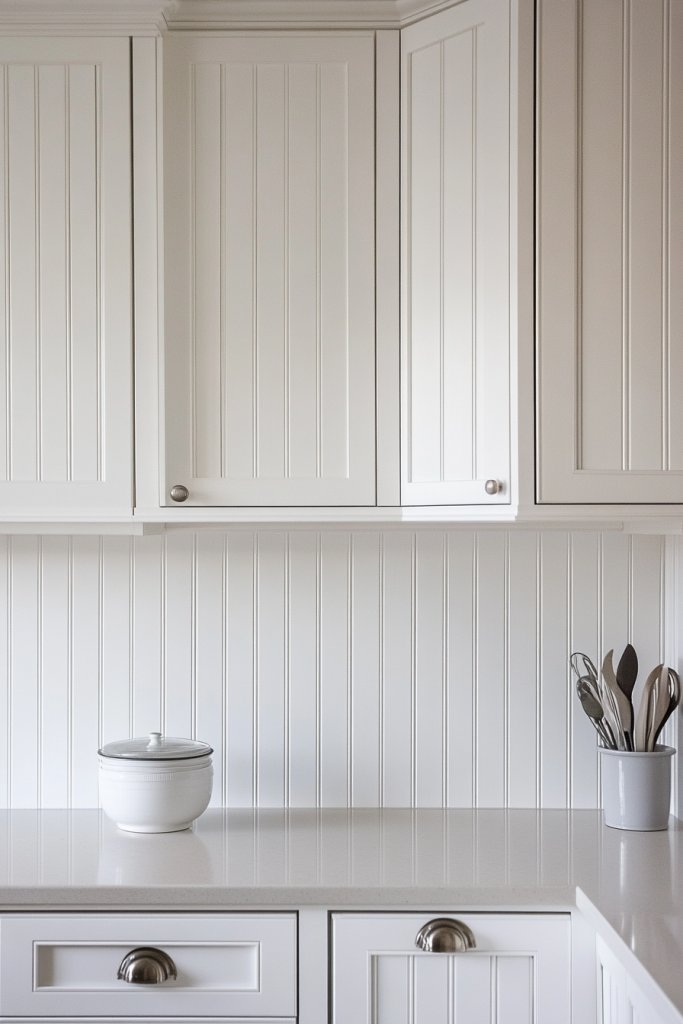
Looking for a cozy, cottage-inspired kitchen that feels inviting and timeless? White beadboard paneling is the classic answer, adding texture and charm without overwhelming the space. It’s perfect for those who want a traditional farmhouse vibe with a touch of softness. Plus, it’s an affordable way to elevate your walls from plain to picturesque.
Visualize narrow vertical panels with evenly spaced, rounded beads running from countertop to ceiling. The soft white finish reflects natural light, creating a bright and airy atmosphere. The subtle texture of the beadboard adds depth, making the wall a focal point that complements vintage or shabby chic decor. Paired with a ceramic farmhouse sink and open shelving, it transforms the kitchen into a cozy retreat.
For a more rustic look, choose beadboard with a slightly distressed or aged finish. In smaller kitchens, keep the paint light and simple to maximize openness. In larger spaces, you can add decorative moldings or wainscoting for extra detail. Seasonal accents like plaid textiles or woven baskets enhance the cottage feel throughout the year.
Start by measuring your wall area and selecting beadboard panels with a smooth, uniform finish. Attach the panels securely to the wall using nails or adhesive, ensuring the beads are evenly aligned. Fill gaps or nail holes with wood filler and sand smoothly. Paint the beadboard with a semi-gloss or matte white paint, applying multiple coats for even coverage. Seal with a clear protective coat if desired for durability.
Add decorative touches like vintage hooks or a painted wooden sign for a personalized entry point. Incorporate textured fabrics and woven baskets nearby to reinforce the cozy, farmhouse atmosphere. Consider installing a narrow shelf or a small ledge above for displaying cookbooks or decorative jars. Keep the look fresh by changing textiles seasonally or adding small decorative accents.
White beadboard paneling offers a timeless, versatile backdrop that suits any farmhouse or cottage style. It’s a DIY-friendly project that instantly makes your kitchen more inviting. Embrace imperfections—each panel’s character enhances the charm. Your kitchen will look both charming and thoughtfully designed, ready for memorable family meals.
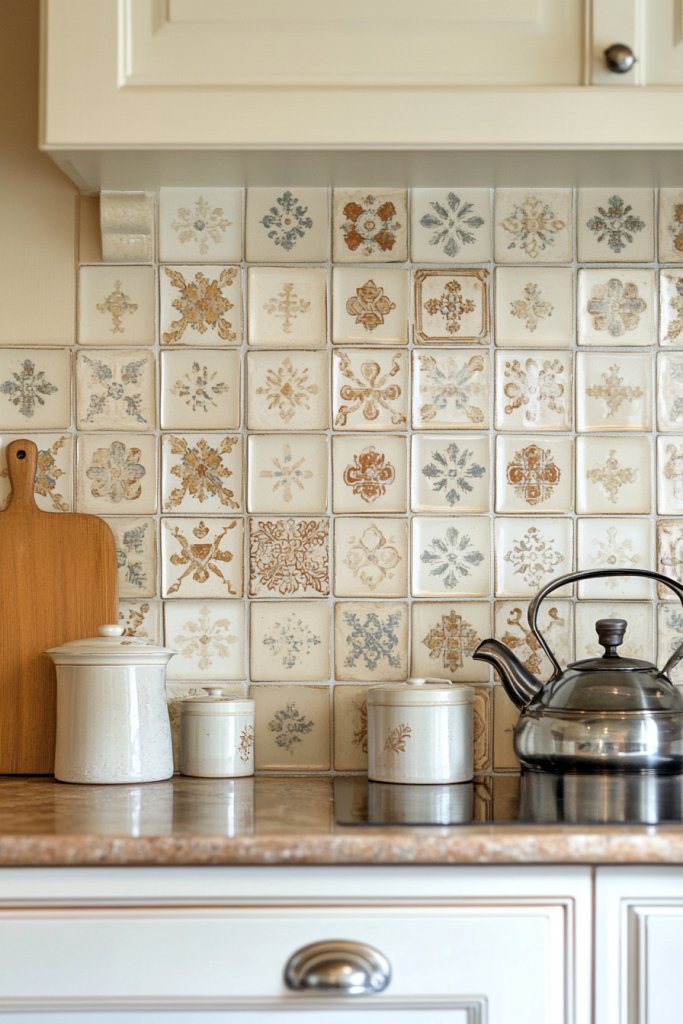
4. Hand-Painted Vintage Tin Tiles
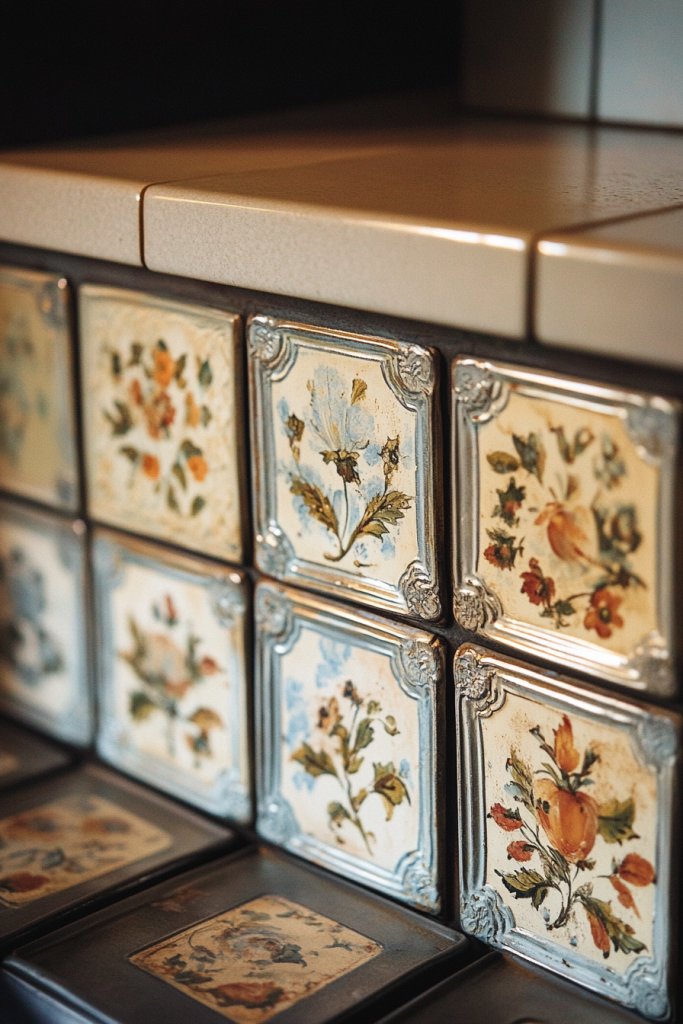
Want to add a splash of vintage charm and texture to your kitchen? Hand-painted vintage tin tiles deliver both, offering a nostalgic look with handcrafted details. They’re perfect for elevating a simple backsplash into a statement piece that sparks conversation. Plus, they’re surprisingly durable and easy to maintain.
Imagine intricate floral or geometric patterns painted in faded, weathered colors on slightly embossed tin tiles. The surface catches light, creating subtle shadows that enhance their textured quality. The distressed finish adds authentic aged character, making each tile unique. Arranged in a classic grid, they evoke a vintage apothecary or old-world kitchen ambiance.
Choose tiles in soft pastel shades for a shabby chic look or bold, darker tones for a more dramatic effect. Mix and match different patterns for a patchwork style that feels curated and personal. Incorporate these tiles with antique metal fixtures or distressed wooden accents to amplify the vintage vibe. Seasonal touches, like a cozy woven cloth or antique jars, complete the scene.
Begin by selecting high-quality tin tiles with authentic vintage finishes. Prepare the wall surface by cleaning and priming it for adhesion. Use a strong adhesive or nails to affix each tile securely, ensuring they’re level. Seal the tiles with a clear matte or satin finish to protect the paint and embossed surface. For a seamless look, grout the edges with a color that complements the pattern, or leave them ungrouted for an authentic vintage appearance.
Customize your tiles with hand-painted initials or motifs for a personal touch. Pair with aged brass or copper fixtures to reinforce the vintage aesthetic. Incorporate decorative elements like small vintage signs or rustic hooks nearby. You can also add a small accent shelf made from reclaimed wood to display antique collectibles or kitchen essentials.
Vintage tin tiles bring a handcrafted, nostalgic feel that instantly enlivens any kitchen. They’re a DIY-friendly project that adds texture and personality. Don’t worry about perfect symmetry—imperfections enhance their charm. Ready to add a touch of vintage elegance and a story to your space?
5. Distressed Brick or Faux Brick Panels
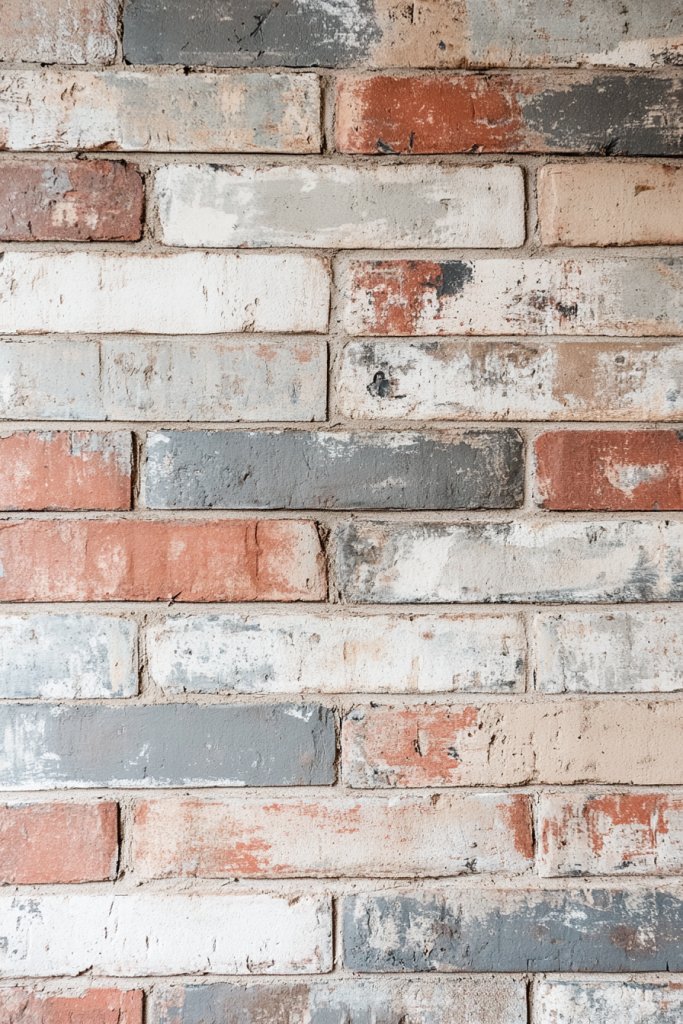
Dreaming of that classic farmhouse brick wall but worried about the mess and cost of real brick? Distressed or faux brick panels offer a practical alternative that captures the aged, rustic charm without the hassle. They add instant texture and a sense of history, making your kitchen feel warm and inviting. It’s a straightforward upgrade that makes a big impact.
Envision panels with a weathered, chipped paint finish or exposed brick texture in shades of red, brown, or gray. The distressed surface mimics years of wear, adding authenticity. When installed, they create a layered, textured backdrop that looks like a vintage brick wall. The uneven edges and faded paint lend a sense of age and resilience, perfect for a cozy farmhouse aesthetic.
Choose panels with different degrees of distress for a subtle or more pronounced vintage look. Pair with reclaimed wood cabinetry or aged metal fixtures for an authentic feel. For a softer look, opt for whitewashed or neutral-colored faux bricks. Seasonal accessories like plaid textiles or rustic pottery enhance the overall rustic vibe.
Begin by measuring your wall and selecting panels that suit your style, whether real or faux. Prepare the wall surface to be clean and smooth. Use construction adhesive or panel clips to attach the panels securely, ensuring they’re aligned evenly. For real brick, apply mortar and sealant; for faux panels, follow manufacturer instructions for best results. Touch up with paint or distressing if needed, to enhance the aged look.
Add vintage-inspired hardware or a distressed metal vent cover to complement the brick look. Incorporate antique or repurposed furniture nearby for a cohesive aesthetic. Seasonal touches like wreaths or fabric curtains soften the industrial feel. Personalize with a small chalkboard or rustic sign for a welcoming, lived-in vibe.
Distressed brick panels are a timeless way to add character without the weight or expense of real brick. They’re easy to install and maintain, making them a smart choice for DIY enthusiasts. Each panel’s aged finish brings unique charm that elevates any farmhouse kitchen. Ready to create a warm, vintage-inspired space?
6. Patterned Cement Tiles with Weathered Finish

Looking to add visual interest and a touch of artistry to your kitchen? Patterned cement tiles with a weathered finish strike the perfect balance between decorative and rustic. They bring a handcrafted, vintage vibe while offering endless design options. Plus, they hide stains and wear better than sleek, glossy surfaces.
Visualize intricate geometric or floral patterns in muted, distressed tones, creating a worn yet elegant look. The matte finish and slight imperfections mimic age, adding authenticity. Arranged in a herringbone or grid pattern, these tiles create a focal point that draws the eye. The textured surface invites touch and makes the space feel warm and inviting.
Choose tiles with traditional patterns in subdued colors like navy, cream, or terracotta for a classic farmhouse look. Mix different patterns for a playful, eclectic vibe. For a softer aesthetic, select tiles with faded colors and delicate designs. Seasonal accents like woven rugs or vintage pottery can enhance the overall charm.
Start by selecting cement tiles that suit your style and measuring your space carefully. Prepare the wall or floor surface, ensuring it’s level and clean. Use a mortar bed designed for cement tiles, pressing each tile firmly into place. Grout with a neutral, matte finish to complement the weathered look. Seal the tiles with a breathable sealer to protect against stains and moisture.
Frame the tiled area with a simple wooden border or add vintage-style metal trim. Incorporate antique or handmade accessories nearby to enhance the artisanal feel. Use textured or woven textiles in adjacent decor to tie the look together. Consider adding a small vintage-inspired sign or a handmade mosaic for extra flair.
Patterned cement tiles are a bold yet timeless choice that instantly elevates your kitchen. Their handcrafted appearance adds warmth and personality. Each tile’s weathered finish makes it easy to hide minor stains or chips, maintaining beauty over time. Ready to add a handcrafted touch to your farmhouse space?
7. Reclaimed Whitewashed Shiplap
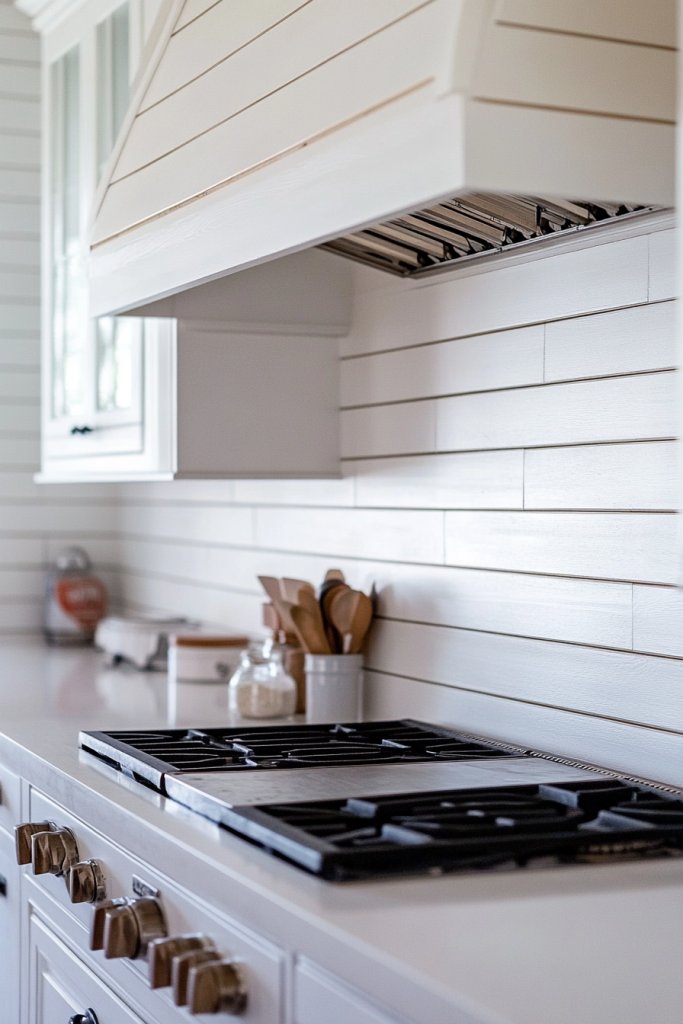
Craving a simple yet charming backdrop that radiates farmhouse warmth? Reclaimed whitewashed shiplap offers an effortless way to brighten your kitchen while adding texture. It’s a favorite for creating a cozy, cottage-inspired setting without overwhelming the space. Plus, it’s eco-friendly and budget-friendly if you source reclaimed wood.
Imagine horizontal wooden planks painted in soft white, with subtle grain and knots showing through for authenticity. The narrow, overlapping boards create a rhythmic pattern that adds depth and dimension. The whitewashed finish reflects natural light, making even smaller kitchens feel more open. Paired with vintage fixtures and soft textiles, it creates a welcoming, rustic atmosphere.
Opt for lightly distressed or heavily weathered finishes depending on your style preference. Incorporate different shades of white or soft pastel accents for seasonal updates. For a more refined look, add narrow molding or beaded details. This style pairs well with both traditional and modern farmhouse decor.
Begin by sourcing reclaimed shiplap panels that are clean and treated for indoor use. Install the planks horizontally, overlapping slightly for the classic shiplap look. Use nails or a pneumatic nailer for secure fastening. Sand lightly to smooth rough edges and knots, then paint or whitewash if not pre-finished. Finish with a clear sealant to protect against moisture and wear.
Customize your shiplap with handwritten chalkboard sections or vintage decals. Add small floating shelves or hooks for functional decor. Incorporate textiles like checkered or striped dish towels to enhance the cozy feel. Regularly update accents seasonally for a fresh look.
Reclaimed whitewashed shiplap is a versatile, DIY-friendly project that instantly adds rustic charm. Its bright finish helps bounce light and create an open feel. Each plank’s unique grain and imperfections add character, making your kitchen truly one-of-a-kind. Ready to brighten and warm your space?
8. Corrugated Metal Sheets in Rusty Finish
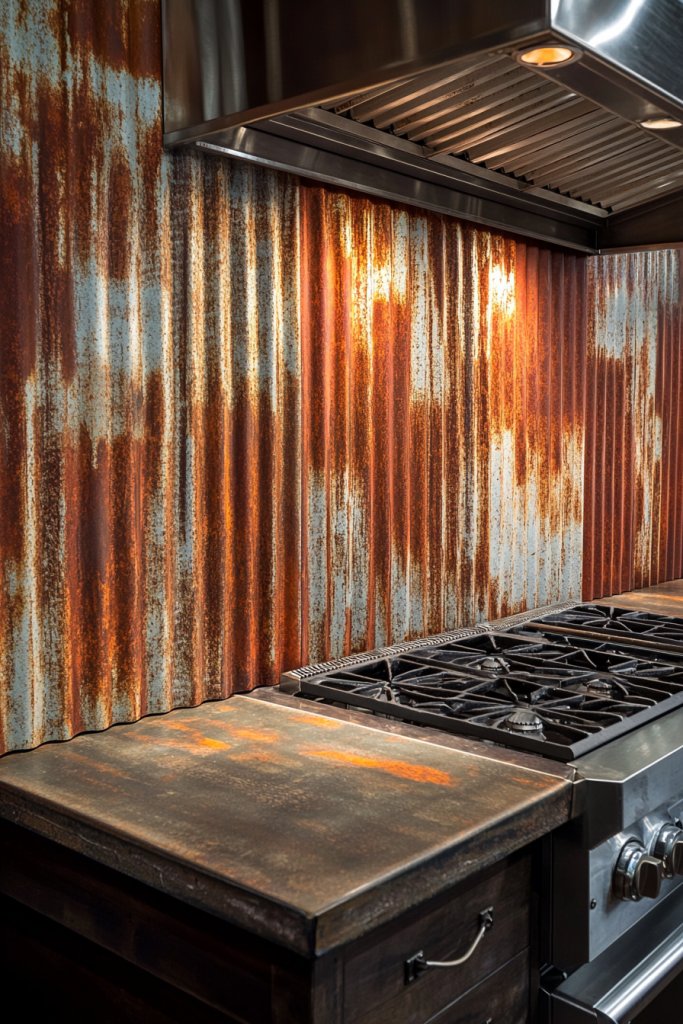
Looking to introduce an industrial edge to your farmhouse kitchen without losing warmth? Corrugated metal sheets with a rusty finish can do exactly that. They add texture and a rugged vibe while still fitting within rustic farmhouse decor. It’s a bold choice, but one that pays off with major visual impact.
Visualize panels of corrugated metal with a weathered, rusty surface in shades of deep orange, brown, and gray. The ridges create shadows and highlights that add depth, making the wall look dynamic. When paired with warm wood and vintage fixtures, the metal’s industrial charm is softened into rustic appeal. The surface’s texture invites tactile curiosity and complements rough-hewn furniture.
Choose panels with different degrees of rust and patina for a layered, aged look. Mix with reclaimed wood or stone for a balanced aesthetic. Keep the color palette earthy with amber, ochre, and deep browns. Seasonal accessories like warm-colored textiles or vintage signs can enhance the overall industrial-rustic contrast.
Start by measuring your wall and selecting corrugated metal sheets with a rust finish. Prepare the wall surface, ensuring it’s clean and smooth. Attach the panels using heavy-duty screws or construction adhesive, aligning ridges for a uniform appearance. Seal the surface with a rust-inhibiting clear coat for longevity. Optional: add a protective layer to prevent flaking or damage.
Incorporate antique hardware or industrial-style lighting fixtures. Use reclaimed wood shelves or vintage metal hooks to add functional storage. Decorate with vintage signs, metal planters, or rustic textiles nearby. Personalize with DIY metal art or distressed paint for extra character.
Corrugated metal in a rusty finish creates a bold, textured focal point that’s easy to install and maintain. It pairs well with most rustic and industrial themes, adding authenticity. The imperfect, weathered surface celebrates age and resilience. Ready to make a statement?
9. Hand-Stained Wooden Tiles
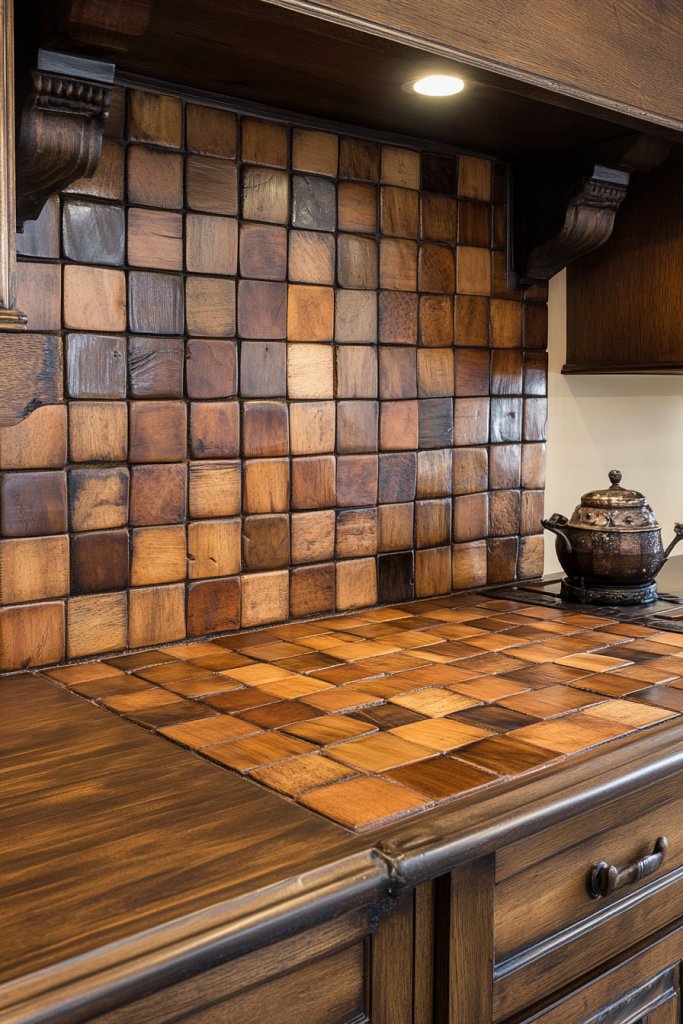
Want to bring a handcrafted, warm touch to your kitchen’s backsplash? Hand-stained wooden tiles are the perfect solution, offering a bespoke look that oozes rustic charm. They add warmth and texture while giving you complete control over color and finish. It’s like creating your own piece of art.
Imagine tiles made from small, rectangular wood pieces stained in earthy hues—warm browns, deep reds, or soft ambers. The natural grain and knots in the wood add depth, making each tile unique. Arranged in a herringbone or plank pattern, they create a rich, textured surface that invites touch. The stained finish enhances the wood’s natural beauty while adding a layer of color.
Choose stains that complement your cabinets and countertops, from warm honey to dark espresso. Mix stained tiles with natural unfinished wood for contrast. For seasonal updates, add decorative accents like painted motifs or personalized initials. These tiles work well in both modern and traditional farmhouse kitchens.
Start by sourcing quality wooden tiles or creating your own from reclaimed wood. Sand the surface smooth and apply a stain of your choice with a brush or cloth. Seal each tile with a clear, matte or satin finish for durability. Install with wood or tile adhesive, ensuring even spacing and alignment. Finish by sealing joints with a matching or contrasting caulk.
Add decorative inlays or painted patterns for a custom touch. Incorporate brass or copper accents nearby for a pop of metallic contrast. Use the tiles as a canvas for personal messages or motifs. Keep the overall look warm and inviting by pairing with cozy textiles and rustic accessories.
Hand-stained wooden tiles blend craftsmanship with nature, creating a truly original backsplash. They’re a DIY-friendly project that adds warmth and personality. Each tile’s unique grain makes your kitchen one-of-a-kind. Ready to craft a personalized, rustic masterpiece?
10. Vintage Ceramic Tiles in Farmhouse Patterns
Yearning for a nostalgic vibe that feels both charming and timeless? Vintage ceramic tiles with classic farmhouse patterns give you that authentic look. They add personality and history to your kitchen, making it feel like it’s been part of your family for generations. Plus, they’re surprisingly easy to incorporate.
Picture tiles decorated with floral, geometric, or medallion patterns in faded, muted colors—think soft blues, creams, and warm browns. The slightly imperfect glaze and vintage motifs evoke old-world craftsmanship. When laid out in a traditional pattern, they create a charming, storybook backdrop. These tiles invite both admiration and nostalgia.
Mix vintage ceramic tiles with modern elements like sleek countertops or minimalist fixtures for an eclectic look. Opt for darker tones for a more dramatic, aged appearance or lighter shades for a bright, airy feel. Seasonal accents like linen towels or rustic pottery complement the vintage theme beautifully.
Select vintage-inspired ceramic tiles with authentic patterns and slightly distressed finishes. Prepare the wall surface, then use a tile adhesive suitable for ceramic. Lay out the tiles carefully, ensuring patterns align properly. Grout with a color that enhances the vintage look, such as warm beige or soft gray. Seal the tiles to protect the glaze and patterns over time.
Incorporate hand-painted or custom-designed tiles that tell your story. Add decorative borders or trims in complementary colors. Surround the backsplash with reclaimed wood trim or vintage metal fixtures to enhance the retro feel. Personal touches like handwritten chalkboard labels or small vintage signs elevate the space.
Vintage ceramic tiles are a charming way to add character and warmth to your kitchen. They offer a nostalgic aesthetic that’s both stylish and functional. Each tile’s unique pattern and glaze imperfections make your space uniquely yours. Ready to bring a vintage story into your home?
11. Weathered Gray Wooden Slats
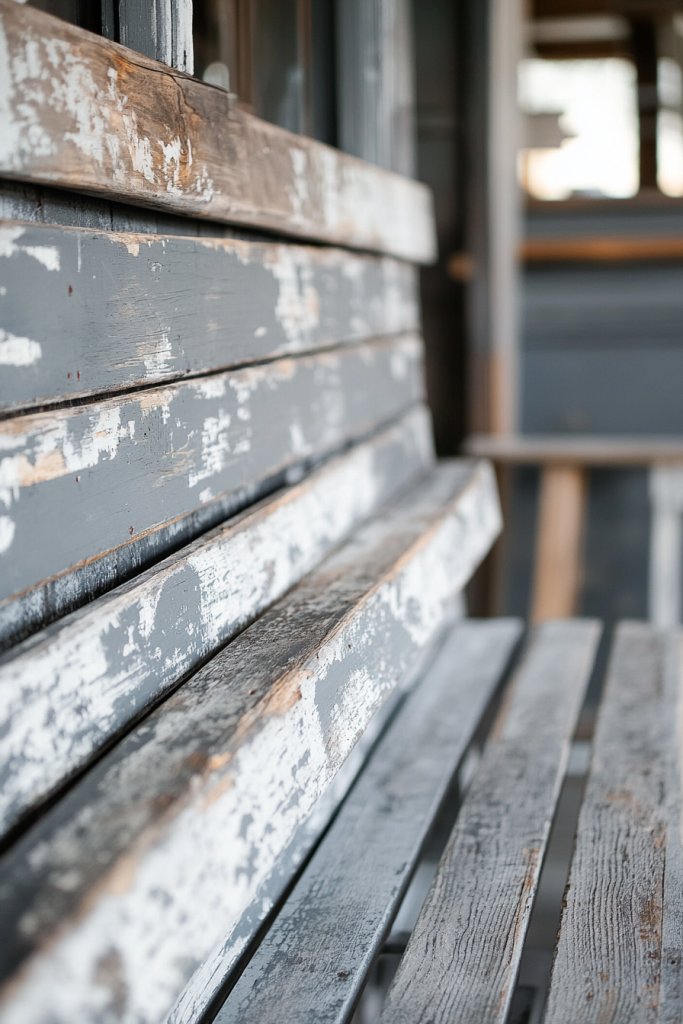
Ever feel like your kitchen needs a little more personality without going full rustic? Weathered gray wooden slats are the perfect way to add that subtle, worn-in charm. They bring a cozy, lived-in vibe that makes any space feel inviting. If your current backsplash feels too sterile or plain, this might just be the upgrade you need to warm things up.
Imagine textured, faded gray planks running horizontally behind your stove, their edges slightly chipped, revealing hints of warm wood underneath. The rough surface catches the light differently at every angle, creating depth and visual interest. The muted tones blend seamlessly with neutral cabinets, while the weathered finish adds a rustic, handcrafted feel. It’s like a piece of countryside charm right in your kitchen.
You can opt for a darker or lighter gray depending on your overall decor. For a more modern twist, pair the slats with sleek black fixtures or matte metal accents. During different seasons, add cozy textiles like linen towels or woolen dishcloths to accentuate the rustic look. Smaller kitchens benefit from vertical or herringbone arrangements to maximize visual impact. Feel free to mix and match with other natural elements for a layered, authentic vibe.
Start by choosing weathered gray wood panels or slats, which can be purchased pre-made or DIY’d from reclaimed wood. Measure your space carefully, and cut the slats to fit your backsplash area. Sand and treat the wood with a weathered finish or stain to achieve the desired aged look. Use construction adhesive or nails to secure the slats, ensuring they stay flush and level. Seal the surface with a matte polyurethane to protect against kitchen splashes and stains. For a seamless appearance, consider adding trim or molding at the edges.
Personalize further by distressing some areas yourself with a wire brush or chisel for a more authentic aged effect. Incorporate decorative hooks or floating shelves made of reclaimed wood to display your favorite kitchen tools or vintage accessories. You can also paint subtle accents or stencils to add a unique touch that matches your personality. Adding a soft fabric runner or a vintage rug nearby enhances the cozy, rustic aesthetic. These small touches make the space truly yours.
Weathered gray wooden slats offer a timeless charm that elevates your kitchen’s character. They’re easy to update with accessories and can adapt to changing styles over time. Don’t worry about perfection—imperfections add to the rustic appeal. This approach proves that a little worn-in character goes a long way in creating warmth and authenticity in your home.
12. Chalkboard Wall with Rustic Frame
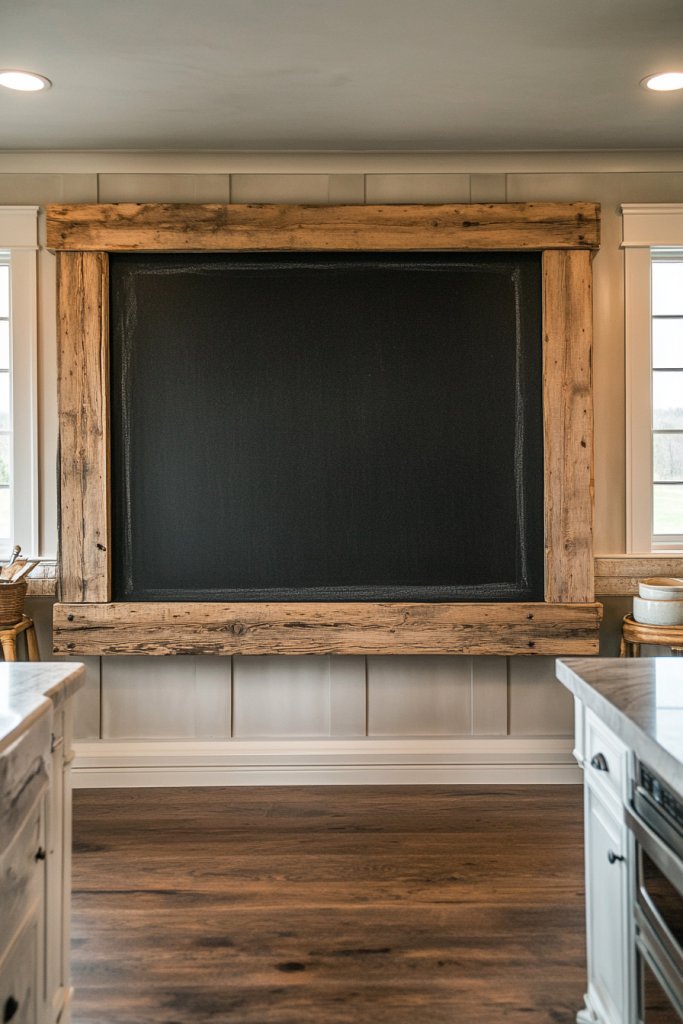
Tired of the same old plain walls in your kitchen? Want a functional and fun way to add personality without cluttering space? A chalkboard wall framed in reclaimed wood might just be your new best friend. It offers a playful canvas for notes, recipes, or doodles, making your kitchen both practical and personal. Plus, it’s a quick upgrade that doesn’t break the bank.
Picture a large rectangle of deep matte black, bordered with rough-hewn, aged wood trim. The chalkboard surface is perfect for chalk sketches, colorful handwriting, or grocery lists. Surround it with vintage-looking brackets or a distressed frame that complements your rustic decor. The texture contrast between the black surface and the rugged wood adds depth and charm. When you write on it, the chalk’s bright colors pop against the dark background, creating a lively focal point.
You can customize the frame with different types of reclaimed wood, from barn wood to pallet slats. For seasonal flair, swap out the chalk and add seasonal messages or artwork. This idea works well in small kitchens as a single feature wall or as a large panel behind the dining area. You could also incorporate magnetic paint underneath for added versatility, allowing you to attach notes or photos with magnets. The chalkboard can be painted directly onto a wall or on a removable panel for flexibility.
Begin by selecting a wall space that’s easily accessible and visible. Prepare the surface by cleaning thoroughly and repairing any cracks or uneven spots. Apply a high-quality chalkboard paint, following manufacturer instructions, and let it cure fully. Frame the painted area with reclaimed wood trim, attaching it securely with nails or brackets. For a rustic touch, leave the wood in its natural state or stain it lightly. Keep chalk and erasers nearby, stored in a vintage tin or small crate for added charm. Regularly clean the surface with a damp cloth to maintain clarity.
Add personalized touches by engraving or carving initials or quotes into the wood frame. Use colorful chalks or chalk markers to make your messages pop. Incorporate small shelves within the frame to hold chalk, brushes, or tiny decorative items. You could also paint seasonal motifs or patterns on the frame to match holidays or themes. This space becomes a canvas for your creativity, making everyday routines more fun and engaging.
A chalkboard wall turns your kitchen into a creative hub, encouraging family interactions and personal expression. It’s an easy way to keep important notes front and center while adding rustic charm. Plus, it’s easily changeable, so your decor stays fresh without extra effort. This idea shows that simple DIY touches can make a big impact and truly personalize your space.
13. Mosaic Pebble Tile in Natural Tones
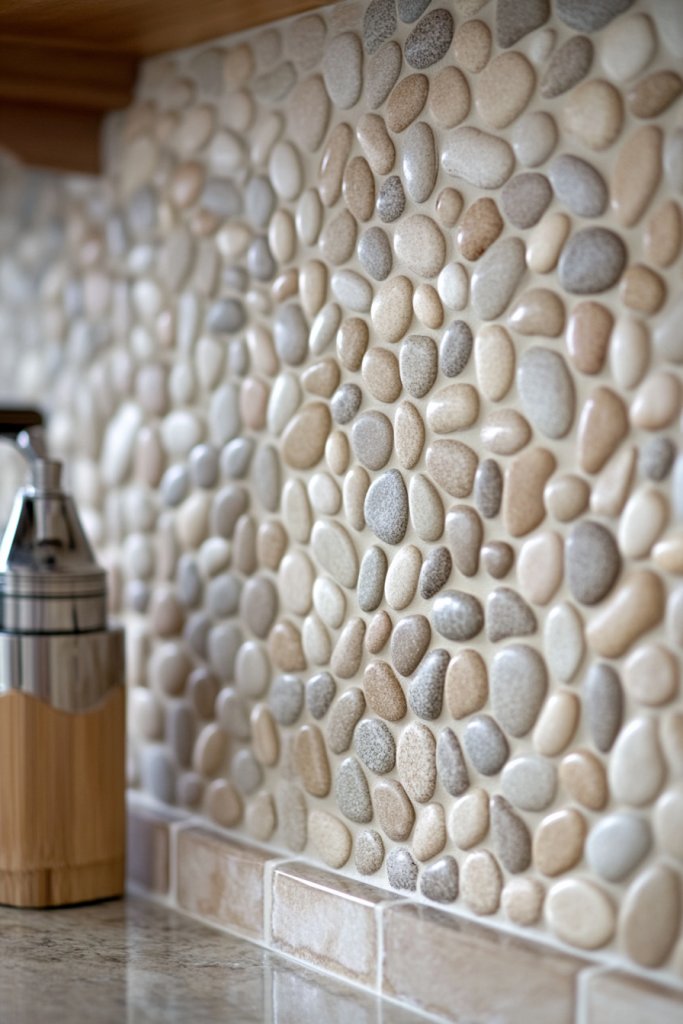
Looking for a backsplash that adds texture and earthy vibes? Mosaic pebble tiles in natural tones are a fantastic choice to bring a touch of nature indoors. They create a calming, organic feel that complements rustic and farmhouse styles. If your current backsplash feels flat or uninspired, this option will inject some personality and grounding energy into your kitchen.
Imagine small, rounded stones in shades of beige, gray, and soft browns, arranged in a mosaic pattern. The uneven surfaces catch the light, creating subtle shadows and highlights. When installed, they resemble a flowing riverbed or a pebble beach, adding a tactile dimension. The natural hues blend effortlessly with wooden accents, neutral cabinetry, and vintage fixtures, creating a cozy and inviting atmosphere. The textured surface invites touch and adds depth to your space.
Choose larger or smaller pebbles depending on your style preference. For a more modern look, opt for uniform pebble sizes and a sleek grout line. Seasonal decor can be layered with textiles like burlap or linen curtains. These tiles work well in both small and large kitchens and can be combined with other natural materials like wood or clay. For outdoor-inspired themes, add small plants or potted herbs nearby to enhance the earthy feel.
Start by selecting a high-quality mosaic pebble tile sheet with your preferred tones. Measure your backsplash area accurately and prepare the wall surface by cleaning and priming. Apply a flexible adhesive designed for natural stone tiles, and carefully press the pebbles into place, following the pattern. Use spacers or a level to keep grout lines even. Once set, fill the gaps with a neutral, waterproof grout, ensuring it’s worked into all crevices. Seal the tiles with a penetrating sealant to protect against stains and moisture. Finish by cleaning excess grout and buffing the surface for a natural, matte finish.
Create a focal point by arranging pebbles in a specific pattern or shape, such as a flower or heart. Mix different shades of natural stones for a more dynamic look. Incorporate small, decorative accents like shells or glass fragments within the mosaic for added interest. Use textured or matte finishes on grout to enhance the organic feel. Complement the backsplash with rustic wooden shelves or open storage to display your favorite cookware or vintage jars.
Mosaic pebble tiles bring a unique, natural charm that elevates your kitchen’s ambiance. They’re durable and timeless, blending beauty with practicality. The textured surface adds tactile interest and invites family and guests to touch and explore. This approach proves that nature-inspired design creates a peaceful, grounding environment perfect for everyday living.
14. Whitewashed Brick Pattern with Exposed Mortar
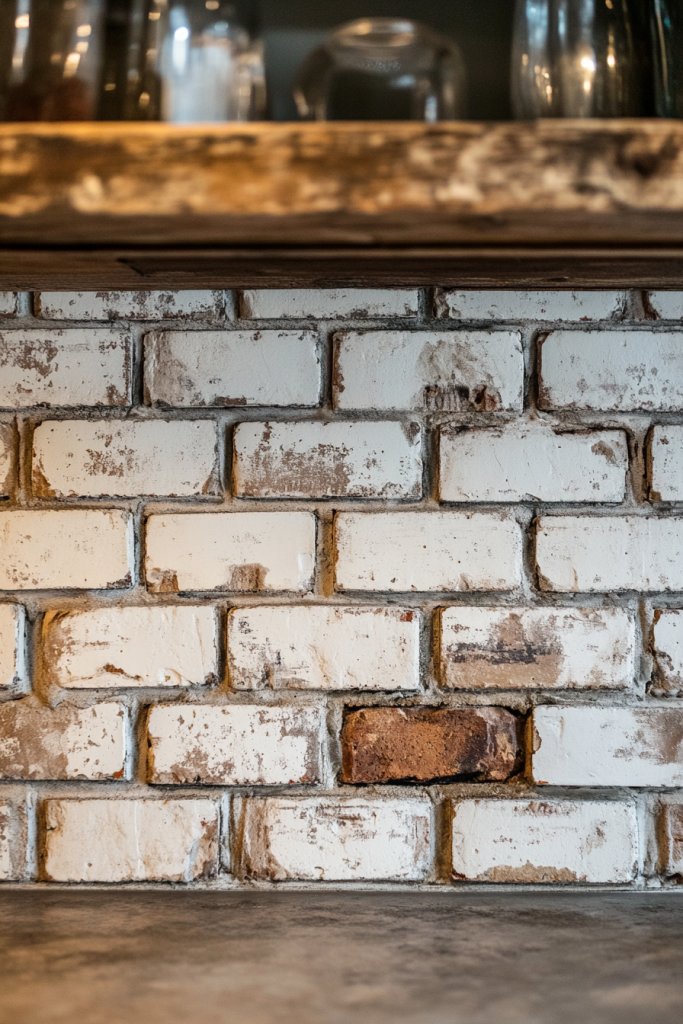
Does your current backsplash lack character and a bit of vintage charm? Whitewashed brick with exposed mortar offers an effortlessly rustic, industrial vibe that’s both stylish and timeless. It’s perfect for those who want a hint of farmhouse appeal without going overboard. If you’re craving a textured, warm backdrop that pairs well with both modern and vintage accents, this might be your ideal solution.
Visualize a wall of classic brick, painted in a soft, chalky white, with the mortar lines left exposed to add contrast. The uneven surface and rough edges create a tactile, layered look that adds depth to the space. When illuminated, the textured bricks cast gentle shadows, enhancing their rustic appeal. This pattern pairs beautifully with distressed wood cabinets, vintage fixtures, and soft textiles, creating a cozy, industrial farmhouse aesthetic. The overall effect is warm, inviting, and full of character.
Adjust the degree of whitewashing or leave some bricks partially unpainted for a more distressed look. For a brighter, more contemporary feel, choose very white or even slightly grayish tones. During different seasons, you can layer textiles or decorative elements that echo the color palette. This pattern works well in open-concept kitchens or small spaces, giving the illusion of added depth and texture. It complements both sleek modern appliances and vintage accessories for a balanced look.
Begin by sourcing or preparing brick veneer panels or real bricks. Clean and repair the surface to ensure adhesion. Apply a whitewash mixture made from white latex paint and water, brushing it onto the bricks and wiping off excess for a distressed appearance. For authentic exposed mortar, carefully remove sections of old mortar or use pre-formed panels. Seal the surface with a breathable, matte finish to prevent moisture damage. Install with construction adhesive or mortar, ensuring alignment and levelness. Finish with a protective sealant if desired.
Add vintage or distressed metal fixtures or shelving to enhance the industrial vibe. Incorporate decorative signs or reclaimed wood accents for extra character. Play with different whitewash techniques—like sponging or dry brushing—for varied textures. For a softer look, layer with cozy textiles or add a small indoor herb garden nearby to bring life into the space. Personal touches like these make the backsplash a true reflection of your style.
Whitewashed brick with exposed mortar offers a perfect blend of rustic warmth and industrial edge. It’s a versatile backdrop that adapts to many decor styles and seasons. The textured surface adds visual interest without overwhelming the space. This timeless look proves that a simple, aged finish can transform your kitchen into a cozy, character-filled haven.
15. Vintage Wire Mesh and Salvaged Tin Accents
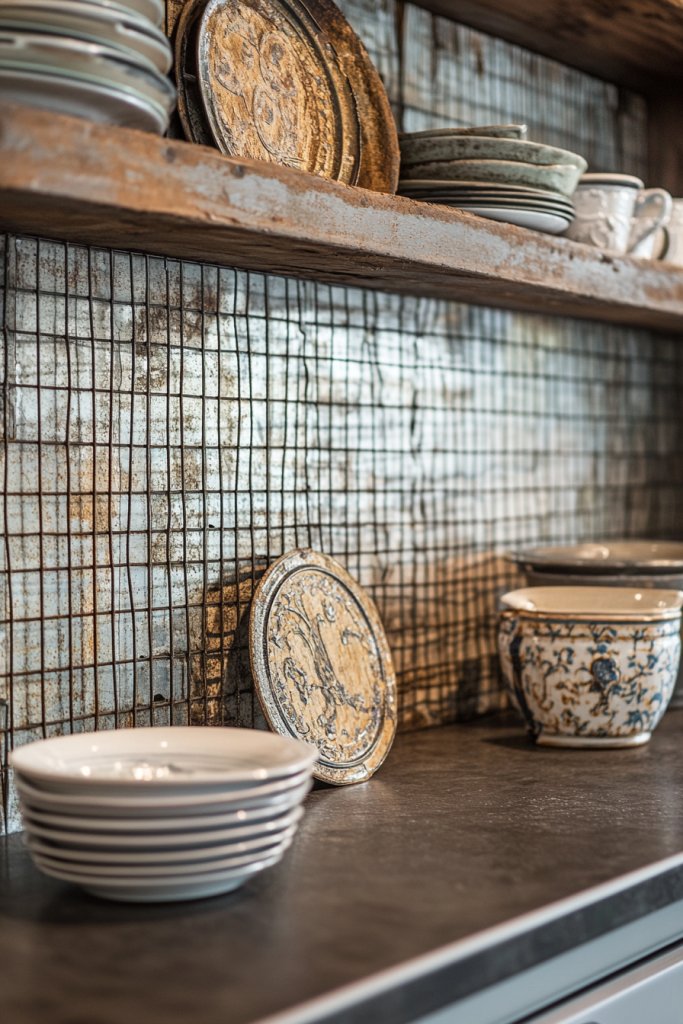
Looking for a backsplash that feels handcrafted and full of character? Combining vintage wire mesh with salvaged tin accents delivers a DIY-inspired look that’s both rustic and industrial. It’s perfect for adding texture and a sense of history to your kitchen. If you love the idea of repurposing and creating a one-of-a-kind feature wall, this idea is right up your alley.
Picture a section of wall covered with a rustic wire mesh, weathered and slightly oxidized for authenticity. Attached to it are salvaged tin pieces with embossed patterns, painted or left in their natural aged state. The contrast between the open, grid-like wire and the detailed metal accents creates a layered, textured effect. This setup resembles a vintage workshop or farm shed, adding depth and visual interest. The metals catch light differently, giving a dynamic, ever-changing appearance.
Use different types of salvaged tin panels or cut-outs to match your personal style. Incorporate hooks or small shelves made of reclaimed wood for practicality and display. For a softer touch, add fabric or burlap accents nearby. This style works well in open kitchens, especially when paired with vintage appliances or distressed cabinetry. Seasonal updates can include adding painted or decorated tin pieces for holidays or special occasions.
Start by sourcing wire mesh and tin accents from salvage yards or online marketplaces. Cut the mesh to size and secure it to the wall using nails or screws, making sure it’s taut and level. Attach tin pieces with small nails or adhesive, arranging them in a pattern or randomly for an eclectic look. To enhance durability, seal the metals with a clear protective coating. You can also add small hooks or containers to turn the backsplash into a functional display area. Regular maintenance involves cleaning with a soft cloth to preserve the patina.
Customize the appearance by painting or distressing the tin accents further. Incorporate personal memorabilia or vintage tools for a curated look. Add lighting fixtures like sconce lamps or under-shelf LEDs to highlight the textured metals. Embellish with hand-painted details or stenciled patterns on the tin for a personalized touch. These accents become conversation starters and showcase your creativity.
Vintage wire mesh combined with salvaged tin accents offers a truly unique, handcrafted aesthetic. It’s a sustainable choice that adds warmth and authenticity. This DIY approach lets you infuse your kitchen with a personal story and a sense of history. Overall, it’s a bold statement that proves rustic charm and creative reuse go hand in hand.
16. Distressed Gray Concrete Look Tiles
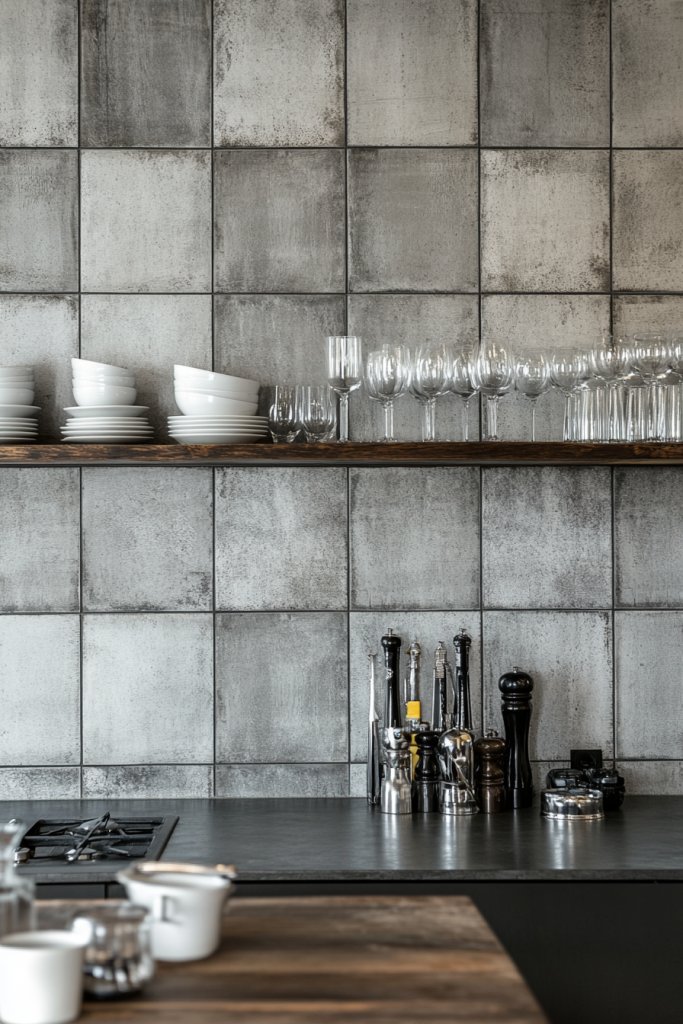
Craving a modern yet rustic backsplash that’s durable and easy to maintain? Concrete-effect tiles in a distressed matte finish strike that perfect balance. They bring an industrial edge softened by their worn look, making your kitchen feel both sleek and cozy. If your current tiles are too shiny or plain, these can add the texture and grit your space needs.
Envision large, rectangle tiles with a matte, concrete-like surface in muted gray tones. The distressed finish features subtle imperfections, like tiny pits and smudges, mimicking aged concrete. When laid out, they create a seamless, monochromatic backdrop that pairs well with brushed metal fixtures and reclaimed wood accents. The textured surface absorbs light, reducing glare and adding depth. The overall aesthetic is raw, modern, with a touch of rustic industrial charm.
Choose lighter or darker shades of gray to match your decor. Combine with textured textiles like wool rugs or linen curtains to soften the industrial vibe. During different seasons, add colorful accessories or textiles to refresh the look. For a more polished appearance, opt for larger tiles with minimal grout lines. These tiles adapt well to both small and large kitchens, especially in open-plan layouts.
Begin by selecting high-quality concrete-look tiles from reputable suppliers. Prepare the wall surface, ensuring it’s clean, flat, and free of grease. Use a flexible adhesive suitable for textured tiles, and lay them in a staggered or grid pattern. Leave consistent grout lines, and choose a neutral grout color like light gray. Apply a stain-resistant sealer to protect the matte finish. Finish by cleaning off excess grout and buffing the tiles for a uniform look. Professional installation is recommended for large areas.
Add visual interest by incorporating decorative borders or contrasting grout colors. Use textured or patterned textiles nearby to enhance the rustic-industrial feel. Incorporate metallic or wood shelving to display your cookware or utensils. Consider adding LED strip lighting underneath upper cabinets for a subtle glow. These simple upgrades make your backsplash both functional and stylish.
Distressed concrete tiles demonstrate that industrial elements can be warm and inviting. They’re highly durable and forgiving of everyday kitchen mishaps. The textured, matte surface reduces fingerprints and smudges, keeping your space looking fresh longer. This choice underscores that rustic charm can be modern and practical at the same time.
Conclusion
With such a diverse range of farmhouse kitchen backsplash ideas, there’s no limit to the charm you can bring into your home. Whether you choose rustic wood, vintage tiles, or unique stone patterns, these designs will add warmth and personality to your space. Don’t hesitate to try out these ideas and make your kitchen a beautiful reflection of rustic elegance—your perfect farmhouse retreat awaits!
Leave a Reply