Ever wondered how a simple wall can completely redefine the vibe of a room? DIY accent walls have skyrocketed in popularity because they offer a cost-effective, personalized way to add character, color, and texture to any space—without the need for a full renovation. Whether you’re craving bold patterns, rustic charm, or subtle sophistication, creating your own accent wall allows you to showcase your style while enjoying the satisfaction of a hands-on project.
In this article, you’ll discover a treasure trove of inspiring ideas and practical tips to transform any room with a DIY accent wall. From eye-catching paint techniques and trendy wallpaper options to textured finishes and creative decor accents, there’s something for every taste and skill level. Get ready to unleash your creativity and turn blank walls into stunning focal points that reflect your personality and elevate your home’s design!
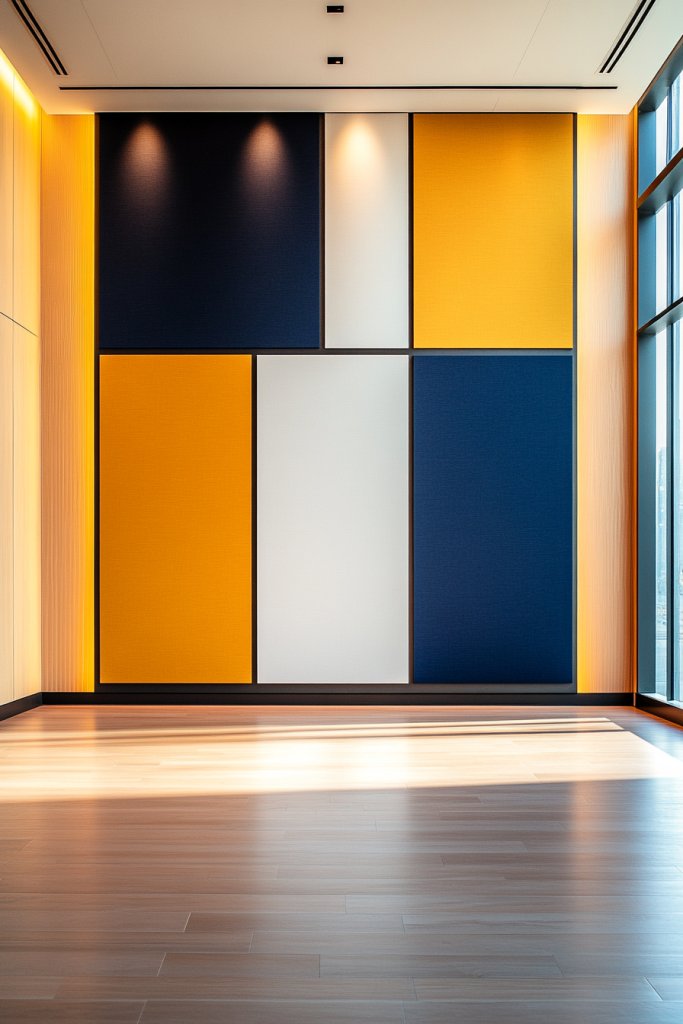
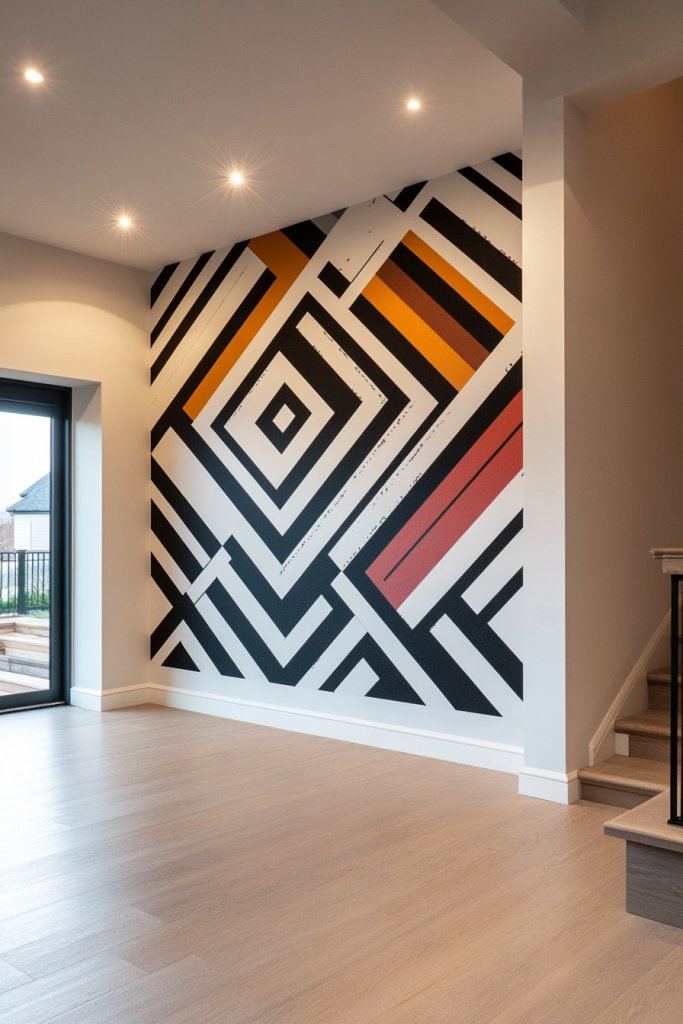
1. Bold Geometric Paint Patterns for a Modern Look
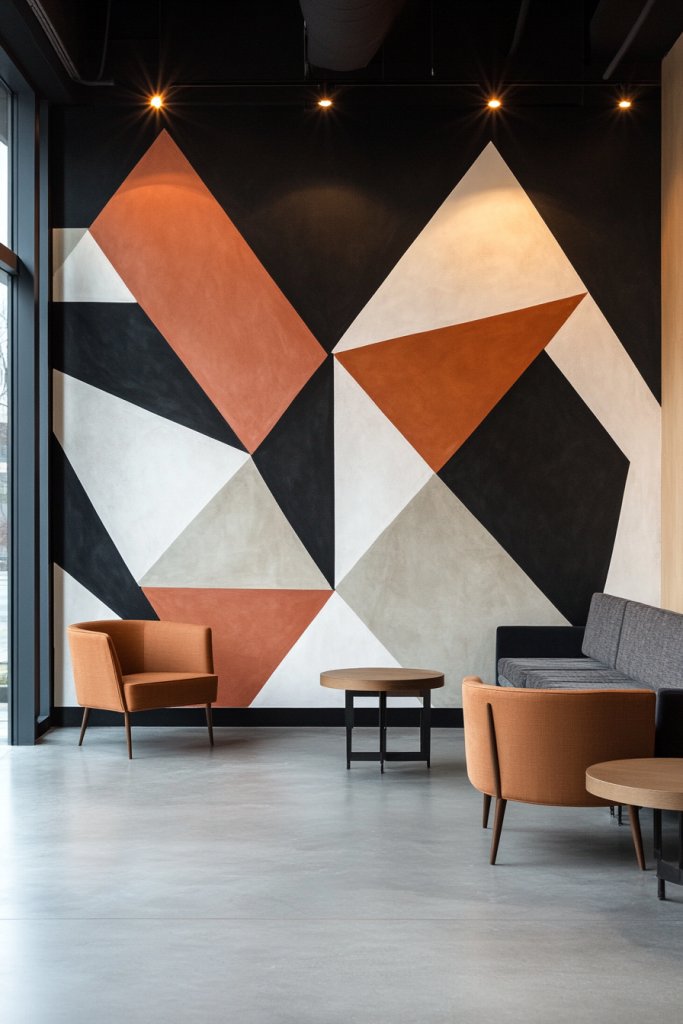
A bold geometric painted accent wall instantly injects contemporary flair into any space, making a striking statement that’s impossible to ignore. This design transforms a plain wall into a work of art, elevating your room’s style with minimal fuss.
Imagine a wall decorated with sharp, angular shapes in contrasting colors like deep navy, crisp white, and soft blush. The patterns might include triangles, diamonds, or hexagons, carefully painted to create a seamless, cohesive look.
The textured edges of the shapes add depth, while the clean lines keep everything looking sleek and modern. The overall effect is dynamic and eye-catching, with a visual rhythm that energizes the room.
The matte or semi-gloss finish enhances the boldness, and the contrast can make your furniture and accessories pop even more. To create this look yourself, start by choosing your color palette and sketching your design lightly with a pencil or painter’s tape for precision.
Use painter’s tape to mask off sharp edges, then fill in the shapes with your selected paints—such as Benjamin Moore’s or Farrow & Ball’s popular shades. For a beginner-friendly approach, opt for pre-cut geometric stencils or painter’s tape to ensure clean lines.
Work in sections, allowing each to dry before removing tape, and finish with a quick touch-up if needed. This project is accessible for most DIYers with patience and a steady hand.
2. Reclaimed Wood Paneling for Rustic Charm
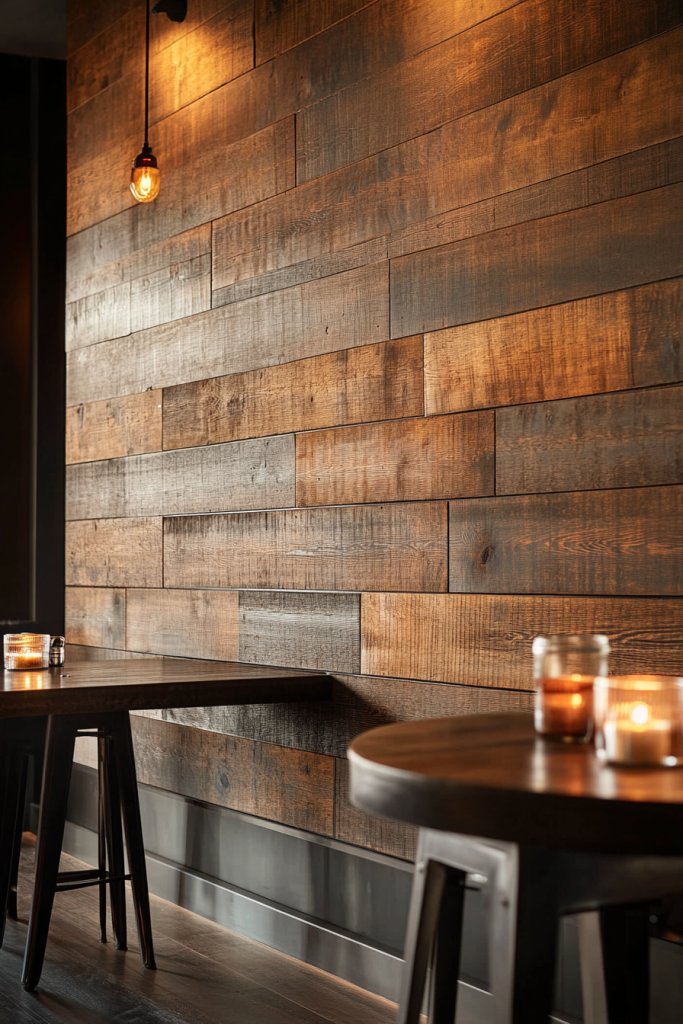
Reclaimed wood paneling offers a warm, inviting rustic look that instantly adds character and cozy charm to any space. This natural material brings texture and history into your home, creating a timeless accent wall full of visual interest.
Picture a wall covered in weathered, vintage wood planks in shades of warm browns, soft greys, and hints of moss green, arranged horizontally or vertically. Each piece has unique knots, grain patterns, and imperfections that tell a story, adding authenticity and depth.
The rough texture of the wood contrasts beautifully with smooth, modern furnishings, creating a balanced blend of rustic and contemporary styles. The scent of aged wood and the tactile experience of the uneven surface evoke a sense of history and craftsmanship, making your space feel grounded and inviting.
To DIY this look, source salvaged or reclaimed wood from local suppliers, salvage yards, or online marketplaces. Measure your wall space and cut the wood planks to size, sanding edges slightly if needed for safety.
Attach the boards securely using nails or a nail gun, ensuring they are flush and level. For a budget-friendly alternative, consider pre-finished faux reclaimed wood panels or peel-and-stick versions that mimic the texture and appearance.
Finish with a light coat of protective sealant or clear stain to enhance the wood’s natural beauty and longevity. This project is ideal for those willing to invest some time but offers remarkable visual payoff.
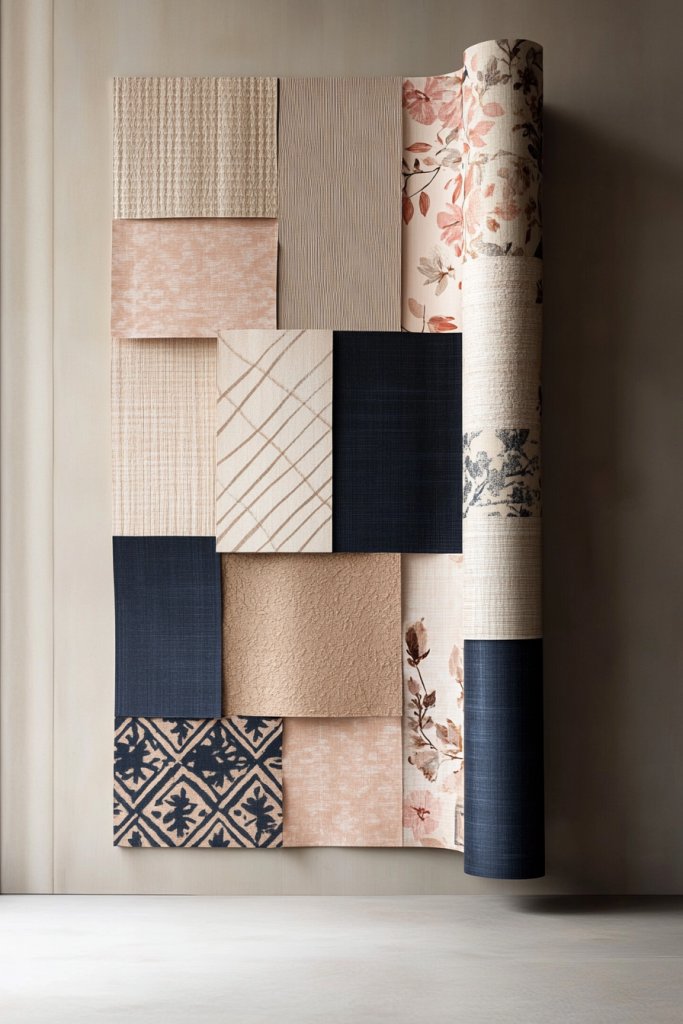
3. Peel-and-Stick Wallpaper in Trendy Prints
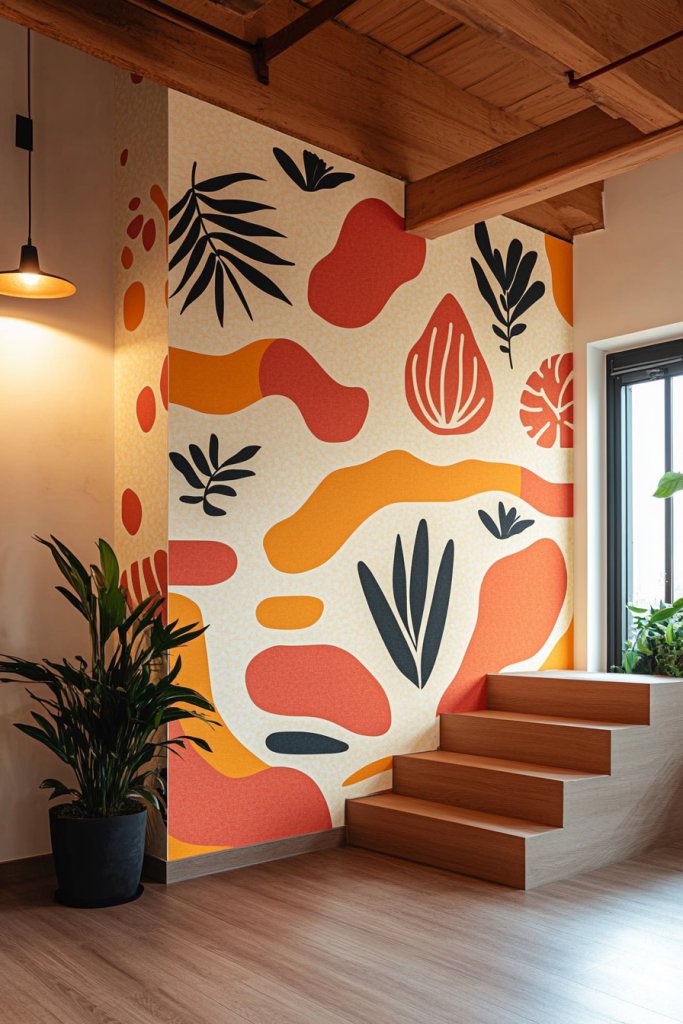
Peel-and-stick wallpaper is a game-changer for creating a bold accent wall without the mess of traditional wallpapering. It offers an easy, removable way to introduce trendy patterns and vibrant colors into your space with minimal effort and commitment.
Visualize a wall adorned with a lively, modern print—think geometric shapes, tropical leaves, or abstract art in shades of emerald green, blush pink, or metallic gold. The peel-and-stick material is smooth and flexible, conforming easily to walls, even around corners and outlets.
It has a slightly textured surface that mimics fabric or painted finishes, adding depth and sophistication. When applied, it creates a seamless, striking focal point that instantly updates your room’s style, perfect for renters or those who love to change decor frequently.
To install, start by cleaning your wall thoroughly to ensure smooth adhesion. Measure and cut the wallpaper panels with a slight overhang for trimming.
Peel off the backing and carefully press the paper onto the wall, smoothing out bubbles with a squeegee or credit card. For added precision, use a level and a sharp utility knife for trimming edges.
Popular brands like Chasing Paper or Wallsauce offer a wide variety of trendy designs at affordable prices. This DIY project is straightforward, requiring only basic tools and patience, making it accessible even for beginners.
4. DIY Fabric Wall Coverings for Texture and Warmth
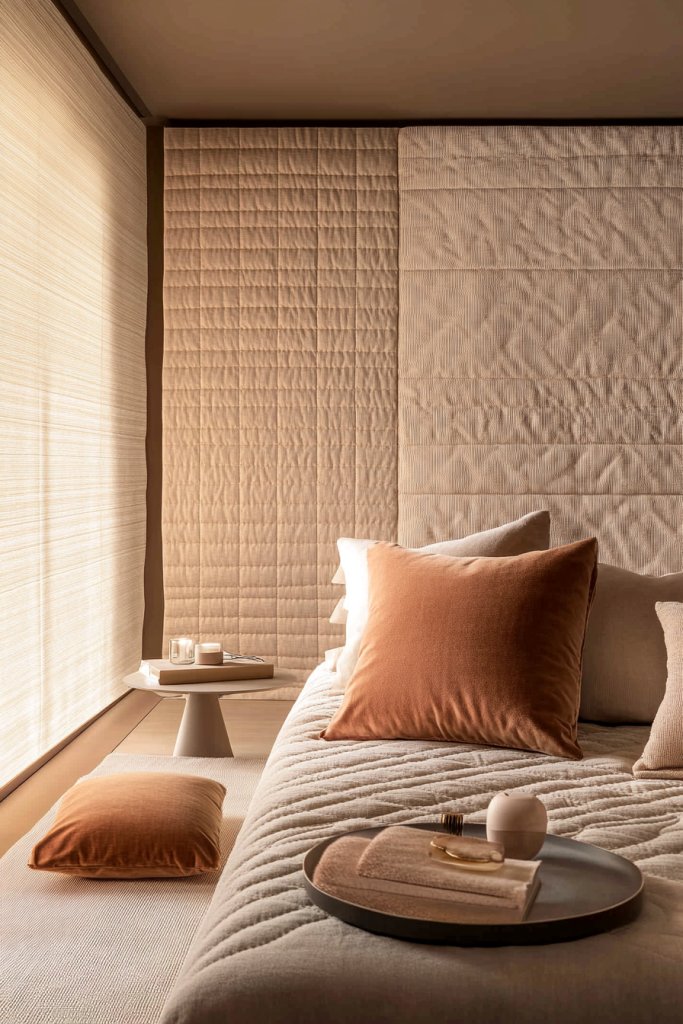
Adding fabric to your accent wall introduces softness, warmth, and a touch of luxury that transforms a plain surface into a cozy haven. This versatile idea allows you to play with textures, colors, and patterns to match your personal style.
Imagine a wall draped with a large, plush velvet or linen fabric in a soothing color like blush, cream, or deep emerald. The fabric is stretched smoothly across the wall, secured with double-sided tape, adhesive spray, or a simple curtain rod system at the top for a more structured look.
The tactile quality of the fabric invites touch, and the gentle drape adds visual softness, making the room feel more inviting. Accents like decorative pillows or throws placed nearby enhance the tactile experience, while the fabric’s scent adds to the cozy ambiance.
To DIY this feature, choose a fabric that complements your decor and measure your wall. Use a spray adhesive or double-sided mounting tape to attach the fabric securely, starting from the top and smoothing downward to prevent wrinkles.
For a more polished look, add a decorative trim or piping along the edges. If you prefer a more permanent solution, staple the fabric to a wooden frame or attach it with curtain rings.
Consider using washable or dry-cleanable fabrics for easy maintenance. This approach is budget-friendly, adaptable, and perfect for those wanting to add warmth and texture without major renovations.
5. Color Block Wall Painting for a Striking Statement
Color blocking creates a bold, contemporary look by dividing your wall into large, contrasting color sections, adding visual interest and modern flair. It’s a simple yet impactful way to elevate your space with a splash of personality.
Visualize a wall painted with large blocks of color—perhaps a deep navy on one side and a bright coral on the other, separated by crisp, clean lines. The edges can be sharp geometric divisions or slightly softer, irregular shapes for a more artistic vibe.
The colors can be matte or semi-gloss, depending on your preferred finish, and the overall effect is vibrant and energetic. The bold contrasts draw the eye and can make even small rooms feel dynamic and lively, while the clean lines contribute to a polished, modern aesthetic.
To implement, start by sketching your design with painter’s tape or light pencil markings. Use painter’s tape to mask off the sections—apply tape carefully to achieve sharp, straight edges.
Paint each section with your chosen colors, such as Benjamin Moore’s or Sherwin-Williams’ hues, allowing each to dry thoroughly before removing the tape. For a more artistic look, experiment with irregular shapes or asymmetrical patterns.
This project is accessible for DIYers at all skill levels, requiring basic painting supplies and patience. The result is a stunning, customizable accent wall that instantly transforms your space into a modern masterpiece.
6. Chalkboard Paint Wall for Functional Art and Notes

A chalkboard paint wall is a versatile and playful way to add an interactive element to any space, blending practicality with creative expression. It’s perfect for family kitchens, home offices, or kids’ playrooms where notes, reminders, or doodles can change daily.
This idea turns a blank wall into a dynamic canvas that invites spontaneous art and organization, making it both functional and fun. Imagine a large section of wall coated in matte black chalkboard paint, offering a smooth surface for chalk markings.
The textured finish contrasts with surrounding smooth walls, adding visual interest. You might see handwritten grocery lists, inspiring quotes, or whimsical chalk drawings that shift over time.
The space feels lively, personalized, and ready for daily updates, with the scent of fresh paint lingering subtly in the air until fully cured. To create your own chalkboard wall, start by choosing the right chalkboard paint—available in various finishes and colors.
Use painter’s tape to outline your designated area, then apply 2-3 coats with a roller, allowing drying time between layers. Once dry, prime the surface with chalk by rubbing the side of a chalk piece over it and erasing.
Keep a box of colorful chalk nearby for easy updates. For a less permanent option, peel-and-stick chalkboard decals are a quick alternative that can be removed without damage.
7. Vintage Tile Mosaics for an Eclectic Vibe
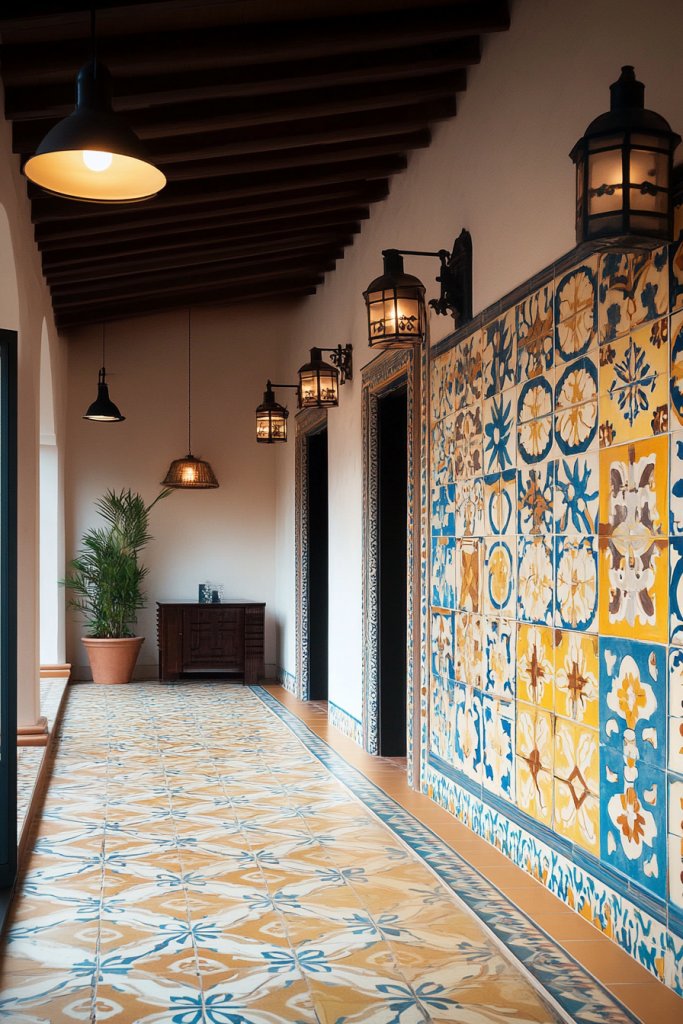
A vintage tile mosaic brings a burst of color, texture, and personality to any accent wall, transforming a plain surface into a captivating focal point. This idea is ideal for adding character to kitchens, bathrooms, or entryways, especially when you love a mix of patterns and history in your decor.
It’s a creative way to showcase craftsmanship and nostalgic charm in a modern home. Picture a wall covered in an array of small, irregularly shaped vintage ceramic tiles—think faded blues, warm terracotta, and crisp white—arranged in a seemingly random, yet carefully curated pattern.
The tiles have textured surfaces, some glazed, others matte, giving the wall a tactile richness. Grout lines are intentionally uneven, emphasizing the handcrafted feel.
The mosaic exudes eclectic warmth, echoing old-world charm, and invites curious glances and tactile exploration. To DIY this look, gather vintage or reclaimed tiles from flea markets, thrift stores, or online sources.
Plan your layout on paper first, then apply a strong adhesive like thinset mortar directly to the wall with a notched trowel. Carefully press each tile into place, leaving slight gaps for grout.
Once set, fill the gaps with a contrasting grout—white or dark—to enhance the mosaic’s details. Seal the finished surface for durability, and enjoy your nostalgic, artful wall.
8. Textured Plaster or Stucco Finish for Depth
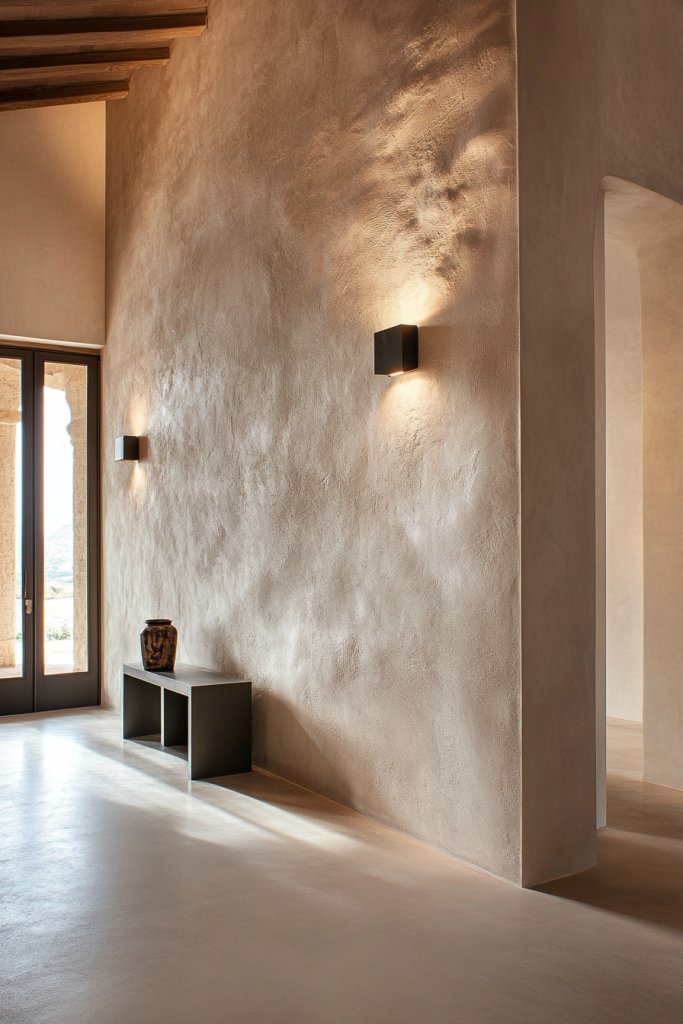
A textured plaster or stucco wall adds instant depth and tactile interest, creating a sophisticated yet earthy backdrop for any room. This technique works beautifully in spaces where you want a subtle, artistic variation in surface and light reflection, such as living rooms or bedrooms.
Its organic feel lends a timeless, artisanal quality that elevates simple walls into works of textured art. Visualize a wall coated in a slightly rough, matte plaster with gentle swirls and ridges that catch the light differently throughout the day.
The surface has a soft, tactile finish—like a hand-pressed clay or natural stone—offering a warm, inviting vibe. The color palette might range from warm beige to cool gray depending on your choice of pigment.
The textured surface invites touch and adds visual complexity, making the space feel layered and cozy. To DIY, start by mixing a pre-mixed plaster or stucco compound according to the manufacturer’s instructions.
Use a trowel or sponge to apply it unevenly across the wall, creating ridges, swirls, or stipples. For more control, use a stencil or a textured sponge to add patterns.
Finish with a sealant or matte topcoat if desired. This technique requires patience but delivers a rich, handmade aesthetic that transforms plain walls into textured masterpieces.
9. DIY Stenciled Wall Designs for Intricate Details

Stenciling is a fantastic way to add detailed, repetitive patterns or motifs to your accent wall without professional help. This method allows for precision and customization, making it perfect for creating a vintage, boho, or modern look depending on your chosen design.
It’s accessible for DIY enthusiasts eager to craft intricate details that elevate their space. Imagine a wall covered in delicate floral, geometric, or ornate damask patterns, all created with stencils.
The design can be monochromatic for subtle elegance or colorful for bold impact. The crisp edges of the stenciled shapes contrast with plain areas, creating a rhythmic visual flow.
The finished wall feels personalized and refined, adding a sense of craftsmanship and style that’s uniquely yours. Begin by selecting a stencil that suits your aesthetic—many are available online or can be custom-made.
Secure the stencil to the wall with painter’s tape, and use a stencil brush or sponge with minimal paint to dab over the cutouts, avoiding drips. Repeat the pattern across the wall in a planned layout, taking care to align edges for consistency.
Once dry, remove the stencil, and touch up any smudges. Seal if needed, and enjoy your detailed, artisan-inspired accent wall.
10. Metallic Foil Accents for a Glamorous Touch
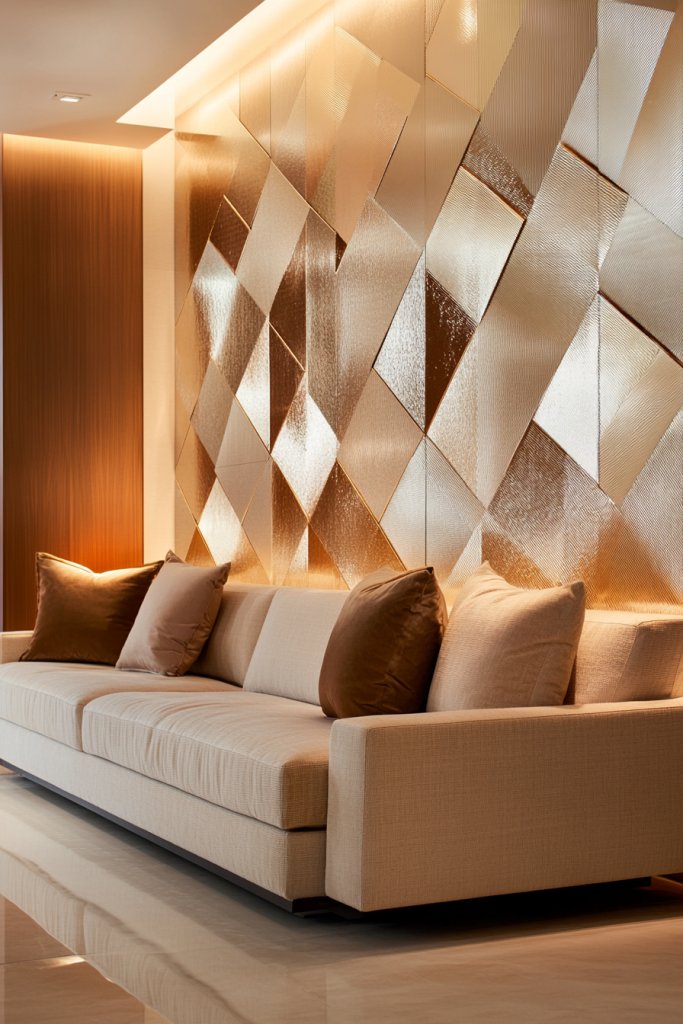
Metallic foil accents are a striking way to add shimmer and sophistication to your accent wall, making it stand out with a luxe, glamorous vibe. This technique works well in modern, art deco, or eclectic interiors where a touch of shine enhances the overall aesthetic.
It’s perfect for those who want a little drama without overhauling their entire space. Picture a wall where certain sections or patterns are highlighted with gold, silver, or rose gold foil.
The metallic surface reflects light beautifully, creating a dynamic play of brightness and shadow. The textured foil contrasts with matte paint or textured finishes, adding depth and a high-end feel.
This shimmering detail can be applied in geometric shapes, stripes, or random patches for a contemporary, eye-catching effect. To DIY, prepare your wall with a base coat of paint or textured finish.
Cut metallic foil sheets to your desired shapes or sizes, then use an adhesive spray or specialized foil adhesive to carefully apply the foil onto the designated areas. Smooth out air bubbles with a squeegee or cloth.
Once set, you can add additional layers or seal for durability. This simple yet impactful method transforms a plain wall into a captivating feature with a touch of luxury.
11. Fabric or Tapestry Wall Hangings for Softness and Style
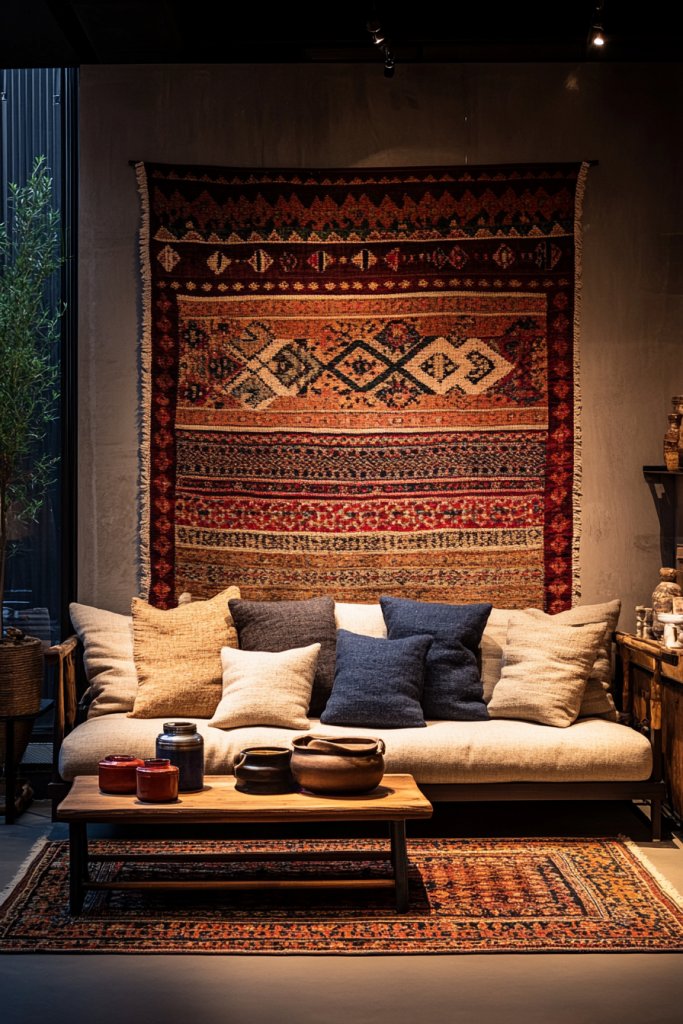
Transforming a plain wall into a cozy focal point is effortlessly achieved with fabric or tapestry wall hangings. These soft, textured pieces add warmth and personality to any room, turning an otherwise stark surface into a statement of style.
They’re perfect for creating a boho-chic, eclectic, or even modern aesthetic, depending on your choice of textiles. Imagine a large, woven tapestry with intricate geometric patterns in warm earth tones like terracotta, cream, and deep brown hanging gracefully from a wooden dowel.
The fabric’s soft fibers invite touch, while the layered textures introduce depth and visual interest. As you step into the space, you’re greeted by the gentle rustle of fabric, adding a subtle sensory dimension.
The wall becomes a vibrant backdrop that softens the room’s atmosphere and invites relaxation. Getting started is simple and budget-friendly.
Select a fabric or tapestry that resonates with your style—consider DIY options with a large piece of patterned cotton or linen, or repurpose an old woven blanket. Attach it to a wooden dowel or curtain rod using clips or a sewn pocket, then hang it on your wall with picture hooks.
For an added personal touch, embellish the edges with tassels or fringe, and choose colors that complement your existing decor. No special skills are needed—just a bit of creativity and ease.
12. DIY Wall Shelves with Decorative Items
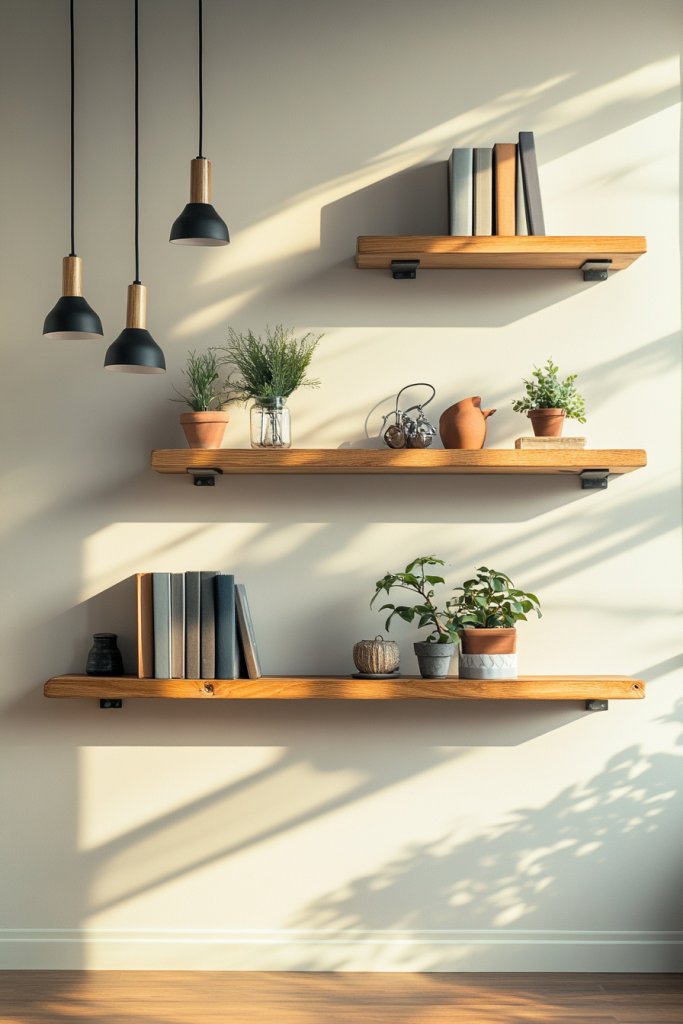
Adding DIY wall shelves is a fantastic way to introduce both function and style to your accent wall. These open shelves provide space for displaying decorative objects, books, or plants, transforming a blank wall into a curated gallery that reflects your personality and taste.
Picture sleek, floating wooden shelves in a warm oak finish, mounted at varying heights to create visual rhythm. On these shelves, you might place a collection of vintage cameras, small potted succulents, or framed photographs.
The shelves themselves add a layer of architectural interest, while the decorative items evoke a lived-in, personalized vibe. The overall effect is a dynamic, layered look that feels both intentional and inviting.
To craft your own, start with simple wooden planks or pre-made floating shelf kits available at hardware stores. Measure and mark where each shelf will go, using a level for precision.
Secure the brackets or mounting hardware to the wall with a drill and anchors if needed, then place the shelves on top. Decorate with your favorite objects—think ceramic vases, candles, or framed art—keeping a balance between clutter and cohesion. With just basic tools and a bit of planning, you can create an eye-catching display that elevates your space.
13. Wainscoting or Beadboard for Classic Elegance
Wainscoting and beadboard are timeless wall treatments that lend a sense of refined elegance to any room, making them perfect for creating a sophisticated accent wall. These paneling techniques add depth, texture, and architectural interest, elevating your space from simple to stylish.
Visualize a crisp, white beadboard wall with narrow vertical planks that extend halfway up the wall, topped with a sleek chair rail. The subtle ridges and grooves catch the light differently throughout the day, creating a soft, textured appearance.
The look is classic yet versatile, fitting seamlessly into traditional, farmhouse, or even contemporary interiors. This approach instantly makes the space feel more polished and thoughtfully designed.
Getting this look is straightforward with some basic materials: pre-cut beadboard panels or tongue-and-groove planks, adhesive, and nails or screws. Measure your wall, cut the panels to size if needed, and attach them securely to the wall using a level to keep everything straight.
Finish with paint or stain—white is a popular choice for a clean, fresh look, but bold colors can add modern flair. For DIY ease, consider using adhesive panels that don’t require nailing, making the project more accessible for beginners. With patience and attention to detail, you’ll achieve a stunning, artisanal-quality wall that transforms your room’s entire ambiance.
14. String Light Backdrop for Cozy Ambiance
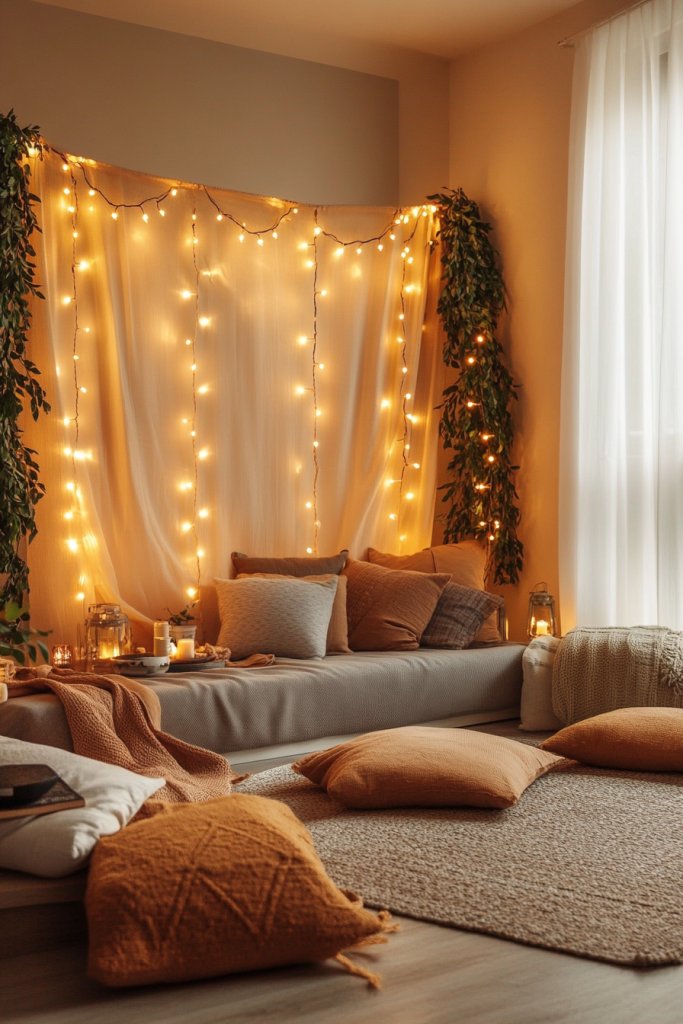
Creating a string light backdrop is an easy and enchanting way to add warmth and ambiance to your accent wall, perfect for bedrooms, living rooms, or even outdoor spaces. This soft glow transforms the wall into a captivating focal point that feels inviting and magical.
Picture a wall draped with warm white fairy lights arranged in a gentle zigzag or cascading pattern. The tiny bulbs emit a cozy, golden glow that bathes the room in a relaxing atmosphere.
Complement the lights with sheer curtains or a lightweight fabric backdrop to diffuse the glow, or hang the lights directly on the wall for a minimalist look. The result is a dreamy, romantic setting that’s ideal for unwinding or entertaining guests.
To DIY this look, gather string lights with LED bulbs—choose warm white for a classic feel or colored options for fun and vibrancy. Use hooks, clips, or thumbtacks to secure the lights along the wall, creating your preferred pattern.
For added softness, hang a sheer curtain or lightweight fabric panel behind the lights, attaching it with clips or push pins. This project requires minimal tools and can be completed in under an hour. It’s a flexible, budget-friendly way to instantly elevate your space, especially for special occasions or cozy nights in.
15. Faux Brick or Stone Wall Using Wall Panels
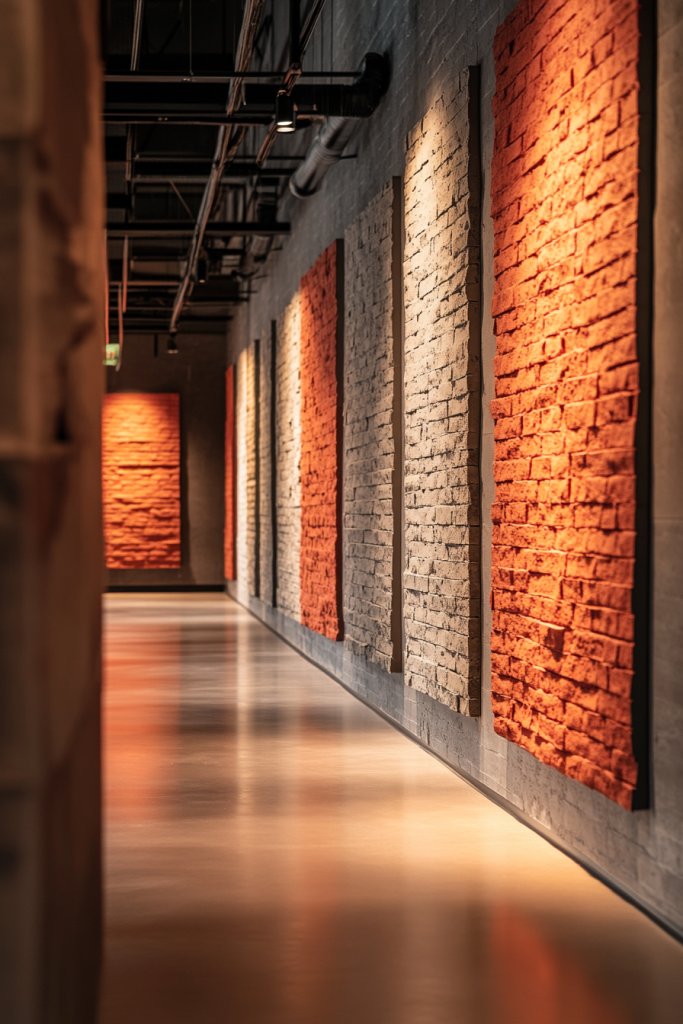
Achieving the look of a rustic brick or stone wall without the hefty price tag or heavy lifting is now simpler than ever with faux wall panels. These panels instantly add texture and character, transforming an ordinary wall into a striking feature with minimal effort.
Picture a section of your wall covered with realistic-looking faux brick panels in a classic red hue, or textured stone panels in cool gray tones. The panels interlock easily, creating a seamless, authentic appearance that adds depth and visual interest.
The tactile surface invites touch, while the rugged aesthetic lends a timeless, industrial vibe to the space. This faux stone or brick backdrop pairs beautifully with modern, industrial, or farmhouse decor, giving your room a bold, textured focal point.
Start by measuring the area you want to cover, then purchase faux brick or stone panels—these are lightweight and easy to cut with a utility knife if needed. Clean the wall surface thoroughly, then apply adhesive or use interlocking system according to the manufacturer’s instructions.
Press the panels firmly into place, ensuring a snug fit, and seal the edges with caulk or grout if necessary. Finish by painting or sealing, if desired, to enhance realism. This DIY project is quick, affordable, and offers a dramatic transformation that elevates your entire space with minimal hassle.
16. Overlapping Wallpaper Strips for a Patchwork Effect
Transform your wall into a vibrant tapestry by overlapping strips of wallpaper for a fun, eclectic patchwork look. This technique adds depth and visual interest, perfect for creating a focal point in any room.
It’s especially effective in spaces that benefit from a playful, personalized vibe, like a creative studio or a lively living room. Imagine a collage of patterned wallpaper strips layered unevenly, with edges that curl slightly at the corners, revealing glimpses of the wall beneath.
You might choose mismatched prints—florals, geometric designs, or textured faux finishes—in a cohesive color palette like blush pinks, navy blues, and warm neutrals. The overlapping creates a textured, layered appearance that feels both spontaneous and curated, with a tactile richness and a slightly bohemian charm.
The room feels lively and inviting, with a visual story told through the varied patterns and textures. To achieve this look, start by selecting your favorite wallpaper patterns and cutting them into strips of varying widths—about 4 to 8 inches wide.
Use a strong adhesive or removable wallpaper strips to attach them, overlapping each strip slightly over the previous one. Work from the bottom up or from one side, making sure the overlaps are even and secure.
For a less permanent option, opt for peel-and-stick wallpaper, which allows you to layer without damaging the wall. Finish with a clear sealant if you want a more durable, slightly glossy finish. This project is beginner-friendly and customizable to suit your space and style.
17. Adhesive Vinyl Decals for Customizable Art
Adhesive vinyl decals are a quick and versatile way to personalize your accent wall with custom designs, quotes, or intricate patterns. They offer a clean, modern look without the mess of traditional painting, making them ideal for renters or those seeking a semi-permanent solution that’s easy to update.
Picture a sleek wall adorned with crisp, colorful decals—geometric shapes, botanical motifs, or inspiring words—applied with precision. The decals are made from durable, matte or glossy vinyl, and can be cut into virtually any shape or design.
They cling smoothly to the wall surface, creating a seamless appearance that looks professionally done. The visual impact is striking, with sharp lines and vibrant colors that pop against neutral or bold backgrounds.
This method allows for endless customization, giving your space a fresh, personal touch. Getting started is simple: select your favorite designs from online shops or create your own using a vinyl cutter or design software.
Clean the wall thoroughly, then peel the backing from the decal and carefully position it on the wall, smoothing out air bubbles with a squeegee or credit card. For larger designs, work in sections to ensure alignment.
You can easily remove or reposition decals without damaging the paint, making this a flexible yet stylish choice for DIY enthusiasts. All you need are your decals, a level or ruler for placement, and a clean cloth to prep your wall.
18. Rope or Twine Accents for Nautical or Industrial Style
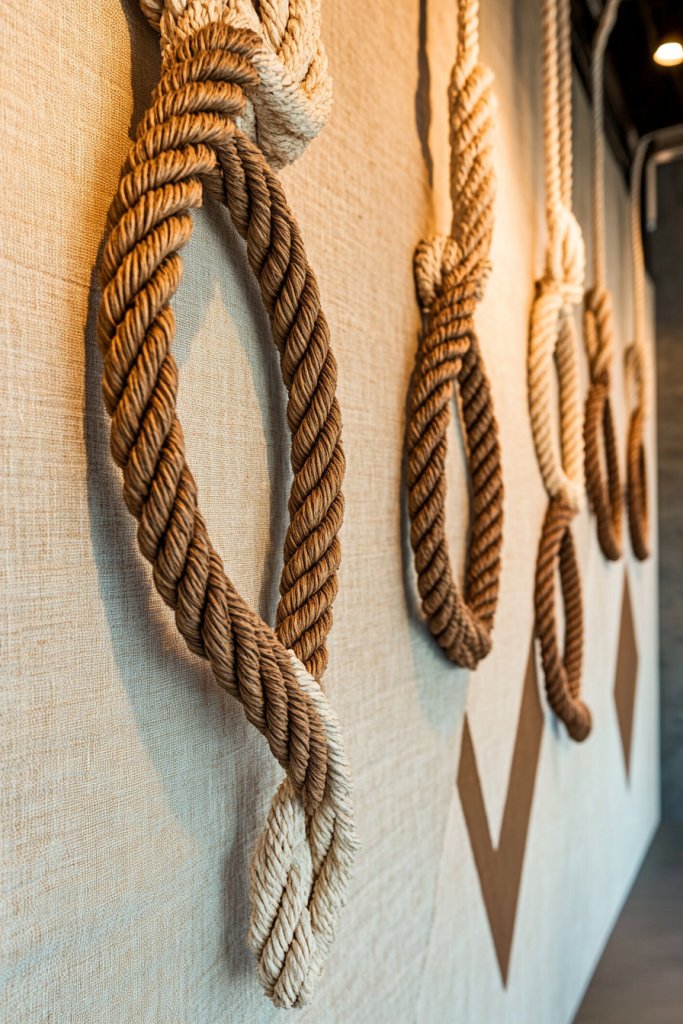
Adding rope or twine accents to your accent wall introduces a tactile, textured element that evokes nautical charm or industrial chic. These natural fibers create visual interest and a cozy, handcrafted feel—perfect for a beach house vibe, or an urban loft with a raw, rustic edge.
Visualize thick, braided ropes or thin, twisted twine arranged in decorative patterns—perhaps framing sections of the wall, creating geometric shapes, or draped in flowing lines. The ropes can be in classic off-white, jute brown, or even painted in bold colors for a more contemporary look.
Their rough texture contrasts beautifully with smooth painted or wallpapered surfaces, adding a layered, tactile dimension that invites touch. Ambient lighting highlights the fibers’ natural roughness, while the overall effect feels warm, inviting, and slightly rugged.
To implement, choose your rope or twine based on the desired aesthetic; jute and sisal are durable and affordable options. Secure the ropes with heavy-duty hooks, nails, or adhesive strips, making sure they are taut or loosely draped depending on your style.
You can form patterns such as chevrons, circles, or grid layouts, or simply run the rope in a single straight line across the wall. For added visual interest, combine different thicknesses or colors of rope. This DIY project requires basic tools and offers a unique, textural upgrade that’s both stylish and functional.
19. DIY Murals Using Wall Stencils or Tape Masks
Creating a mural with stencils or tape masks transforms your wall into a piece of art with minimal fuss. This technique is perfect for adding bold patterns, abstract designs, or even simple motifs that make a big visual impact—ideal for those who want to infuse personality into their space without hiring a professional artist.
Imagine a large, geometric mural with sharp lines and crisp shapes, or a delicate floral pattern that whispers elegance. Using stencils, you can easily replicate intricate designs, while tape masks allow for clean, straight lines and layered color blocking.
The process involves selecting your design—think modern abstracts, botanical outlines, or graphic patterns—and transferring it onto the wall with painter’s tape or stencil spray. The final result is a cohesive, eye-catching feature that looks professionally painted but is entirely DIY.
Begin by sketching your design on paper, then transfer it onto the wall with a pencil or light marker. Secure your stencil or tape in place, ensuring it’s flat against the surface.
Use small brushes or paint rollers with your chosen colors—acrylic or latex paint works well—and carefully fill in the design. Remove the stencils or tape while the paint is wet to maintain sharp edges.
For beginners, start with simple shapes or partial designs and gradually build confidence. This approach allows you to create a customized mural that elevates your space with personal flair and artistic expression.
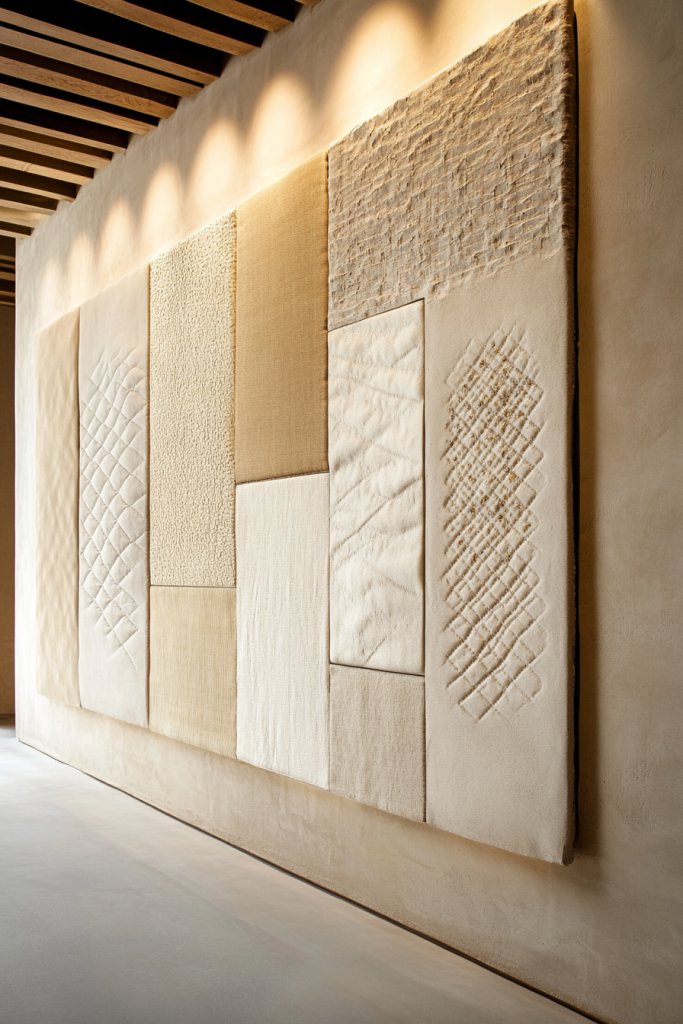
20. Textured Fabric Wall Panels with Quilted Patterns
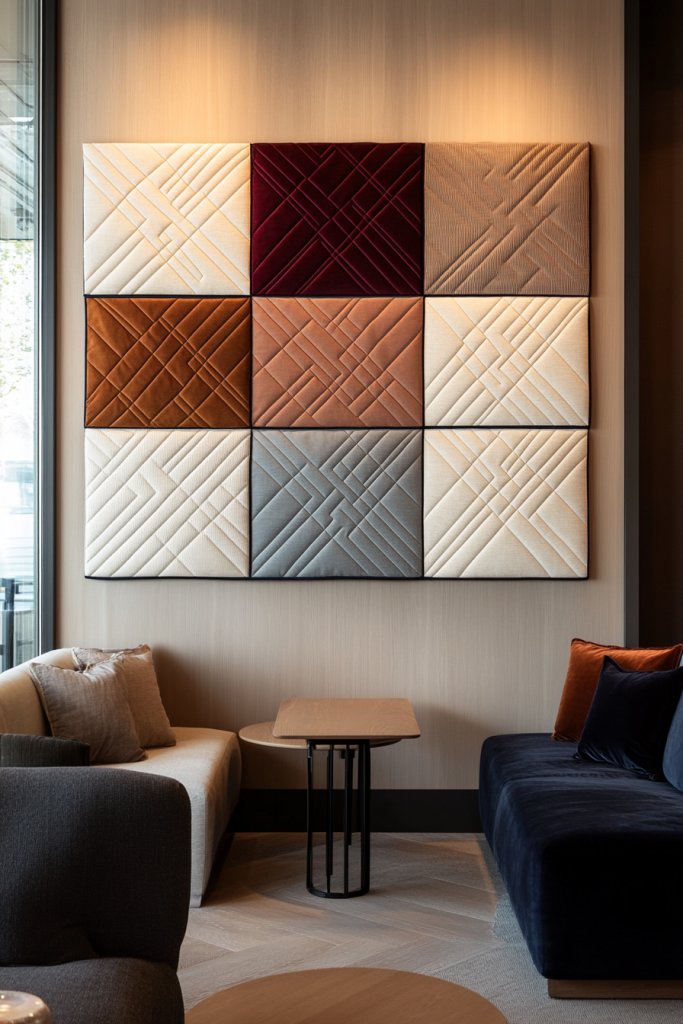
Textured fabric wall panels add softness and warmth to an accent wall, creating a cozy, inviting atmosphere. With the addition of quilted patterns, these panels introduce tactile dimension and intricate visual interest, perfect for bedrooms, reading nooks, or lounge areas.
Visualize plush fabric panels with stitched diamond or chevron quilting, arranged in a grid or staggered layout. The fabrics can range from velvet in deep jewel tones to linen in neutral shades, depending on your decor style.
The quilted texture catches light and shadow, adding depth and a handcrafted touch. The overall effect is luxurious yet approachable, transforming a plain wall into a feature that invites touch and comfort.
The tactile quality pairs well with soft lighting and plush furnishings, making the space feel layered and thoughtfully curated. To create your own fabric wall panels, start with large pieces of fabric or felt cut into rectangles or squares.
Sew or glue quilting patterns onto the fabric—using a sewing machine or fabric adhesive for a no-sew option. Mount the panels onto the wall with double-sided mounting strips or a simple frame, ensuring they’re evenly spaced for a polished look.
For easier installation, you can also use adhesive hooks or Velcro strips. This project offers a personalized, warm aesthetic that is both functional and decorative, with endless opportunities for customization in color, pattern, and texture.
21. Sculptural Wall Decor with DIY Ceramic or Clay Pieces
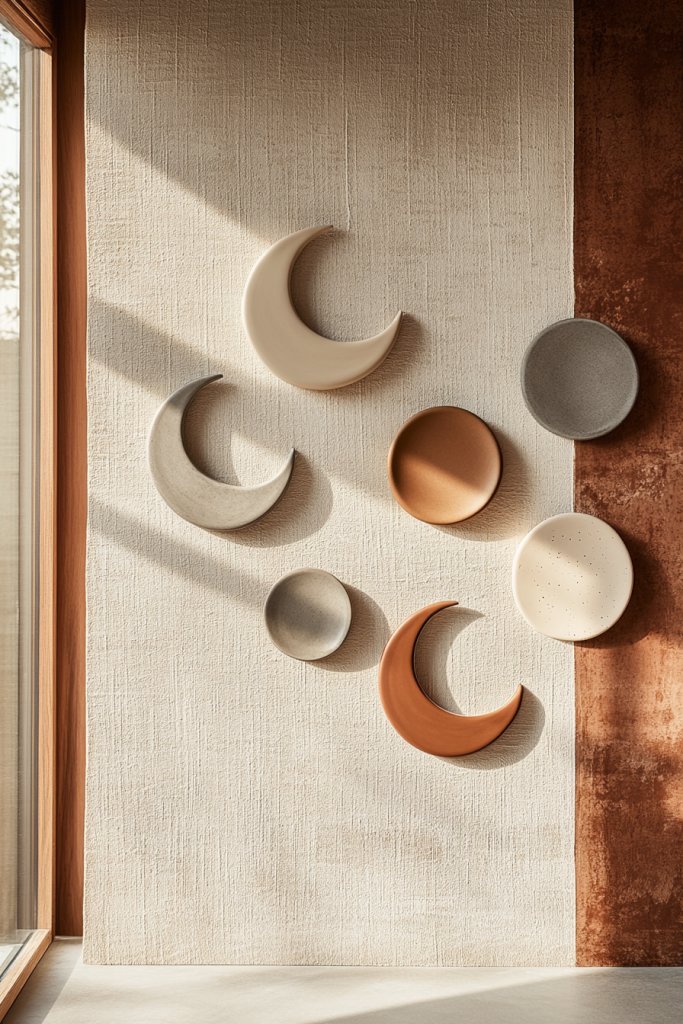
Adding sculptural ceramic or clay pieces to your accent wall creates a stunning three-dimensional focal point that turns a flat surface into a mini art installation. This approach introduces tactile interest and a sense of handcrafted charm, elevating your space with textured depth and visual intrigue.
Imagine a wall adorned with a curated arrangement of organic-shaped ceramic discs, crescent moons, or abstract forms. The pieces can be glazed in soft matte neutrals like warm beige, slate gray, or muted terracotta, contrasting beautifully against a painted or wallpapered background.
The tactile surfaces invite touch, while the irregular shapes add a dynamic, sculptural rhythm that catches light and shadows throughout the day. The overall effect is both modern and earthy, adding a sense of artisanal craftsmanship and personality to any room.
To recreate this look, gather pre-made or DIY ceramic or clay pieces—these could be purchased or crafted with simple air-dry clay or kiln-fired ceramics. Use a strong adhesive like construction glue or epoxy to affix each piece directly onto your wall in a thoughtfully spaced arrangement.
For added stability and a polished look, consider creating a pattern or asymmetrical layout that suits your space. Start by marking placement lightly with painter’s tape before fixing each piece for a balanced, professional finish. This project is accessible for DIY enthusiasts willing to experiment with texture and form!
22. Colorful Acrylic Paint Drips for an Artistic Touch
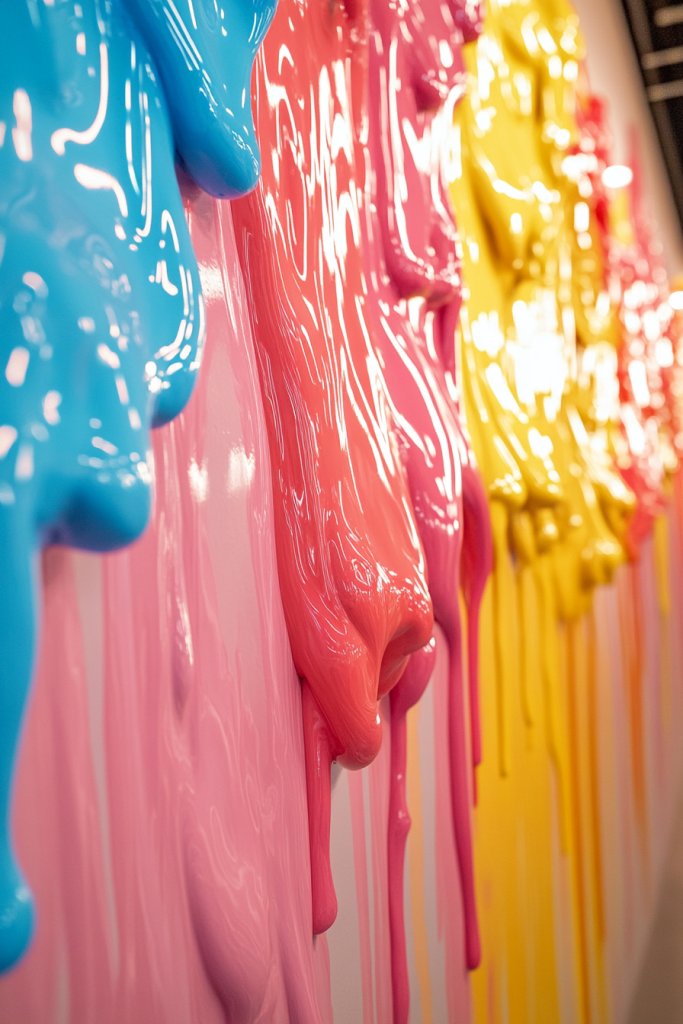
Creating a wall with vibrant, dripping acrylic paint is an eye-catching way to infuse energy and artistic flair into any room. This technique transforms a plain wall into a bold, expressive canvas, perfect for showcasing personality and creativity.
Picture a wall layered with streaks and splashes of bright colors—think electric blue, fiery red, sunny yellow, and vivid pink—flowing downward in irregular, organic drips. The paint appears as if it’s melting or flowing, adding a sense of movement and spontaneity.
The glossy finish amplifies the colors’ vibrancy, while the textured drips add tactile dimension, making the wall a dynamic visual centerpiece. This technique lends a contemporary, street-art vibe that’s both playful and sophisticated, suitable for eclectic, boho, or modern interiors.
To achieve this look, start with a clean, primed wall. Use a palette of acrylic paints in your favorite shades and a large brush or squeeze bottles for controlled application.
Dip the brush or squeeze the paint directly onto the wall and let it naturally run downward, encouraging drips by tilting the wall or using gravity. For cleaner lines, tape off sections beforehand or use painter’s tape to create borders.
Layer the colors in multiple coats, allowing each to dry before adding new drips for depth. This approach is perfect for an expressive, DIY art installation with minimal materials and maximum impact.
23. Layered Wall Textures Combining Multiple Techniques
A layered wall that combines different textures and techniques creates a rich, multidimensional backdrop full of visual interest and tactile appeal. This method allows you to blend various DIY methods—like plaster, fabric, and paint—to craft a truly unique accent wall.
Visualize a wall where smooth painted areas are interwoven with sections of textured plaster, quilted fabric patches, and perhaps even metallic accents. The plaster adds depth with a slightly rough, matte finish, while fabric panels introduce softness and warmth, especially if they have tactile details like quilting or embroidery.
Combining these elements results in a wall that invites touch and adds visual complexity, making the room feel curated and bespoke. The color palette can be monochromatic for subtle sophistication or bold and contrasting for a more eclectic vibe, with textures playing the starring role in the aesthetic.
To implement this layered approach, start by preparing your wall surface. Apply a base coat of paint or wallpaper for a uniform background.
Use a spatula or trowel to add textured plaster in selected areas, then attach fabric panels with a strong adhesive or staple gun for a secure fit. Metallic or reflective accents can be added with foil tape or metallic paint to highlight certain sections.
The key is to plan your layout beforehand, ensuring a harmonious mix of textures and colors. This technique is perfect for creative DIYers eager to experiment with different materials and craft a truly personalized accent wall.
Conclusion
With so many creative DIY accent wall ideas—from bold paint patterns and textured finishes to reclaimed wood, trendy wallpaper, and personalized murals—there’s endless potential to transform any space into a reflection of your style. Don’t be afraid to experiment and mix techniques, turning your vision into reality with a little effort and imagination.
Start small or go all out—your perfect accent wall is just a DIY project away. Unleash your creativity and make your home uniquely yours!
Leave a Reply