Looking to add charm and functionality to your home without breaking the bank? Cheapest wood options have become a favorite among DIY enthusiasts and homeowners alike, thanks to their affordability, versatility, and natural beauty. These budget-friendly woods make it easy to bring your creative ideas to life without overspending.
In this article, you’ll discover a variety of inspiring projects that utilize inexpensive wood to create stunning decor, furniture, and storage solutions. Whether you’re a seasoned crafter or a beginner, these ideas will help you craft beautiful pieces that suit any style and space, proving that budget-friendly doesn’t mean sacrificing quality or originality.
1. Upcycled Pallet Coffee Table with a Rustic Finish
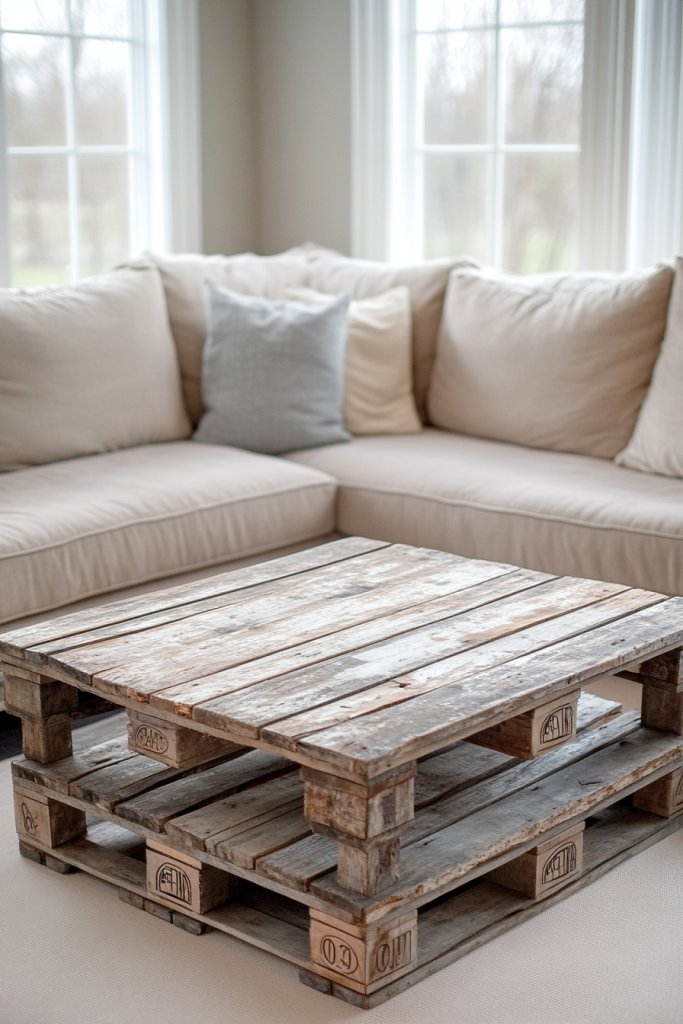
Ever wanted to add a touch of rustic charm to your living room without breaking the bank? Crafting a unique coffee table from old pallets is the perfect way to do it. It’s a fun project that combines style with budget-friendly DIY spirit. Plus, it gives your space a cozy, reclaimed vibe that everyone will love.
Imagine a weathered wooden pallet transformed into a sturdy tabletop, with rough edges softened by a matte sealant. The rich, natural grain of the wood creates a warm focal point, while metal casters add a vintage industrial touch. Surround it with mismatched cushions or a soft rug to complete the inviting scene. It’s imperfectly perfect and full of character.
You can stain the wood for a darker, more refined look or leave it raw for a raw, farmhouse feel. Painting the pallets a bold color adds a modern twist, especially in contemporary spaces. Smaller pallets can serve as side tables, while larger ones work as central coffee spots. Seasonal decor, like fairy lights or cozy throws, can easily change the vibe.
Start by sourcing sturdy pallets—look for ones with minimal damage. Break down the pallets if needed, sanding edges for safety. Assemble the pieces with nails or screws, ensuring stability. Finish with a weatherproof sealant or stain for durability. Adding caster wheels is optional but makes moving the table effortless. Keep the design simple or customize with decorative touches like stenciled patterns.
Personalize your pallet coffee table with stenciled initials or a geometric pattern. Attach small storage baskets underneath for remotes and magazines. Use a contrasting stain or paint for accents, or add a glass top for a sleek look. Incorporate decorative hardware or handles for an industrial edge. This project is your canvas for creativity.
Turning old pallets into a stylish coffee table proves you don’t need to spend a fortune to make a statement. It’s satisfying to see a piece of trash become a centerpiece. Ready to take on a budget-friendly DIY that transforms your space? Your rustic, chic table awaits!
2. Simple Wooden Wall Shelves Using Reclaimed Wood
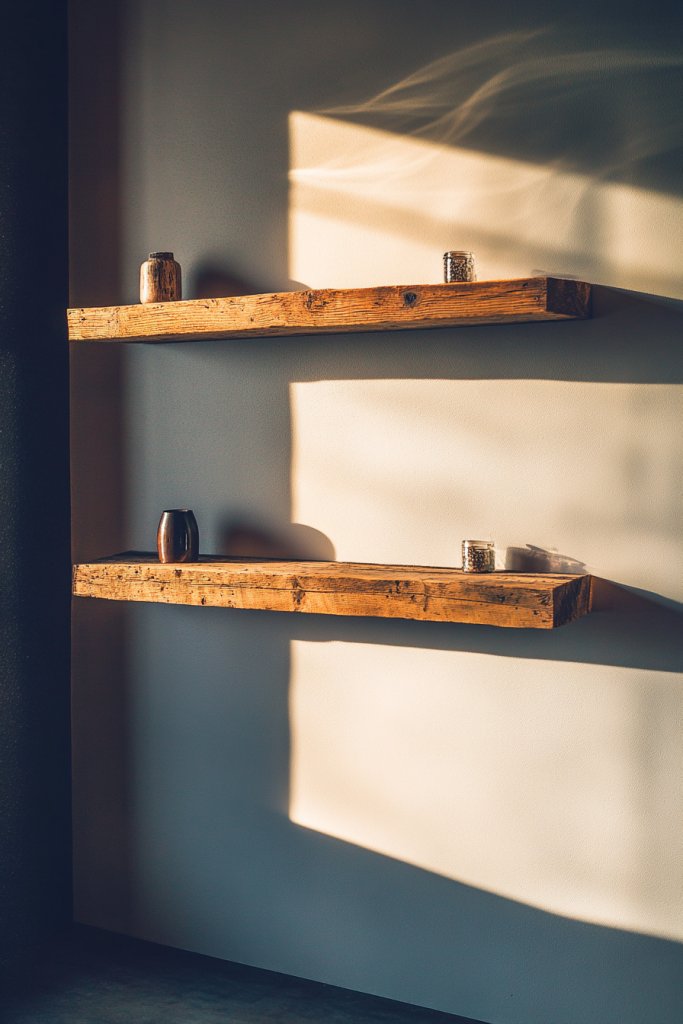
Tired of clutter and craving a sleek storage solution that also adds visual interest? Wall shelves made from reclaimed wood are the answer. They’re affordable, eco-friendly, and instantly elevate your decor. Plus, they let you display your favorite items without sacrificing space.
Picture a set of narrow, rustic shelves mounted on a painted wall, their rough textures contrasting beautifully with smooth ceramics or books. The natural knots and imperfections of the reclaimed wood add character, making the wall feel warm and inviting. Light catches the uneven edges, creating cozy, shadowy corners. This simple setup transforms a blank wall into a focal point.
Use different lengths and thicknesses for an eclectic look or uniform sizes for a clean, modern aesthetic. Stain or paint the wood to match your color scheme. Install them at varying heights for visual rhythm or in a straight line for minimalism. They work well in living rooms, kitchens, or bedrooms, offering versatile styling options.
Start by selecting reclaimed wood planks with interesting grains or knots. Sand the surfaces for safety and a smooth finish. Use sturdy brackets or floating shelf hardware, anchoring into wall studs for stability. Attach the wood with screws, ensuring they are level. Finish with a clear sealant or stain for longevity. Arrange your items on the shelves to balance aesthetics and function.
Add small decorative items like vintage jars, framed quotes, or tiny plants (if you ignore the restricted content rules). Customize the color with eco-friendly stains or paints. Incorporate LED strip lighting underneath for a subtle glow. Mix and match different woods for a layered, textured look that reflects your personality.
Installing reclaimed wood shelves is an easy, wallet-friendly way to upgrade your space. It’s a DIY project that’s accessible even for beginners and results in a professional look. Ready to give your walls a stylish, functional makeover? This is one upgrade that pays off in both style and savings.
3. DIY Wooden Crate Storage Bins for Organizing
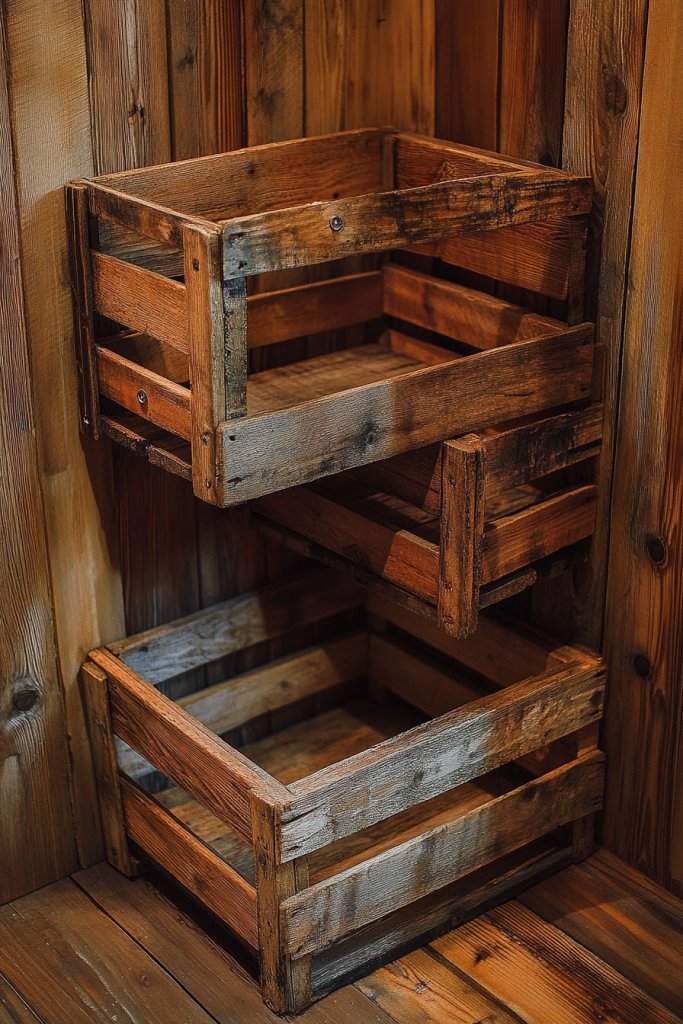
Clutter is the enemy of a peaceful home, but finding stylish storage solutions on a budget can be tough. Wooden crates are the perfect DIY fix—cheap, versatile, and customizable. They turn messy spaces into organized havens without costing a fortune.
Imagine stacking painted or stained wooden crates in a corner, their rustic texture adding charm. The open sides make it easy to grab or see stored items, while the different heights create visual interest. Fill them with plush blankets, shoes, or craft supplies for a neat, inviting look. A coat of chalk paint or stain personalizes each crate, making them a standout feature.
Paint or stain the crates in colors that match your decor—think pastel hues or deep earthy tones. Attach casters for easy mobility or stack them to save space. Combine different sizes for a playful, eclectic effect or keep them uniform for a sleek, minimal look. Use them in closets, kids’ rooms, or even as decorative storage in living areas.
Start by sourcing used wooden crates from thrift stores or repurposing old wooden boxes. Sand rough edges and clean thoroughly. Paint or stain the crates to your liking, applying multiple coats for durability. For added stability, secure stacks with screws or brackets. Use labels or tags to identify contents easily. These crates are simple to assemble and customize as your needs evolve.
Decorate the crates with stencils or decals for a personalized touch. Incorporate fabric liners or cushions inside for delicate items. Mix different finishes—matte, gloss, or distressed—for an aged look. Attach handles for easier hauling or stacking options. This DIY project adapts perfectly to different rooms and styles.
Using wooden crates for storage proves that organization can be both stylish and budget-friendly. It’s a simple project that results in a functional, charming space. Feeling inspired to declutter? Your custom crates are just a few steps away!
4. Budget-Friendly Wooden Frame Mirror with Scrap Wood
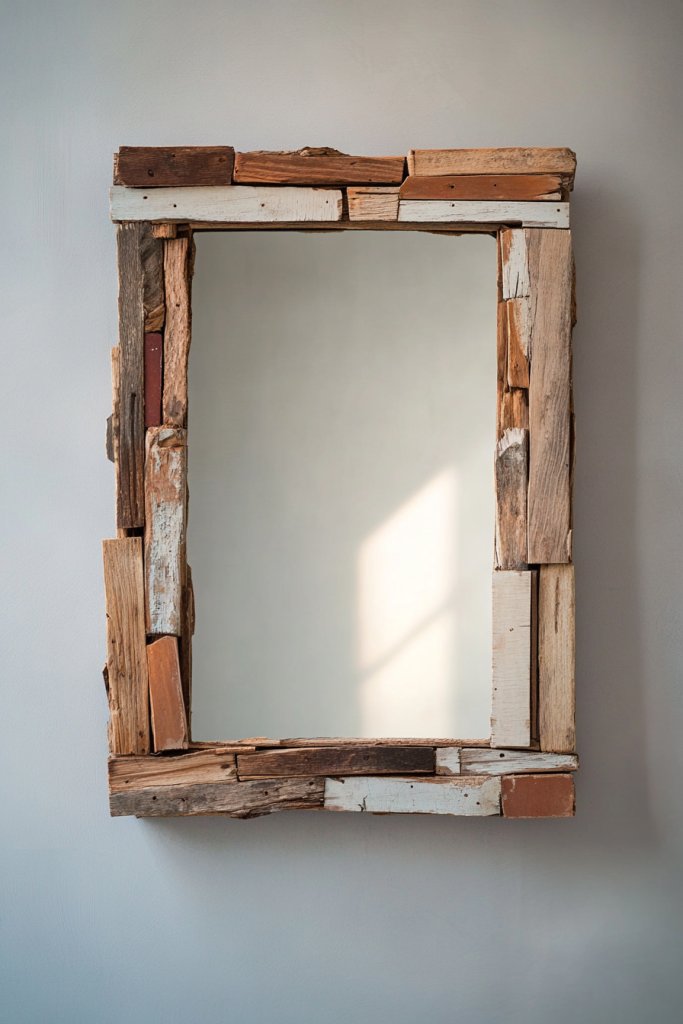
Looking to add a statement mirror without splurging on expensive frames? Repurposing scrap wood into a custom frame offers a stylish, budget-conscious solution. It’s a fun project that combines creativity with practicality. Plus, it gives your space a warm, handcrafted touch.
Envision a large mirror with a chunky, uneven frame made from reclaimed wood pieces. The natural textures and irregular shapes create an eye-catching border, adding depth and character. The reflective surface brightens the room, while the rustic frame grounds the decor. It’s perfect for entryways, bedrooms, or living rooms seeking a cozy, personal vibe.
Paint the frame in bold or neutral colors to match your decor. Use different wood tones for an eclectic look or keep it uniform for simplicity. Incorporate decorative elements like metal accents or carved details for extra flair. Adjust the size of the frame based on the mirror’s dimensions or your wall space. It’s adaptable to any style, from farmhouse to industrial.
Start by gathering scrap wood—palettes, leftover planks, or reclaimed pieces. Cut the wood into strips or shapes that fit your design. Sand all edges for safety and a smooth finish. Assemble the frame using nails, screws, or adhesive, ensuring it’s sturdy and square. Attach the frame to the mirror with strong glue or mounting hardware. Finish with a sealant or paint to protect the wood.
Add a pop of color with bright paints or stain for a vintage look. Incorporate decorative metal corner brackets or embellishments for extra style. Consider adding a distressed finish for a shabby chic feel. Personalize with engraved initials or patterns on the frame. This project is perfect for customizing every detail.
Creating a custom scrap wood mirror frame proves you can achieve high-end looks on a tight budget. It’s a satisfying DIY that adds personality and warmth. Ready to craft a one-of-a-kind mirror? Your rustic masterpiece awaits!
5. Thrifted Wood Door Headboard with a Painted Finish
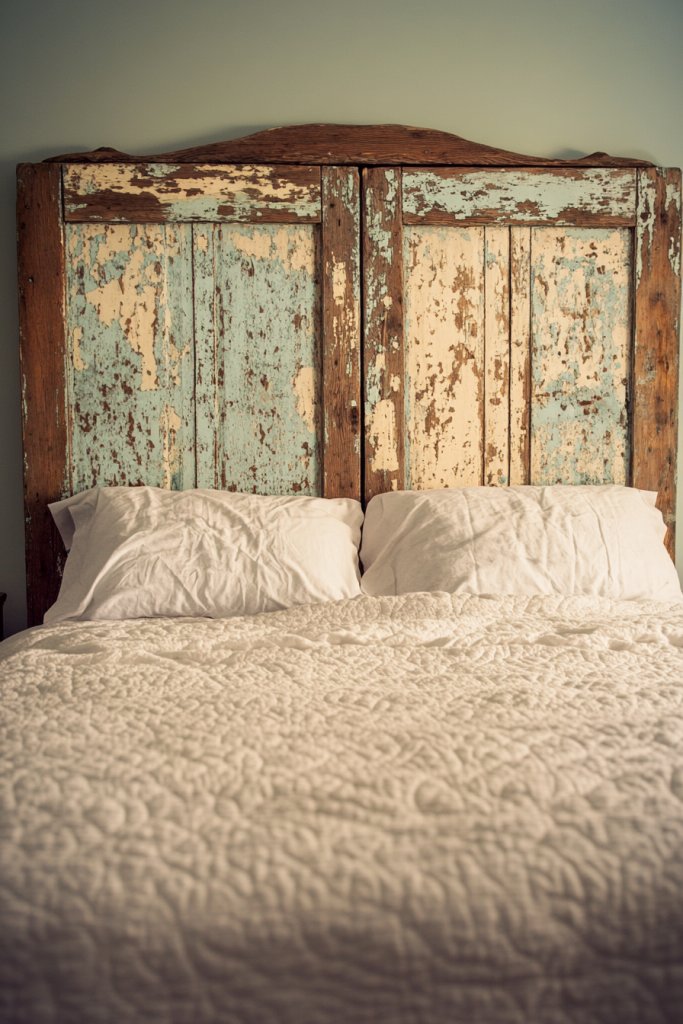
Want a stylish headboard without the hefty price tag? Thrifted wood doors are an overlooked treasure that can turn your bed into a statement piece. Repurposing an old door adds charm and character effortlessly. Plus, it’s an eco-friendly way to upgrade your bedroom decor.
Picture a vintage wooden door mounted behind your bed, painted in a soft matte hue or left in natural wood for a rustic look. The door’s panels and hardware add texture and visual interest. Its size and design make it the perfect backdrop, transforming your space instantly. Soft bedding and minimal accessories let the headboard shine.
Paint the door in a bold color or a distressed finish for a shabby chic vibe. Add decorative trim or stenciled patterns for extra personality. Keep it natural for a minimalist look or add fabric or wallpaper to the panels for a layered effect. Match the headboard height to your ceiling or bed frame for a cohesive look. It fits various bedroom styles, from vintage to modern.
Source old wooden doors from thrift stores, salvage yards, or online marketplaces. Clean and sand the surface to remove dirt and rough edges. Paint or stain the door, applying multiple coats for a smooth, even finish. Attach mounting brackets or hooks to secure it to the wall, ensuring stability. Adjust the placement for height and balance. Add decorative hardware if desired for extra flair.
Decorate with stenciled motifs or metallic accents to match your decor. Use peel-and-stick wallpaper or fabric panels to add texture. Incorporate LED backlighting or fairy lights behind for a subtle glow. Personalize with initials or decorative handles. It’s a one-of-a-kind headboard that you can customize endlessly.
Turning a thrifted door into a headboard proves that style doesn’t have to be pricey. It’s a bold, creative choice that highlights your DIY skills. Ready to transform your bedroom? This project is your ticket to a chic, budget-friendly update.
6. Small Wooden Plant Stands Made from Offcuts
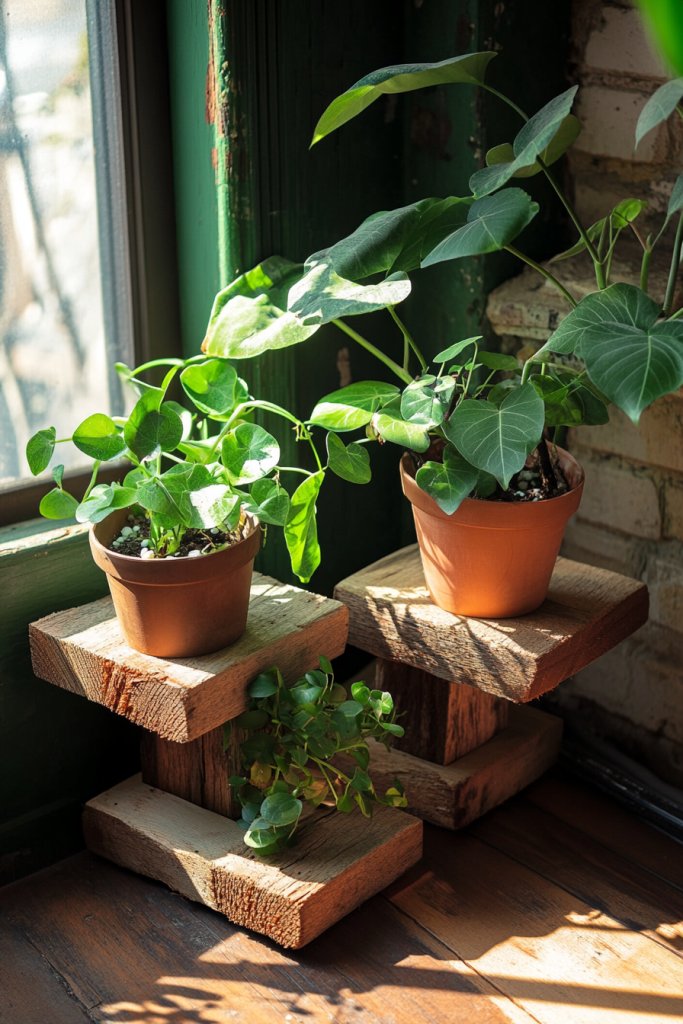
Love greenery but hate clutter? Small wooden plant stands made from scrap wood are the perfect way to showcase your favorite plants stylishly. They’re affordable, customizable, and add a touch of nature to any room without taking up too much space. Plus, they’re a great way to use leftover wood.
Imagine a trio of tiny stands crafted from offcuts, each with a different height and finish. The natural wood grain contrasts beautifully with vibrant pots and lush leaves. Position them near windows or in cozy corners, creating a mini indoor garden. The varied heights add visual interest, giving your space a fresh, organic feel. It’s simple, charming, and full of life.
Paint or stain the stands in complementary or contrasting colors. Use different shapes—round, square, or tapered—for a playful look. Stack or arrange them in clusters for variety. These stands work well in small spaces, on shelves, or as standalone accents. You can even add wheels for mobility or attach hooks for hanging baskets.
Gather offcuts from previous projects or thrift stores. Cut the wood into small blocks or tapered legs, sanding all edges smooth. Assemble with nails or wood glue, ensuring stability and balance. Finish with a protective sealant or stain. Position your plants for optimal light and aesthetic appeal. The process is straightforward and rewarding.
Add decorative elements like painted patterns, stenciled designs, or metallic accents. Incorporate non-slip pads on the bottom for safety. Customize the height or shape to suit specific plant sizes. Personal touches like engraved initials or decorative hardware make each stand unique. These stands blend function with personal style.
Using offcuts to craft plant stands shows that even small leftover pieces can create something special. It’s a sustainable, budget-friendly project that adds greenery and personality to your home. Feeling inspired? Your green oasis is just a few cuts away!
7. Wooden Picture Ledge with Reclaimed Wood Slats
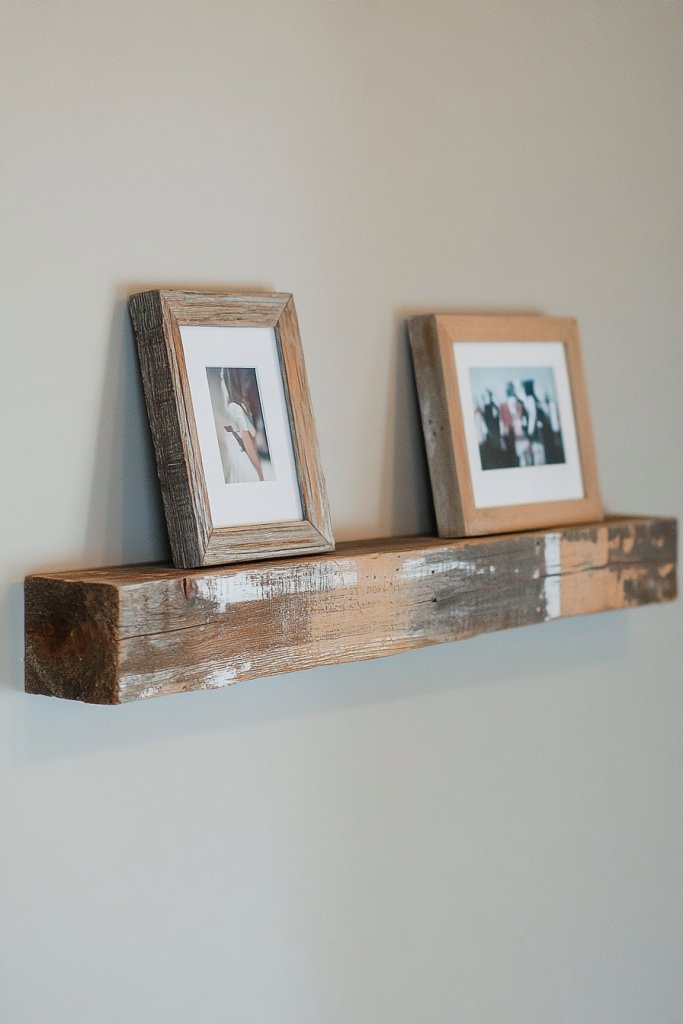
Looking for an easy way to display photos or art without cluttering surfaces? A wooden picture ledge made from reclaimed wood offers an affordable, stylish solution. It’s simple to build and adds a warm touch to any wall. Plus, it keeps your favorite memories or prints front and center.
Envision a narrow, rough-sawn wood shelf mounted just below eye level, holding framed photos, small prints, or decorative objects. The textured wood adds a rustic charm, especially when paired with modern or vintage frames. The ledge’s minimalist design allows for easy swapping of artwork, keeping your display fresh and dynamic. It’s a subtle yet impactful addition to any room.
Paint or stain the wood to match your decor palette. Install multiple ledges in a staggered pattern for visual interest. Use different widths or lengths for variety. Mount them at various heights or align them in a straight line. They look great in living rooms, hallways, or bedrooms, offering flexible styling possibilities.
Select reclaimed wood with interesting grain or texture. Cut the slats to your desired length and sand smooth. Attach brackets or mounting hardware, securing into wall studs for strength. Position the ledge at the perfect height, ensuring it is level. Finish with a protective sealant or stain. Arrange your photos or decor items, and you’re done.
Decorate with painted or stenciled accents for a personalized touch. Use colorful or distressed finishes for a vintage look. Incorporate small decorative elements like hooks or clips for hanging items. Change out artwork seasonally or as your mood shifts to keep the display lively. It’s a simple project with endless customization options.
A reclaimed wood picture ledge proves that you can create beautiful, functional decor on a tight budget. It’s a project that combines sustainability with style, perfect for any DIY lover. Ready to showcase your favorite memories? This project is your canvas for creativity.
8. Minimalist Wooden Coasters from Scrap Pieces
Tired of the same old coasters that don’t stand out? DIY wooden coasters from scrap pieces are a simple, budget-friendly way to add a personal touch to your table. They protect surfaces while showcasing your craftsmanship. Plus, they make great handmade gifts for friends and family.
Imagine small, square or circular coasters with natural wood grain patterns, each uniquely shaped and finished. Some may have a smooth, polished surface, while others feature a distressed, rustic look. Arrange them in a set on your coffee table or dining area, creating a warm, inviting atmosphere. The natural hues and textures add subtle elegance.
Decorate with engraved initials, painted patterns, or heat-resistant coatings for a functional finish. Use different woods—maple, oak, or pine—for variety. Combine with fabric or cork pads underneath for extra protection. You can also make larger or smaller versions for different uses, like plant mats or table protectors. It’s a versatile project adaptable to any style.
Gather scrap wood, cut into uniform squares or circles using a saw or jigsaw. Sand all edges for safety and a smooth finish. Apply a sealant or finish for durability and water resistance. Personalize with stencils, paints, or engravings before sealing. Use felt pads or cork backing to prevent slipping. These coasters are quick and easy to produce in batches.
Add custom monograms or decorative motifs for a personalized touch. Use vibrant colors or metallic paints for a modern twist. Incorporate textured finishes like wood burning or carving. Keep a consistent size for a cohesive set, or mix shapes for an eclectic look. These coasters make a stylish yet practical gift.
Simple yet effective, DIY wooden coasters show that small projects can have a big impact. They’re a practical way to practice finishing techniques and woodworking skills. Want to impress guests? Your personalized coaster set is ready to wow!
9. DIY Wooden Candle Holders Using Offcuts
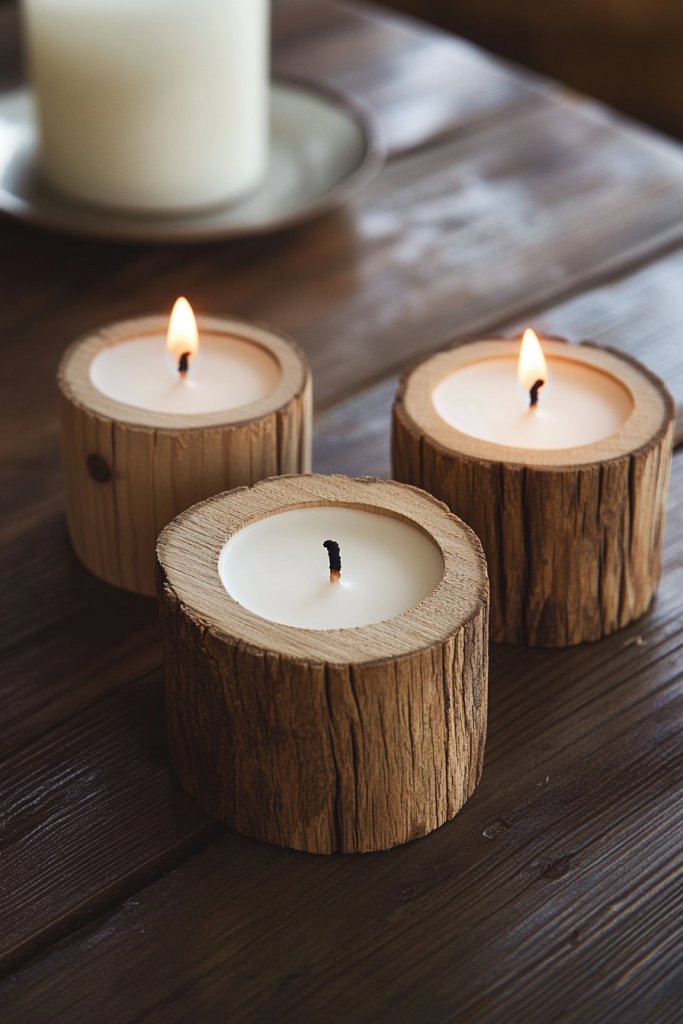
Looking to create cozy ambiance without spending a lot? Wooden candle holders made from offcuts are an easy, inexpensive DIY project. They add warmth and style to any space, whether for everyday use or special occasions. Plus, they’re a perfect way to repurpose scrap wood.
Visualize small blocks or cylindrical shapes with a simple drilled hole for a candle. The natural wood tones and textures give a rustic, inviting feel. Arrange a few on a dining table or mantle, their flickering flames casting a gentle glow. The simplicity of the design emphasizes craftsmanship and natural beauty. It’s a cozy, inviting scene.
Paint or stain the holders in colors to match your decor. Use different shapes—square, round, or hexagonal—for variety. Incorporate decorative elements like carved patterns or metallic accents. Stack or group them for a layered look, perfect for centerpieces. They can be designed for tealights, pillar candles, or votives.
Cut leftover wood into blocks or shapes using a saw. Sand all surfaces and edges for safety. Drill holes for candle placement, ensuring they’re centered and deep enough for stability. Finish with a protective sealant or stain. Secure candles with a dab of hot glue if needed. Arrange your holders on a tray or directly on surfaces for a warm glow.
Personalize with engraved initials, carved motifs, or painted designs. Use contrasting stains or paints for visual interest. Add decorative elements like metallic accents or beads. Mix different sizes or shapes for a varied set. It’s a simple project with lots of room for creative expression.
DIY wooden candle holders are proof that small, thoughtful projects elevate your home’s ambiance. They’re budget-friendly and customizable, perfect for gifting or personal use. Ready to add some cozy charm? Your handcrafted candle holders are just a few steps away!
10. Affordable Wooden Bench from Salvaged Wood
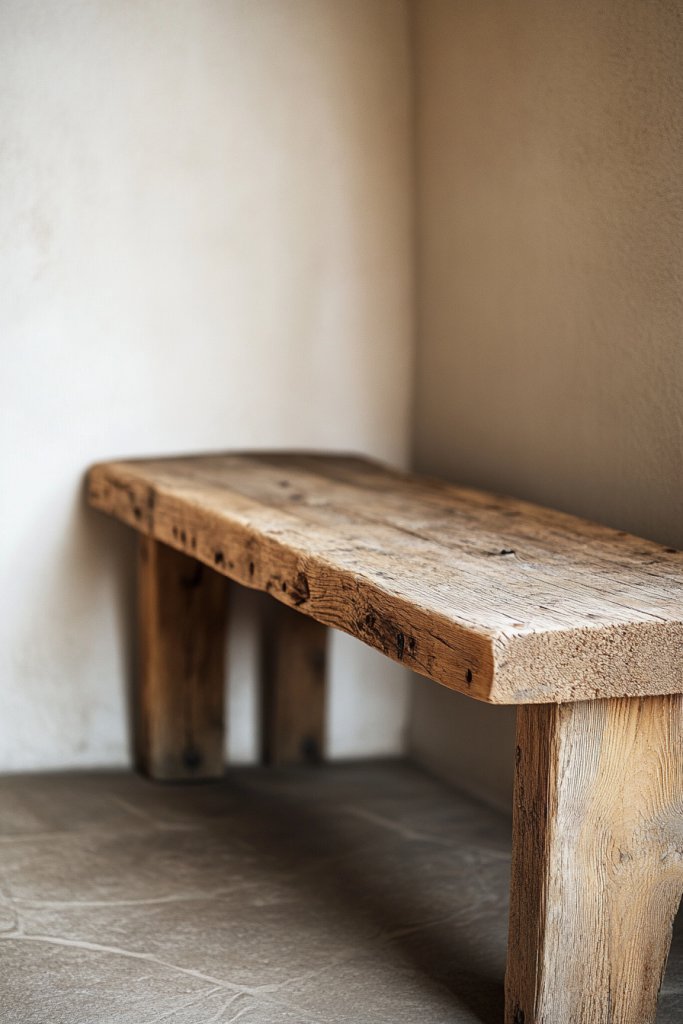
Need extra seating or a stylish entryway piece without shelling out hundreds? Building a wooden bench from salvaged wood is an affordable, practical solution. It’s a project anyone can tackle, and the result adds character and function to your space. Who knew saving money could look this good?
Picture a sturdy, rustic bench with a thick, reclaimed wood seat and simple legs. The natural imperfections and aged patina give it a lived-in charm. Place it at your entryway for shoes and bags, or use it as additional seating in the living room. The rough textures contrast beautifully with smooth cushions or throws, creating an inviting atmosphere.
Stain or paint the wood to match your decor. Use metal or wooden legs—either painted or natural—to customize the style. Make it long and narrow for a hallway or wider for a cozy nook. Add cushions or upholstery to enhance comfort. It’s versatile enough to suit rustic, modern, or eclectic aesthetics.
Source reclaimed wood from salvage yards, pallets, or old furniture. Cut to size, then sand thoroughly for safety. Attach legs securely with screws or brackets, ensuring stability. Finish with a weatherproof or protective coating if used outdoors. Decorate with cushions or throws for added comfort and style. It’s a straightforward build that offers big style points.
Paint or stain the bench in your favorite color or finish. Embellish with decorative hardware or carved details. Attach a shelf underneath for extra storage. Personalize the top with a cushioned pad or quilted fabric. It’s a piece that evolves with your style and needs.
A salvaged wood bench proves that you don’t need to buy new to get a high-end look. It’s a budget-friendly, eco-conscious project that transforms your space. Want an entryway that invites guests in? Your DIY bench is ready!
11. Creative Wooden Key Hooks from Reclaimed Pieces
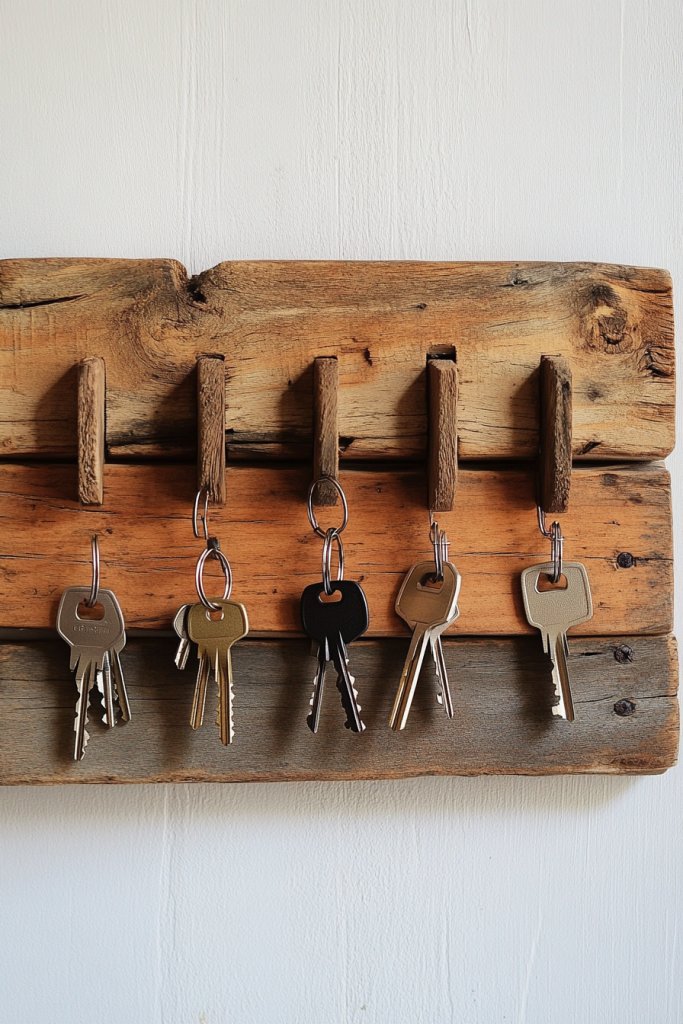
Keys cluttering up your countertops and making mornings chaotic? DIY wooden key hooks are a simple, affordable fix. Using reclaimed wood, you can craft a functional and stylish organizer that keeps your keys handy and your space tidy. Who says organization has to be boring?
Imagine small, uniquely shaped wooden blocks mounted on a wall, each with a metal hook or knob. The natural grain and imperfections of the wood add a rustic charm. Position them near your door or in the mudroom, creating a mini art installation that’s both practical and decorative. It’s a clever way to add personality.
Paint or stain the wood in coordinating colors or leave it raw for a natural look. Use different shapes—rectangular, circular, or irregular—to add visual interest. Mount multiple hooks vertically or horizontally for different needs. Incorporate decorative elements like carved motifs or metallic accents. It’s adaptable to various entryway styles.
Source reclaimed wood from scrap piles, pallets, or old furniture. Cut into desired shapes and sand smooth. Attach hooks or knobs securely with screws or nails. Mount the pieces on the wall using anchors or screws into studs. Arrange the hooks in a pattern that’s both functional and pleasing. Finish with a sealant or protective coating.
Add painted or engraved initials for each family member. Incorporate decorative hardware or painted designs for extra flair. Consider adding small shelves or cubbies for mail or sunglasses. Personal touches make the key hooks both functional and stylish. They’re a small project with a big impact.
DIY reclaimed wood key hooks show that small, personalized projects can make everyday routines easier. They’re budget-friendly, eco-conscious, and easy to customize. Ready to organize your space with style? Your handcrafted key hooks are just a few steps away!
12. Rustic Wooden Picture Frames Crafted from Scrap Wood
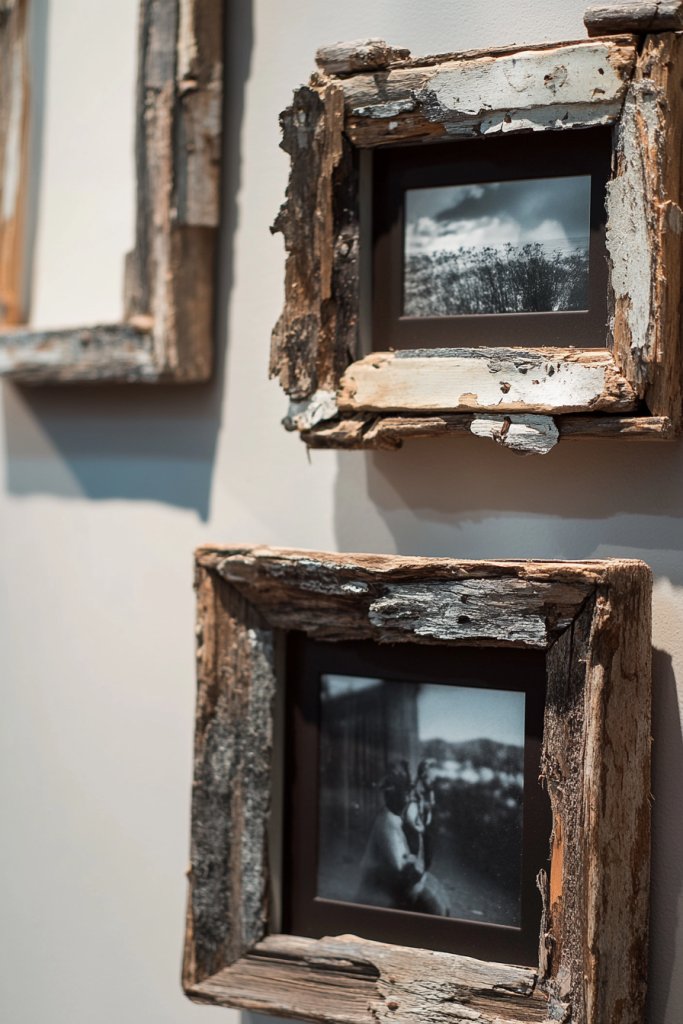
Want to showcase your favorite photos or artwork without buying expensive frames? Rustic DIY picture frames made from scrap wood are the perfect solution. They add warmth and personality to your decor, all while being budget-friendly. Plus, they’re a great way to reuse old wood.
Picture a frame with uneven edges, knots, and natural grains that highlight the character of reclaimed wood. The frame surrounds a treasured photo, creating a cozy, handcrafted feel. The contrast between the rough wood and the smooth glass makes the image pop. Hang multiple frames in a gallery wall for a curated, personal display. It’s rustic charm at its best.
Paint or stain the wood for different aesthetics—whitewashed for shabby chic or dark for a modern look. Use different shapes—square, rectangular, or irregular—to suit your photos. Decorate with metallic accents or carvings for added detail. Mix and match finishes for an eclectic vibe or keep it uniform for a sleek appearance. It’s versatile and customizable.
Collect scrap wood, cut to size, and sand all edges for safety. Assemble the frame using nails or glue, ensuring the corners are square. Add backing with cardboard or lightweight board, securing your photo in place. Finish with a sealant or stain to preserve the wood. Hang using picture hooks or wire. Simple, effective, and personal.
Decorate the frame with painted patterns, engraved initials, or textured finishes. Add decorative corner brackets or metallic accents for extra flair. Incorporate a mat or border for a layered look. Customize the size to fit different photos or art pieces. Each frame becomes a unique piece of your story.
Crafting your own rustic picture frames proves that stylish decor doesn’t have to be expensive. It’s a satisfying project that showcases your creativity. Want to turn your walls into a personal gallery? These frames are your starting point.
13. Small Wooden Side Tables Using Budget Lumber
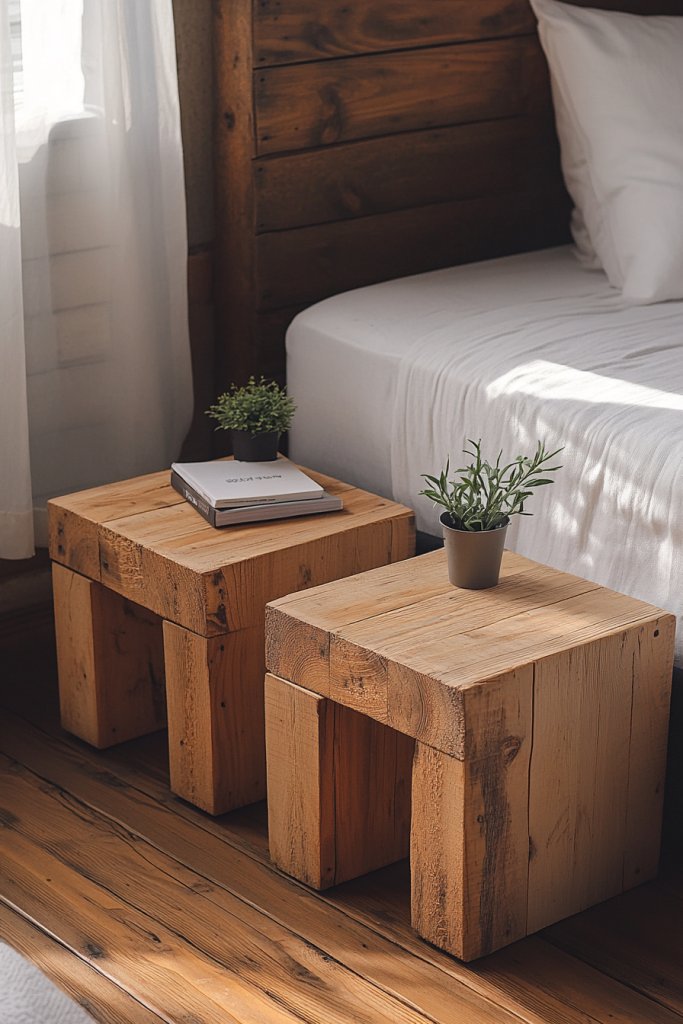
Need a versatile table for your bedside or living room without spending a fortune? DIY small wooden side tables made from budget lumber are the answer. They’re practical, customizable, and add a touch of crafted charm. Who knew creating furniture could be so affordable?
Picture a compact table with a thick, natural wood top and simple legs, finished with a clear sealant to highlight the grain. It stands beside a cozy armchair, holding a book or a cup. The warm tones and simple design complement various styles, from rustic to modern. It’s a functional piece that feels handcrafted and inviting.
Paint or stain the wood in different shades to match your decor. Use tapered or straight legs, or repurpose metal hairpin legs for a modern touch. Keep the design minimal or add a drawer or shelf for extra storage. Adjust the size for small spaces or larger areas. It’s adaptable and easy to personalize.
Cut the lumber to your desired dimensions, sanding all surfaces thoroughly. Attach the legs securely with screws or brackets, ensuring stability. Finish with a protective coating suitable for indoor furniture. Assemble the table on a flat surface, checking for wobbling. Decorate with a small lamp, plant, or your favorite book. Simple and effective.
Paint or stain the table in your preferred color or natural finish. Attach decorative hardware or add a patterned overlay. Incorporate a drawer or small storage basket underneath. Personalize with painted motifs or decals. It’s a small project that can be tailored to fit your style and space.
Building your own side table shows that furniture can be budget-friendly and personalized. It’s a rewarding project that elevates your home’s style. Want to add a unique piece that reflects your taste? Your DIY side table is ready to serve!
14. Wooden Chalkboard Sign with Recycled Wood Frame
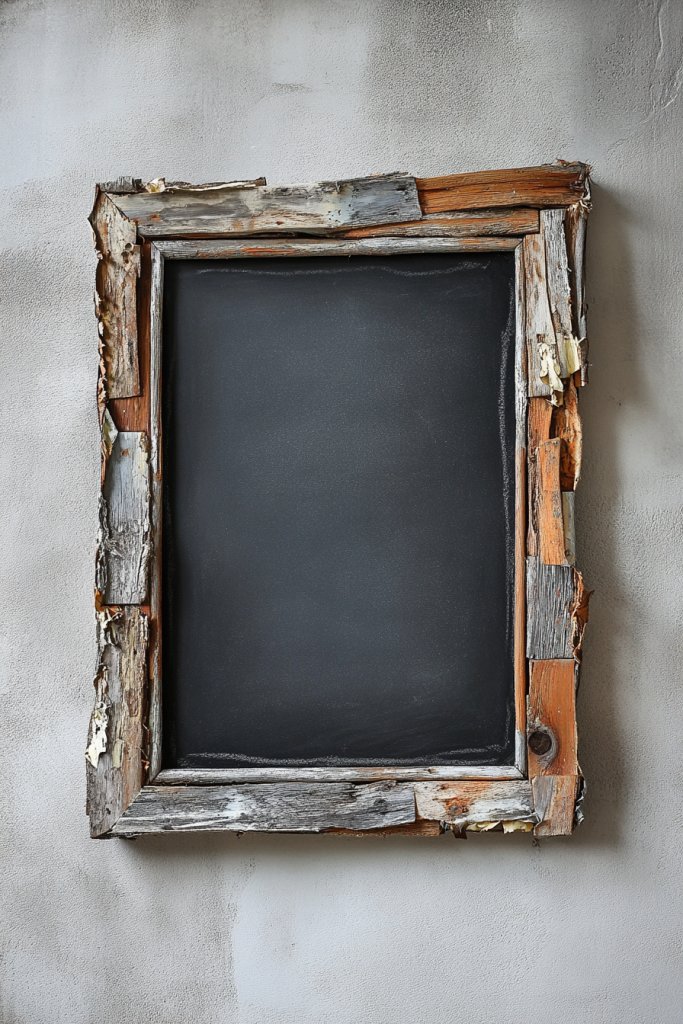
Looking for a charming, customizable sign for your home or event? A wooden chalkboard framed with recycled wood offers a budget-friendly DIY project. It’s perfect for messages, reminders, or decorative quotes. Plus, it adds a rustic touch that feels personal and inviting.
Imagine a rectangular chalkboard with a distressed wooden frame, its natural knots and grains adding character. Write a heartfelt message or menu in chalk, and hang it in your kitchen or entryway. The contrast between the black chalkboard surface and the warm, textured frame creates a cozy focal point. It’s both functional and decorative, blending farmhouse charm with practicality.
Paint or stain the recycled wood frame for different aesthetics—whitewashed for shabby chic or dark for a contemporary look. Change the size to fit your space or purpose. Decorate with small embellishments, like metal corner brackets or painted accents. Use it indoors or outdoors, depending on the finish. It’s versatile and easy to update.
Source reclaimed wood from pallets, old furniture, or salvage yards. Cut the wood to size and sand thoroughly. Assemble the frame with nails or glue, ensuring a tight fit. Attach the chalkboard surface with adhesive or screws. Finish with a protective coat to withstand weather if used outside. Write your message with chalk or chalk markers, and update as needed.
Add decorative stencils, painted borders, or personal initials. Incorporate hooks or small shelves for accessories. Change the message seasonally or for special occasions. Use different colors of chalk or markers for variety. Personal touches turn a simple sign into a statement piece.
Creating a personalized chalkboard sign from recycled wood proves you can craft stylish decor for less. It’s a fun, functional project that adds personality to your home. Want to impress guests with your DIY skills? This sign is your perfect start.
15. DIY Wooden Coatrack Using Offcut Pieces
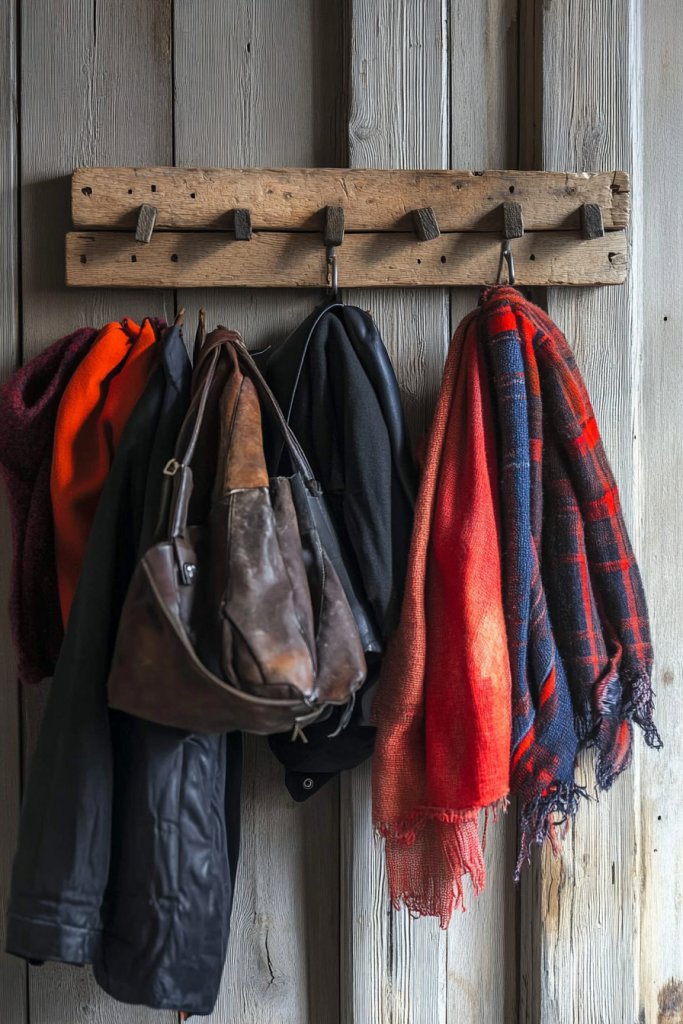
Cluttered entryways drive you crazy? A custom wooden coat rack made from offcuts provides an affordable, stylish solution. It keeps your jackets, scarves, and bags organized while adding a rustic touch. Plus, it’s a satisfying DIY project that costs next to nothing.
Imagine a simple horizontal plank mounted on the wall with several hooks, each crafted from scrap wood or repurposed hardware. The natural textures and imperfections give it a charming, handcrafted look. Hang it near your door, and it instantly transforms the space into a warm, inviting entry point. It’s functional art that welcomes you home.
Paint or stain the wood to match your decor palette. Use different hook styles—metal, wooden, or rope for a varied look. Mount multiple rails for extra hanging space or keep it minimal. Add decorative brackets or carved details for personality. It adapts to small or large entryways and suits various styles.
Gather scrap wood, cut to length, and sand all surfaces. Attach hooks securely, ensuring they can bear weight. Mount the rack into wall studs or use anchors for stability. Position at a comfortable height for easy access. Finish with a sealant or stain, then hang your coats and accessories. Simple but effective.
Decorate with painted patterns, engraved initials, or metallic accents. Add small shelves or cubbies for accessories like hats or gloves. Personalize with decorative hardware or contrasting stains. Change hooks seasonally or as your style evolves. It’s a practical piece that reflects your personality.
A DIY wooden coat rack from offcuts shows that you don’t need fancy materials to make something functional and stylish. It’s a budget-friendly upgrade that adds charm and order to your home. Want to impress guests with your craftsmanship? This project is just the beginning.
16. Compact Wooden Jewelry Organizer from Thin Slats
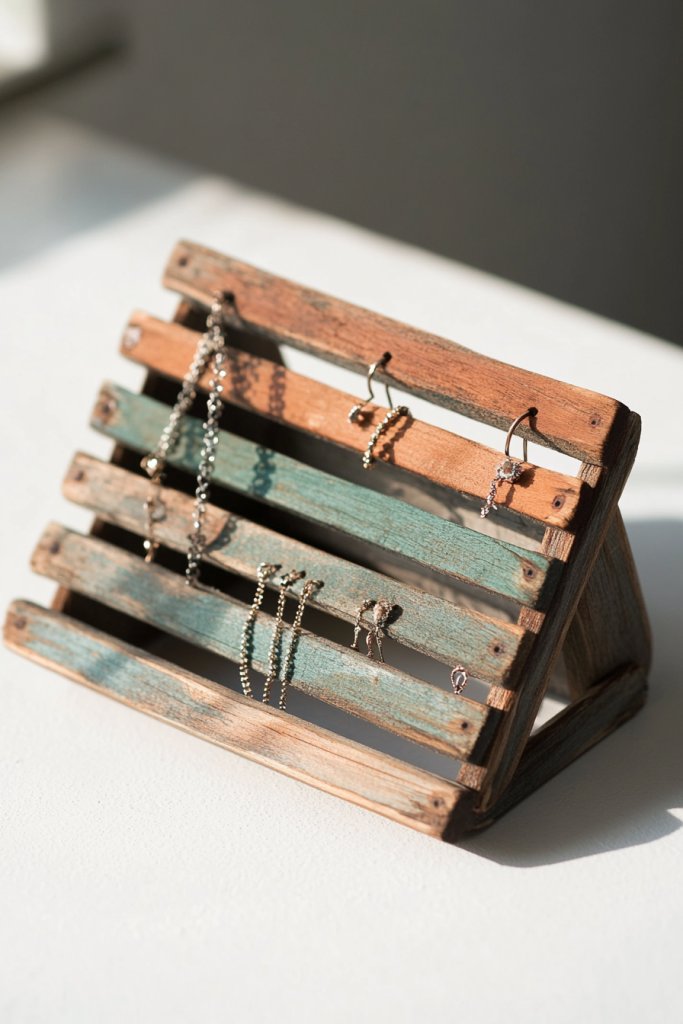
Jewelry cluttered on countertops or in drawers? A DIY jewelry organizer made from thin wood slats offers an affordable, stylish way to keep your accessories in order. It’s a simple project that makes selecting earrings or necklaces quick and easy. Plus, it adds a handcrafted touch to your vanity.
Picture a wall-mounted grid of slender wooden strips with tiny hooks or notches for hanging earrings, rings, and necklaces. The natural wood’s warmth contrasts with shiny jewelry, creating a functional art piece. Arrange it in a grid or a more organic pattern depending on your space and style. The open design keeps everything visible and accessible.
Paint or stain the wood to match your decor. Use different widths or lengths of slats for variety. Incorporate small baskets or compartments for storing smaller items. Mount it vertically or horizontally for different wall spaces. It’s perfect for bedrooms, bathrooms, or closets, offering maximum utility in a small footprint.
Cut thin wooden strips to size, sanding all edges. Attach hooks, notches, or small pegs at regular intervals using nails or glue. Mount onto a backing board or directly onto the wall with screws or nails. Finish with a protective coating to prevent wear. Organize your jewelry by type or frequency of use for an efficient setup.
Add painted or engraved labels for different jewelry categories. Incorporate decorative elements like painted patterns or metallic accents. Use different stain shades for a layered look. Personalize with initial engravings or motifs. It’s a functional piece that reflects your style and keeps your jewelry organized.
Building your own jewelry organizer from thin wood slats proves that even small projects can make a big difference. It’s budget-friendly, customizable, and keeps your accessories tidy. Ready to get organized in style? Your handcrafted jewelry station awaits!
17. Reclaimed Wood Lazy Susan for Dining or Decor
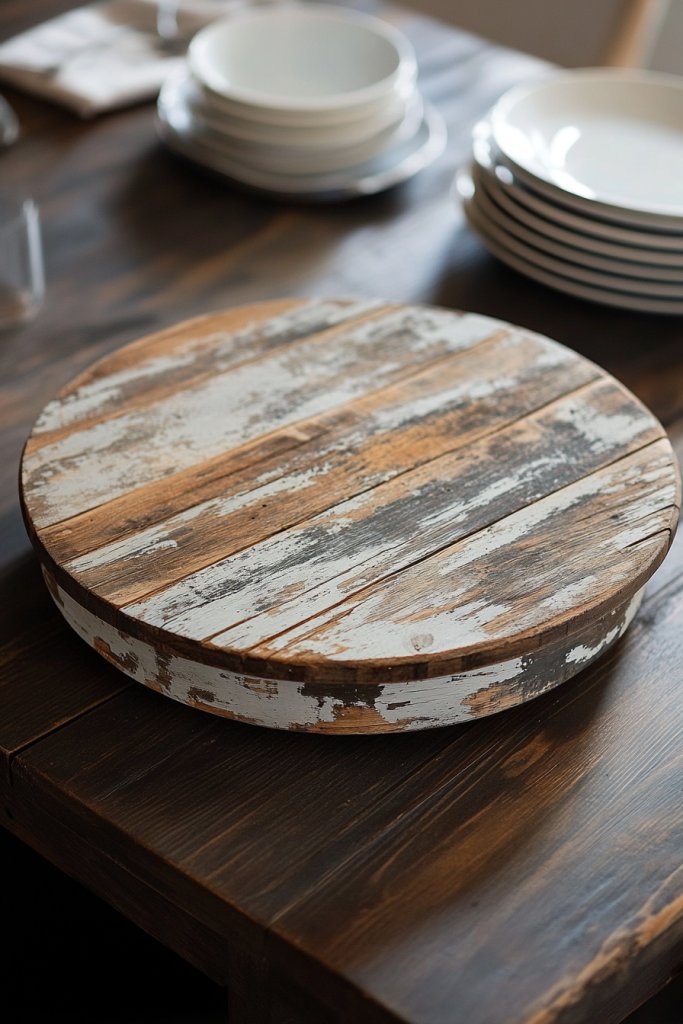
Tired of cluttered tabletops or awkward serving setups? A reclaimed wood Lazy Susan is a budget-friendly way to add both function and rustic charm. It makes sharing dishes easier and adds a centerpiece touch that sparks conversation. Who knew saving money could be so stylish?
Imagine a round, weathered wooden disc with a smooth, finished surface, rotating effortlessly on a sturdy base. It’s perfect for passing appetizers, condiments, or even as a decorative display. The natural imperfections and grain add authenticity, making it a focal point in your dining or living area. It’s both practical and eye-catching.
Paint or stain the wood for a different look—dark and glossy or light and matte. Use different sizes to suit your space or needs. Add decorative metal or rope accents for a nautical or vintage vibe. Incorporate a smooth, silent-turn mechanism for ease of use. It adapts seamlessly from casual family dinners to elegant parties.
Source reclaimed wood from pallets, old furniture, or salvage yards. Cut into a perfect circle with a jigsaw or router. Sand thoroughly for smoothness. Attach a rotating mechanism or base, ensuring stability and smooth operation. Finish with a protective sealant to withstand moisture and use. Place on your table, and you’re ready to serve.
Engrave or paint patterns, initials, or motifs to personalize. Use contrasting stains or paints for visual interest. Add decorative hardware or embellishments for extra character. Customize the size or shape for specific serving needs. It’s a functional piece that can be styled to match any decor.
A reclaimed wood Lazy Susan shows that even the simplest projects can have a big impact. It’s budget-friendly, eco-conscious, and highly functional. Want to impress guests at your next gathering? Your handcrafted serving piece is ready!
18. Small Wooden Plant Drawer or Window Sill Planter
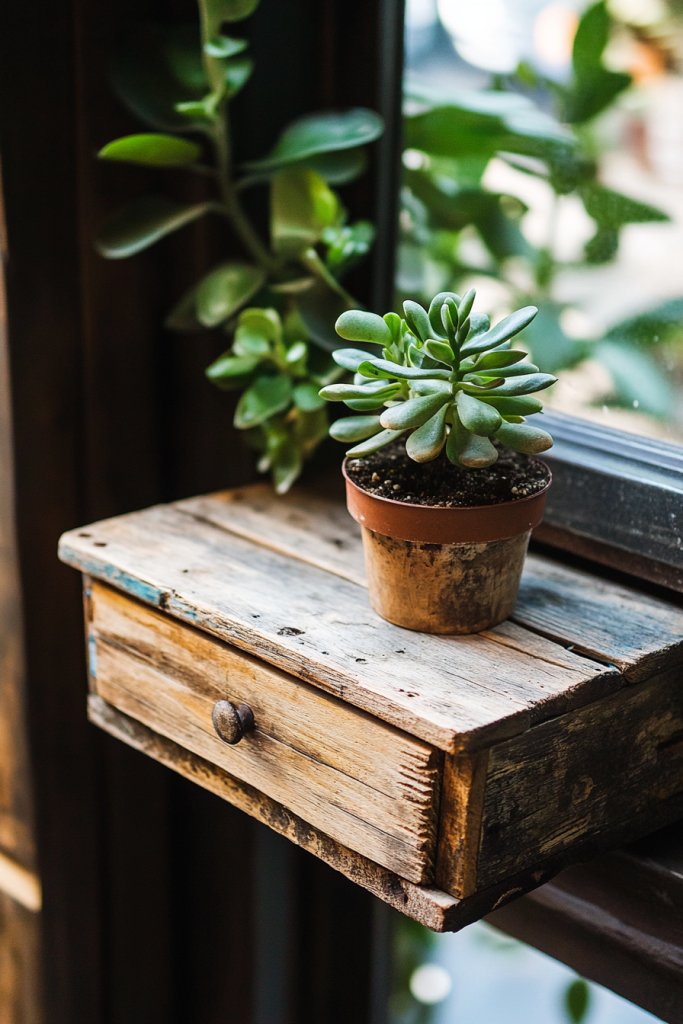
Craving a touch of greenery but limited on space? A small wooden plant drawer or window sill planter made from scrap wood is an easy, affordable solution. It transforms tiny areas into vibrant, personal gardens. Plus, it’s a fun DIY project that adds life to your home.
Picture a shallow wooden box with a rustic finish, filled with lush greenery spilling over the edges. It sits on a window sill or tucked into a corner, catching sunlight and brightening the space. The natural textures and simple design create a cozy, inviting atmosphere. It’s a small but impactful way to incorporate plants into your decor.
Paint or stain the wood in colors that complement your room. Use different sizes or shapes for variety. Incorporate drainage holes or liners to protect the wood and keep plants healthy. Mix different plant types—succulents, herbs, or small flowers—for a layered, colorful display. It’s perfect for urban apartments or small homes.
Gather scrap wood or old crates, cutting them into small drawers or boxes. Sand all surfaces and reinforce joints for durability. Add drainage holes if necessary, and line with waterproof material. Seal the wood with a weatherproof finish if used outdoors. Fill with soil, plant your greens, and place in a sunny spot. Easy and rewarding.
Decorate with painted patterns, engraved labels, or decorative hardware. Add small pebbles or decorative stones for aesthetic appeal. Personalize with plant markers or themed touches like seashells or stones. Change plants seasonally or as your mood shifts. It’s a charming, adaptable project.
Creating your own small planter from scrap wood proves that you can craft beauty from leftovers. It’s an affordable, eco-conscious way to brighten your space. Want a mini garden that’s all yours? Your DIY planter is ready to flourish!
19. Wooden Tray or Serving Platter from Thin Plywood
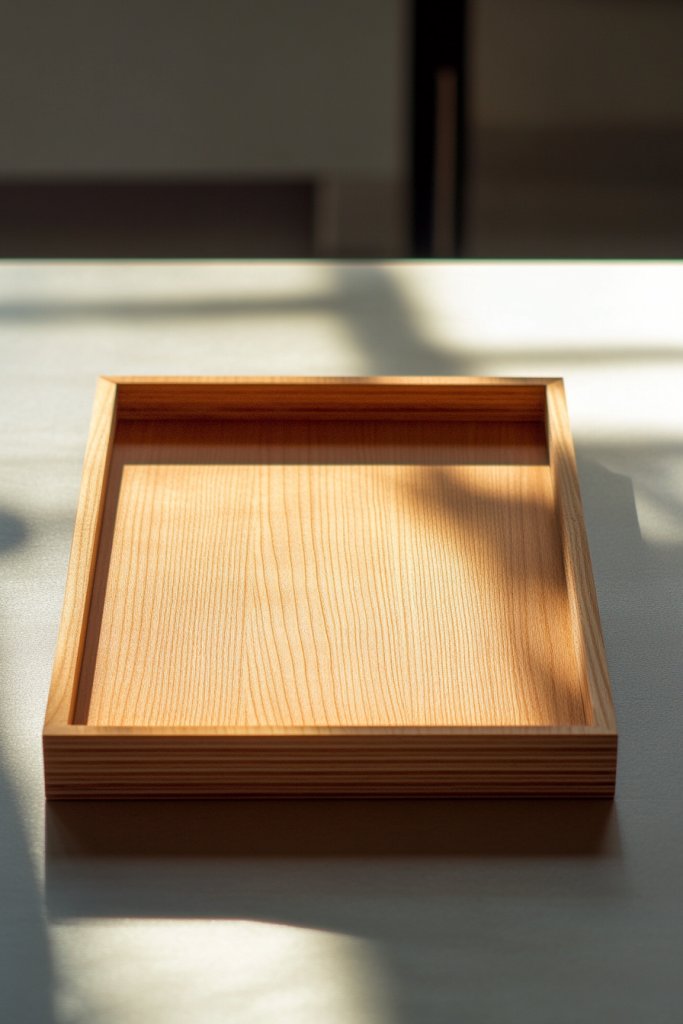
Looking for a stylish, inexpensive way to serve snacks or organize your space? A wooden tray or platter made from thin plywood is the perfect DIY project. It’s functional, customizable, and adds a natural touch to your table or countertop. Who says you need to buy expensive serveware?
Imagine a sleek, rectangular tray with rounded edges, finished with a clear protective coat. The subtle grain of the plywood adds texture, while handles or raised sides make it easy to carry. It’s perfect for brunches, cheese boards, or organizing small items. The minimalist design complements any style, from modern to rustic.
Paint or stain the wood for a pop of color or a polished look. Add decorative elements like painted motifs, stenciled patterns, or metallic accents. Resize it for different uses—small for jewelry or large for serving. Incorporate leather or rope handles for added style and functionality. It’s a versatile piece that can be tailored to your needs.
Cut plywood to your desired shape and size using a saw or jigsaw. Sand all edges thoroughly for safety. Attach handles using screws or strong adhesive. Finish with a food-safe sealant or a decorative stain. For a layered look, add a border or painted design. Use it to serve or organize, making everyday routines more stylish.
Decorate with painted patterns, monograms, or decorative hardware. Use contrasting stains or paints for visual interest. Incorporate non-slip pads or felt underneath for stability. Personal touches like stenciled messages or motifs make it uniquely yours. It’s a simple project with endless customization options.
Creating your own wooden serving tray from plywood proves that DIY can be both stylish and functional. It’s a budget-friendly project that adds a personal touch to your home. Want to impress guests or organize your space? Your handcrafted tray is ready!
Conclusion
From rustic shelves to personalized signs and charming planters, the array of cheapest wood ideas showcased here offers endless possibilities to enhance your home. Embrace these affordable options and start transforming your space today—your creativity is the only limit. Dive into your projects with confidence and turn your ideas into beautiful reality!
Leave a Reply