Ever wish you could give your home a stylish makeover without breaking the bank? Cheap DIY home decor has become a beloved trend because it lets you personalize your space while saving money and unleashing your creativity. It’s all about transforming everyday items and simple materials into stunning accents that reflect your unique style—no fancy skills or big budgets required! In this article, you’ll find a treasure trove of clever, budget-friendly ideas to elevate any room.
From eye-catching gallery walls to charming painted planters, these DIY projects are designed to inspire and empower you to craft beautiful decor on a dime. Whether you’re a beginner or a seasoned DIYer, get ready to discover a variety of easy, fun, and affordable ways to refresh your home and make it truly yours!
1. Create a Stylish Gallery Wall Using Budget Frames and Printable Art
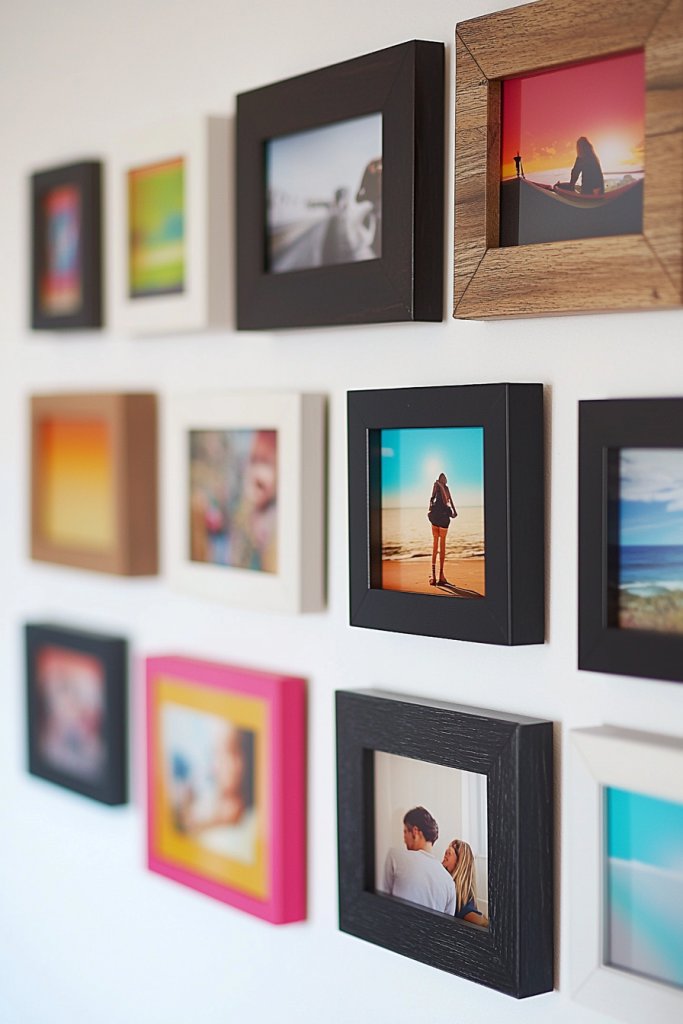
Transforming a plain wall into an eye-catching feature doesn’t have to break the bank. A gallery wall filled with favorite prints and photos adds personality and visual interest, making any space feel more curated and lively.
Imagine a blank wall adorned with a mix of inexpensive black-and-white photo frames and colorful printable artworks. The frames vary in size and shape, layered slightly unevenly for a relaxed, eclectic vibe.
You might choose downloadable botanical prints or abstract designs in shades of soft pink, navy, or gold accents. The overall look feels vibrant yet cohesive, with textures from the frames’ matte or glossy finishes contrasting beautifully against the wall.
The arrangement invites viewers to explore the space, making it feel warm and personalized without the need for costly art pieces or gallery commissions. To recreate this, gather budget-friendly frames from thrift stores or discount stores—think black, white, or metallic finishes—and print your favorite artwork or photos from free online resources.
Lay the arrangement on the floor first to experiment with placement before hanging. Use measuring tape and painter’s tape to mark positions on the wall for even spacing.
Secure each frame with nails or Command hooks for easy rearranging later. This DIY project offers a charming, customizable focal point that’s simple to update whenever your style or collection changes.
2. Repurpose Mason Jars into Chic Storage or Vase Displays
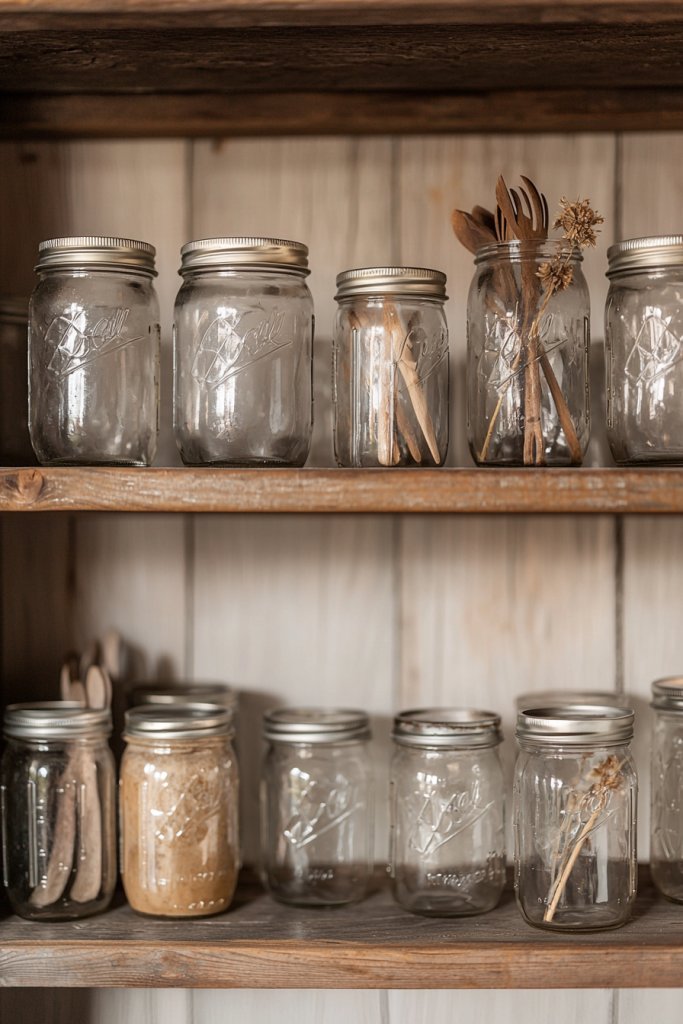
Mason jars are a classic, budget-friendly way to add rustic charm and functionality to your home decor. With a little creativity, these versatile glass containers can serve as stylish storage solutions or decorative vases, transforming your space effortlessly.
Picture clear mason jars filled with colorful dried beans, candies, or twinkle lights for a cozy, inviting glow. Alternatively, you could use them as vases for fresh or faux flowers, tying a simple twine bow around the neck for a charming touch.
The jars’ textured glass and vintage appeal bring warmth and nostalgia, while their neutral transparency complements any color palette. Whether positioned on a kitchen shelf, bathroom countertop, or coffee table, they add a layer of texture and personality to your decor.
To make your own, start with clean mason jars—pick up a pack from dollar stores or thrift shops. Fill them with items that match your style, such as dried herbs, seashells, or fairy lights.
For a more decorative look, paint the lids or jar rims with metallic spray paint or chalk paint and add labels or decals using stencils or printable labels. Place them on open shelving, tabletops, or clustered together on trays for maximum impact. These jars are simple, inexpensive, and endlessly adaptable to suit any room or season.
3. Sew Simple Cushion Covers from Old or Scrap Fabrics
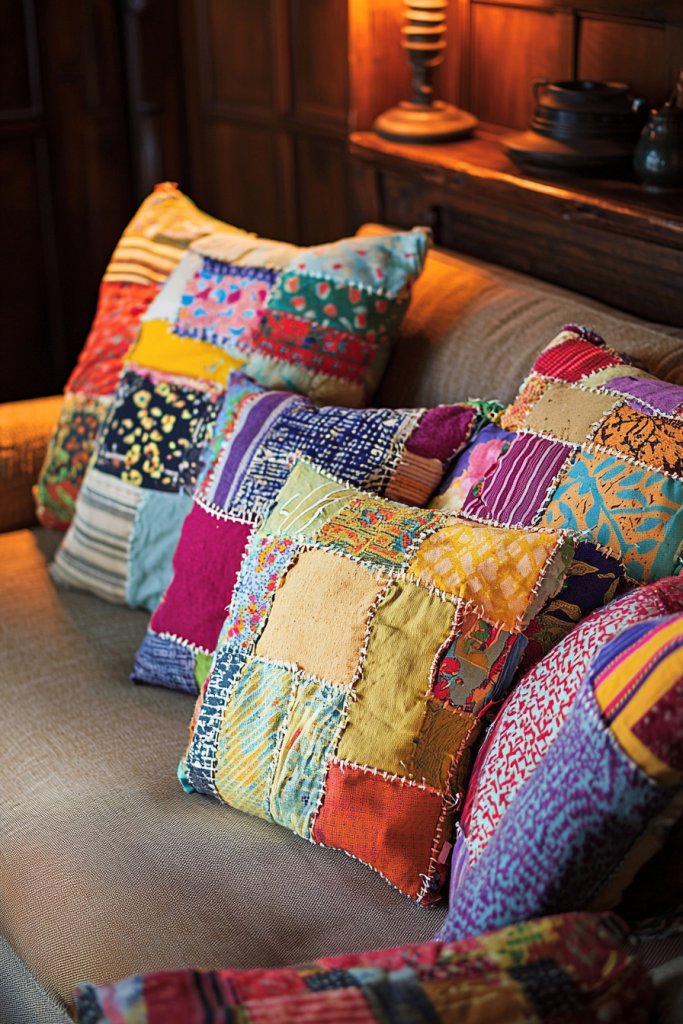
Updating your couch or armchair with fresh cushion covers is a quick way to elevate your living space without splurging. Using old or scrap fabrics, you can craft personalized, stylish covers that reflect your taste and add cozy texture.
Visualize a collection of cushions in soft, muted tones—perhaps a cream-colored knit cover paired with a textured burlap or patterned cotton—arranged casually on your sofa. The covers are simple rectangles or squares with concealed zippers or envelope closures, giving a clean, tailored look.
The tactile contrast of different fabrics creates visual interest, while the colors and textures evoke warmth and comfort. This DIY approach allows you to experiment with patterns, colors, and sizes, making your space uniquely yours.
To get started, measure your cushions, then cut fabric accordingly—preferably cotton, linen, or scrap upholstery fabric. Sew simple covers using a basic straight stitch, adding an invisible zipper or overlapping flap for easy removal.
You can find affordable textiles at thrift stores or repurpose old clothing and linens. Once finished, slide the covers over your cushions and arrange them on your sofa or chairs. This project is beginner-friendly, budget-conscious, and offers endless opportunities for customization and seasonal updates.
4. Craft Geometric Wall Shelves with Wooden Clamps and Offcuts
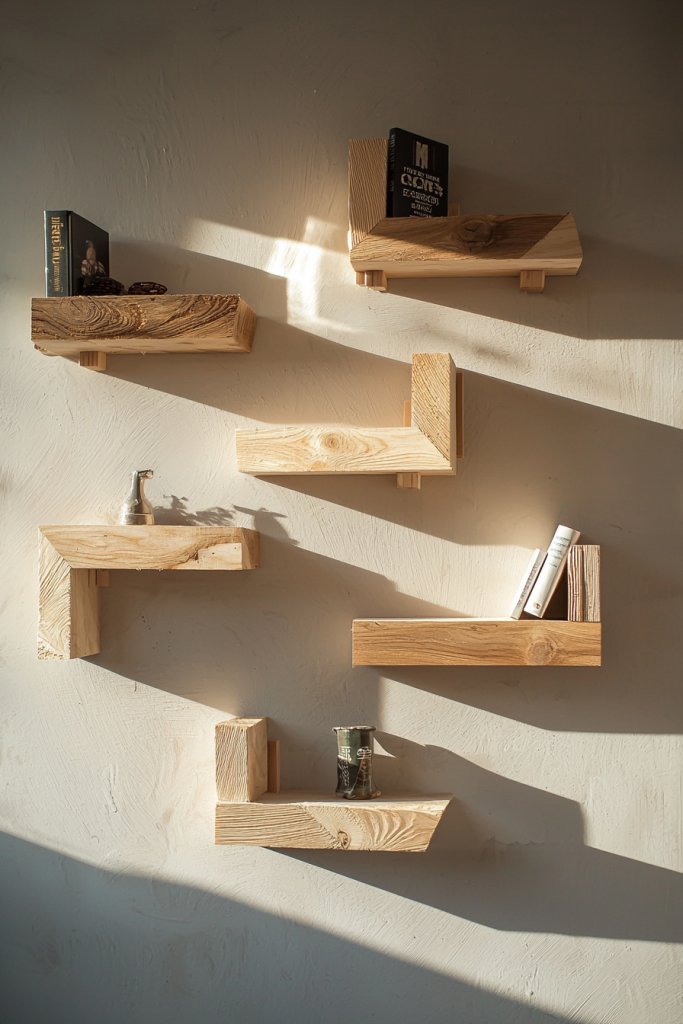
Creating modern, minimalist wall shelves from inexpensive materials is a great way to display decor or store essentials stylishly. Using wooden clamps and scraps of wood, you can build geometric shelves that are both functional and decorative.
Imagine sleek triangular or square shelves mounted on a wall, painted in trendy shades like matte black, blush pink, or natural wood tones. The shelves are held in place by simple wooden clamps or brackets, giving an industrial-chic vibe.
The design emphasizes clean lines and sharp angles, making the space feel contemporary and uncluttered. These shelves provide perfect spots for small plants, candles, or decorative objects, adding dimension and interest to any room.
Start by collecting offcuts of wood or inexpensive plywood—you can find these at hardware or thrift stores. Cut them into your desired shapes using a saw or have them pre-cut at the store.
Attach each piece to a sturdy wall using L-brackets or adhesive strips, then secure with clamps or corner braces for extra stability. Paint or seal the wood if desired, and arrange your decor on the shelves. This project is accessible for beginners and highly customizable, offering a chic, economical way to enhance your wall decor.
5. Decorate with DIY Painted Terra Cotta Pots and Vases

Hand-painted terra cotta pots bring a pop of color and personality to your home, perfect for decorating without the need for real plants. With simple techniques, you can customize plain pots into charming accents or whimsical decor objects.
Picture a set of terracotta pots painted in soft pastels—light pinks, blues, or muted greens—featuring hand-drawn patterns like stripes, polka dots, or geometric lines. These painted pots sit on floating shelves, windowsills, or mantelpieces, adding visual interest through their vibrant colors and textures.
Even without plants, they serve as decorative objects that evoke a cozy, artistic vibe, especially when paired with candles or fairy lights inside. The tactile quality of painted clay adds warmth and a handmade feel, making your decor more inviting and lively.
To create your own, start with plain terra cotta pots from any garden supply store. Use acrylic paints or spray paints in your favorite colors; for easier handling, apply multiple thin coats with a brush or sponge.
Decorate with stencils, painter’s tape, or freehand designs—just ensure the paint is fully dry before handling. You can also decoupage patterned paper or fabric onto the pots for extra texture. Once finished, display your custom-painted pots as standalone decor or use them as containers for faux flowers or decorative objects, transforming simple clay into statement pieces that brighten your home on a budget.
6. Make a Statement Mirror Frame Using Recycled Materials
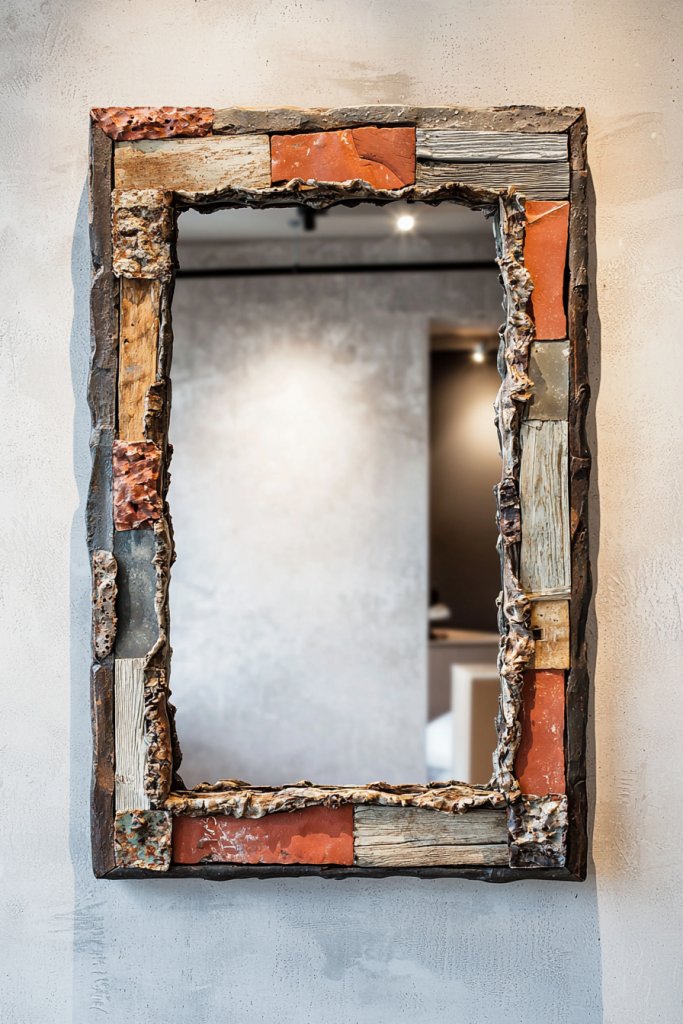
A beautifully crafted, eco-friendly mirror frame can instantly become the focal point of any room without breaking the bank. This idea transforms a simple mirror into a stunning piece of art that reflects your personality and creativity.
Imagine a large, rectangular mirror with a handmade frame composed of repurposed wood scraps or decorative trims gathered from old furniture or thrift stores. The frame might feature a rustic, distressed finish or be painted in bold colors like navy blue or metallic gold for a modern touch.
The textures of weathered wood or smooth painted surfaces add visual interest, while the frame’s thickness and design create depth around the reflective surface. When hung on the wall, this statement piece not only enlarges the space visually but also adds character with its unique, reclaimed charm.
To create your own recycled-material mirror frame, start by sourcing old wood, decorative trims, or even ornate picture frame pieces from thrift shops or leftover craft supplies. Measure the size of your mirror and cut your materials to fit snugly around the edges.
Attach the pieces using hot glue or small nails, depending on the material, and finish with paint or stain if desired. Once assembled, hang your custom frame mirror on an empty wall for an eye-catching, budget-friendly decor upgrade that’s both sustainable and stylish.
7. Style a Coffee Table with a Layered Tray and Decorative Objects

A well-styled coffee table can instantly elevate your living space, turning an ordinary surface into a curated centerpiece filled with personality and charm. This idea combines practicality with aesthetic appeal through thoughtful arrangement.
Picture a simple wooden or glass tray layered with a mix of decorative objects: a stack of colorful books, a few scented candles in patterned holders, a small potted succulent or faux plant, and a decorative sculpture or figurine. Add a soft throw or a textured table runner underneath the tray for warmth and visual layering.
The combination of different heights, textures, and colors creates a dynamic, inviting look. The space feels cozy, curated, and ready for entertaining or relaxing, with each item contributing to a cohesive style that reflects your taste.
To achieve this look, gather a tray—wooden, metal, or acrylic—and select a few favorite decorative objects you already own or can buy affordably, like vintage books or handmade candles. Arrange the objects in a balanced, slightly asymmetrical layout on the tray, ensuring some items are stacked or layered for depth.
Place the tray on your coffee table or side table, and adjust the arrangement until it feels natural and inviting. This simple styling trick transforms your table into a mini display that instantly adds personality and polish to your living room.
8. Design Unique Wall Art with Washi Tape or Scrapbook Supplies
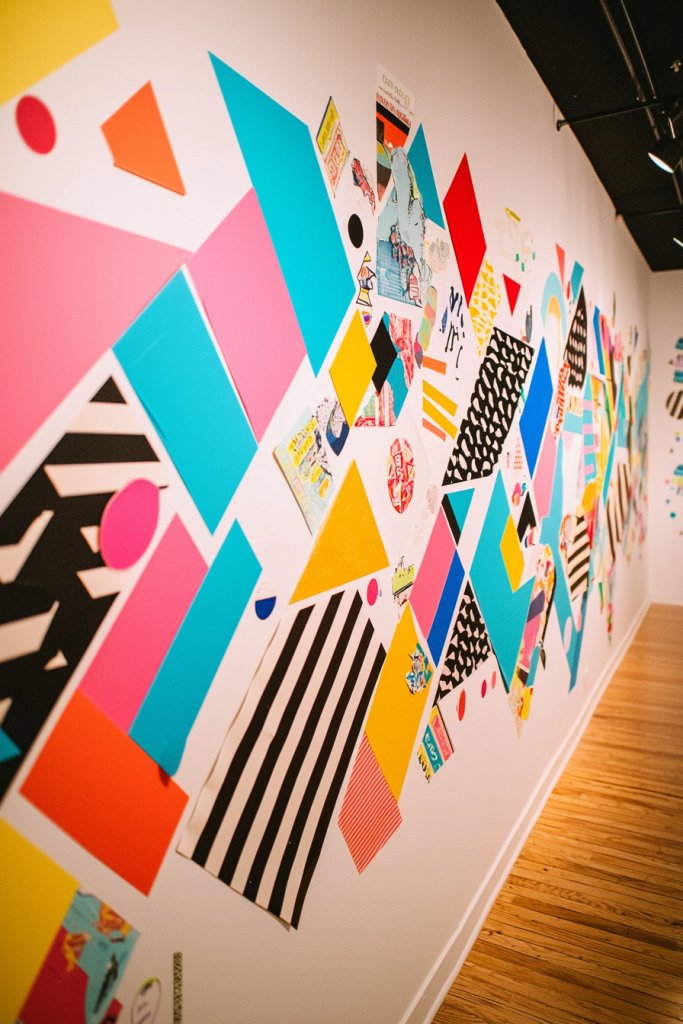
Creating custom wall art with washi tape or scrapbook materials is a fun, budget-friendly way to add color and personality to your home. This DIY approach allows for endless creativity and easy customization without the need for painting skills or expensive frames.
Visualize a blank wall transformed into an eye-catching display of geometric shapes, abstract patterns, or inspiring quotes, all crafted with colorful washi tape or decorative paper. You might create a large chevron pattern, a series of framed photo collages, or even a faux mosaic using small paper pieces.
The textures of tape or paper add visual interest, while their vibrant colors and patterns can be coordinated with your existing decor. The overall effect is playful and modern, with a DIY vibe that’s perfect for renters or those who love changeable decor.
Getting started is simple: select a few rolls of washi tape in your favorite colors or patterns, or gather scrapbook paper, cardstock, and scissors. Use painter’s tape or washi tape to create clean lines and shapes directly on the wall, or cut paper into shapes and arrange them in a grid or freestyle layout.
Secure paper with double-sided tape or poster putty, making sure everything is easy to remove or reposition later. This approach provides a fun, customizable, and affordable way to add vibrant wall art that can be updated as your style evolves.
9. Construct a DIY Floor or Table Lamp from Upcycled Items
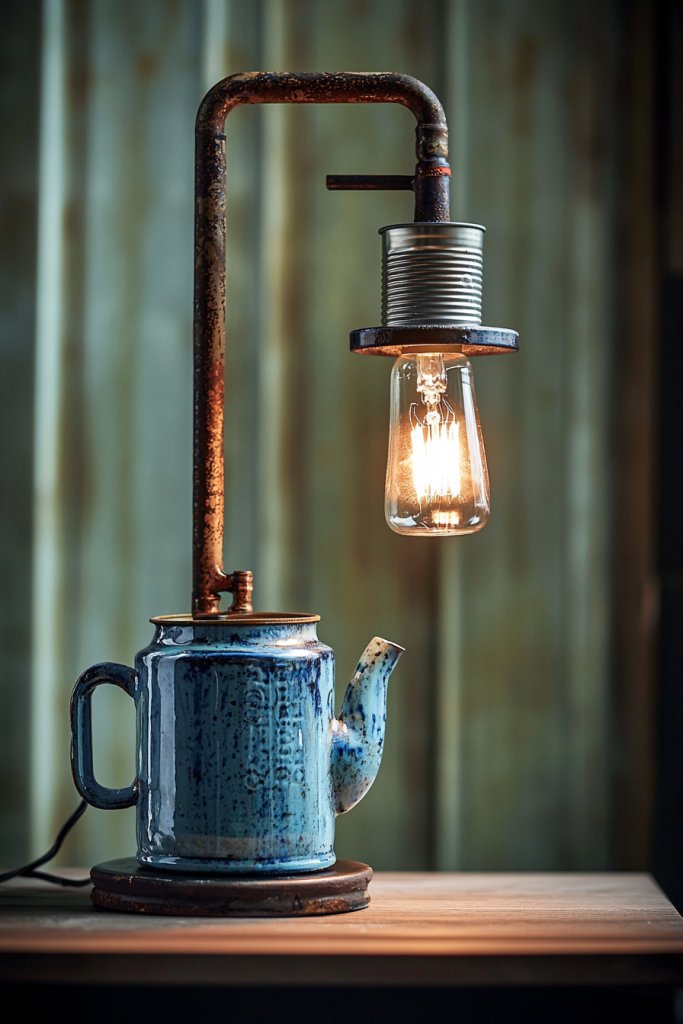
Lighting can dramatically change the ambiance of a room, and building your own lamp from upcycled items is a creative, budget-conscious way to bring warmth and personality to your space. Plus, it’s a satisfying project that can be tailored to your style.
Picture a floor or table lamp made from a vintage glass jar, a woven basket, or an old metal watering can, paired with a simple light socket kit. For a soft, warm glow, you might choose a string of fairy lights inside a large jar or an Edison bulb in a rustic metal fixture.
The lamp’s base could be a stack of books, a repurposed wooden crate, or a ceramic vase, creating a layered, textured look. When turned on, the soft light filters through the materials, creating inviting shadows and highlighting your unique decor style.
To make your own upcycled lamp, gather materials such as an old jar or container, a basic lamp kit from a hardware store, and a light bulb of your choice. Attach the socket to your chosen base following the kit instructions, then fit the container over the socket or place it inside if suitable.
Secure everything with hot glue or wiring connectors, and add a switch if needed. Plug it in, and you’ll have a one-of-a-kind lighting piece that combines sustainability with design flair—perfect for cozy corners or bedside tables.
10. Cover Old Furniture with Decorative Fabric or Contact Paper
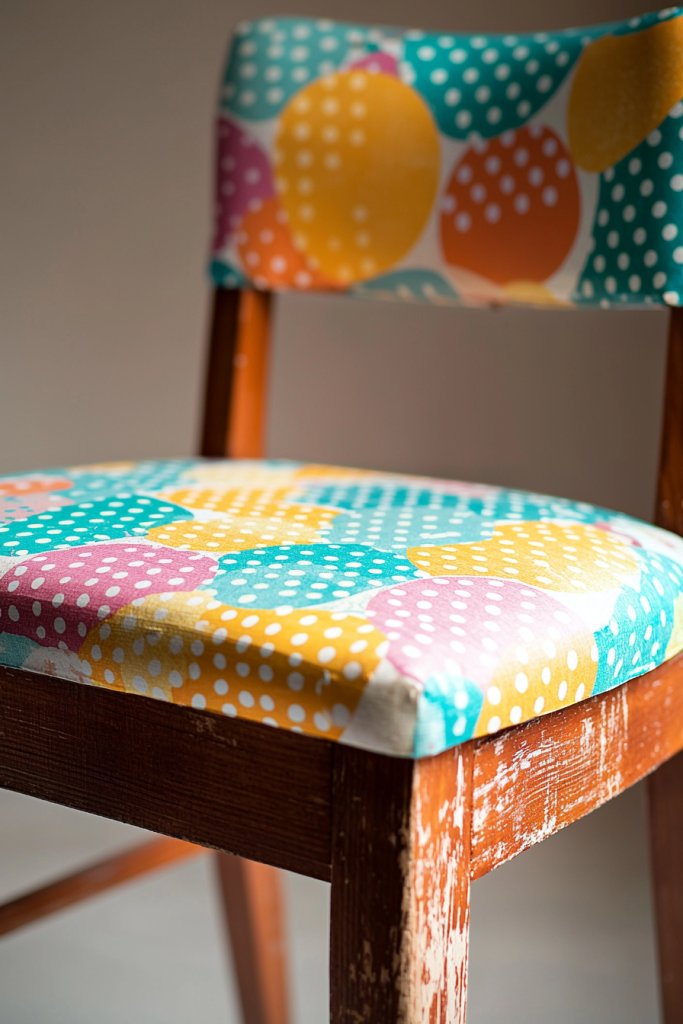
Revamping tired furniture with new textiles or contact paper is an easy, inexpensive way to breathe new life into your home decor. This technique allows you to customize pieces to match your style while keeping costs low.
Imagine a worn-out dresser or an old wooden chair transformed with a vibrant patterned contact paper or a cozy fabric slipcover. For fabric, choose an affordable textile like a soft cotton or linen, and sew simple cushion covers or reupholster with spray adhesive and a staple gun.
For contact paper, pick a bold print—think geometric patterns, floral designs, or metallic finishes—and carefully peel and stick it onto the furniture surface, smoothing out bubbles as you go. The result is a fresh, modern look that’s highly customizable and easy to change over time.
To get started, select a piece of furniture you want to update and gather your materials: contact paper or fabric, scissors, a staple gun, or adhesive spray. Measure the surfaces carefully and cut your materials to size, leaving extra for edges.
Apply the contact paper or fabric smoothly, pressing out air bubbles or wrinkles. Finish by trimming excess material and reattaching any hardware if needed. This straightforward project can be completed in a few hours, transforming your furniture into a stylish, personalized statement piece without the expense of buying new.
11. Assemble a Cozy Reading Nook with DIY Pillows and a Thrifted Chair
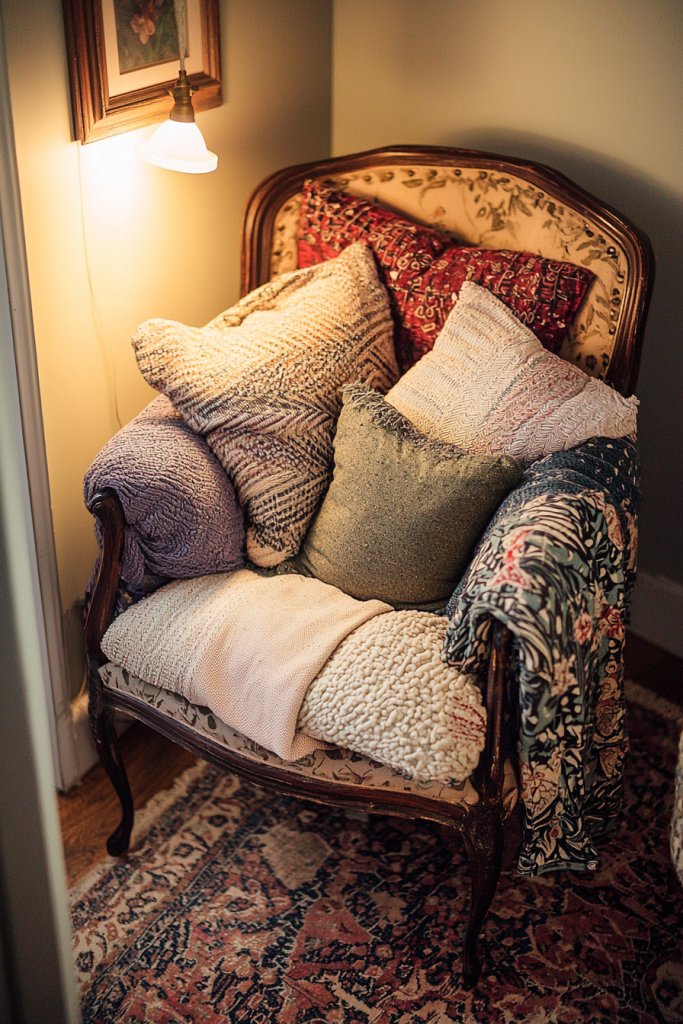
Creating a cozy reading nook is a wonderful way to transform a small corner into a personal retreat without breaking the bank. It’s about crafting a space that beckons you to unwind, read, or simply relax, making your home feel warmer and more inviting.
This idea resonates with anyone craving a peaceful sanctuary within their busy lives, especially with its affordability and ease of customization. Imagine a snug corner with a vintage or thrifted armchair dressed in soft, layered cushions.
You might add a chunky knit throw blanket in a neutral or pastel hue, draped casually over the armrest for texture and comfort. Surrounding the chair, a small side table or stack of books, along with fairy lights or a simple lamp, enhances the inviting atmosphere.
The space feels warm with a tactile mix of textiles, and the scent of a nearby candle or fresh linen adds to the ambiance. Bright, cheerful colors or muted earth tones can set the mood, depending on your style.
To recreate this cozy nook, start by sourcing an affordable chair at thrift stores or online marketplaces. Sew or repurpose old pillow covers using scrap fabrics or inexpensive textiles like linen or cotton—think soft blush, cream, or muted gray.
Add a few decorative cushions in various sizes and textures for comfort and visual interest. Finish by placing a cozy throw or blanket over the chair and arranging a small side table or a stack of your favorite books nearby. Personal touches like string lights or a small vase of dried flowers will complete your charming escape.
12. Decorate with DIY Textile Wall Hangings Using Yarn or T-Shirts
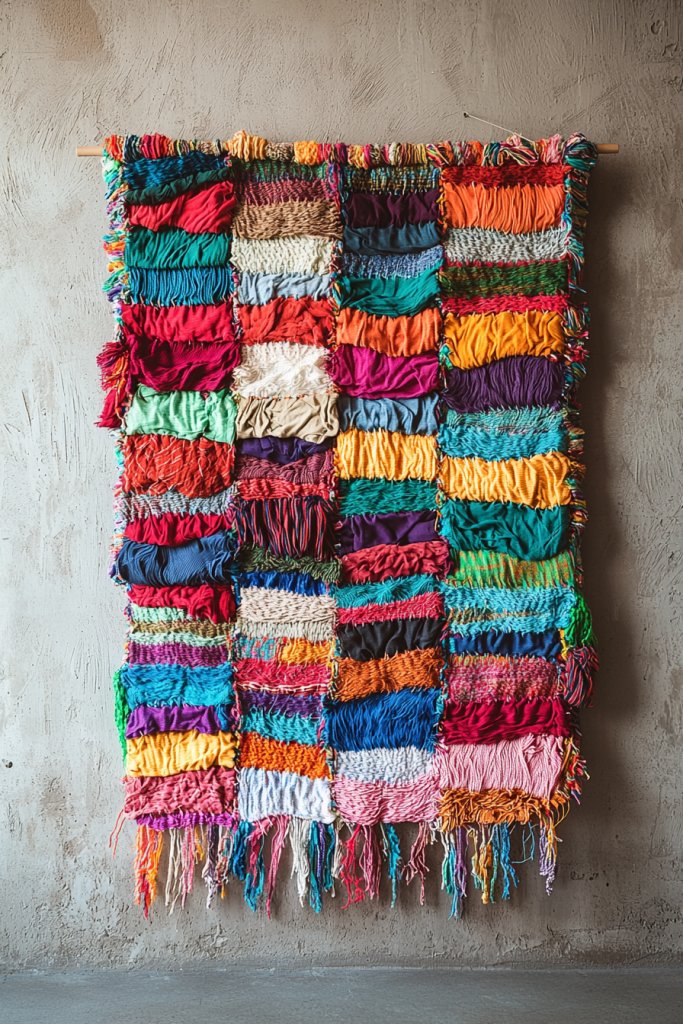
Textile wall hangings add warmth, texture, and personality to any space, making them a popular trend in affordable home decor. Using simple, everyday materials like yarn or old T-shirts, you can craft eye-catching art that elevates your walls without spending much.
This approach appeals especially to creative DIYers looking for a personalized touch that’s both fun and budget-friendly. Picture a large wall adorned with a boho-inspired tapestry made from thick, neutral-colored yarns twisted into chunky knots or woven into geometric patterns.
Or imagine a vibrant, abstract piece created from colorful T-shirts cut into strips and tied into a grid or layered design. The textures are tactile—soft, fibrous, and slightly rough—adding depth and visual interest.
The color palette can be neutral with pops of bright hues, or monochrome for a sleek, modern vibe. These hangings become focal points, inviting touch and admiration.
To make your own textile wall art, gather materials like yarn, T-shirts, or even fabric scraps. For yarn hangings, cut lengths of yarn and knot or braid them into desired shapes, then attach to a wooden dowel or stick.
For T-shirt weavings, cut the shirts into strips, then weave or knot them into a grid or design on a sturdy backing like cardboard or a wooden frame. Use hot glue or simple knots to secure your design, and hang with a nail or Command strip. These DIY pieces are easy to update or change as your style evolves, making your walls uniquely yours.
13. Personalize Space with Customizable Chalkboard or Corkboard Panels
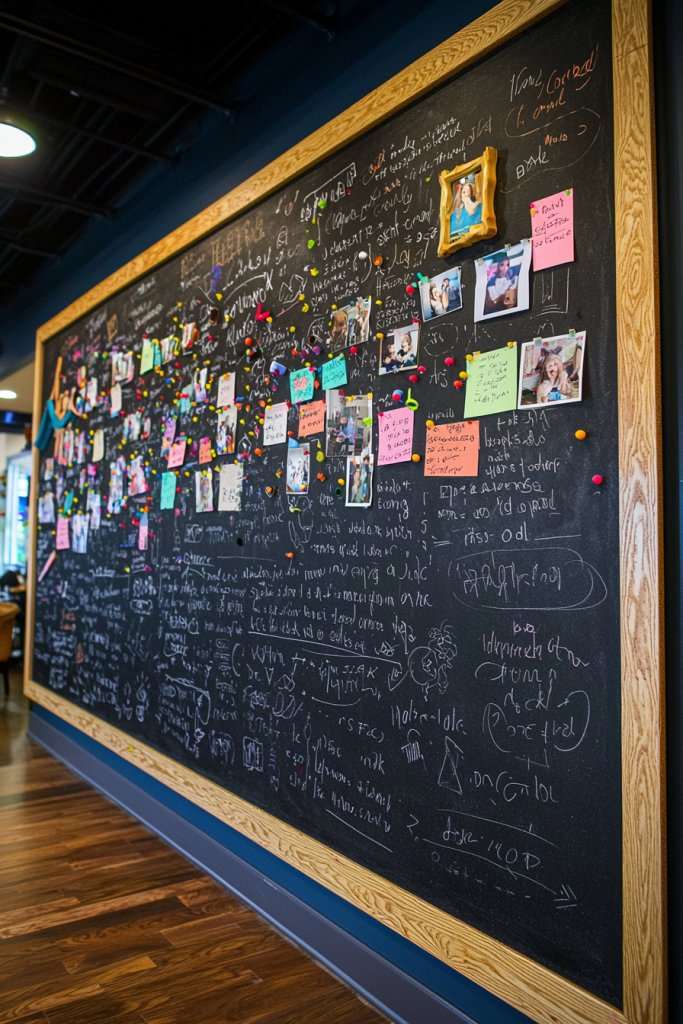
Adding a chalkboard or corkboard panel is a fantastic way to combine functionality with style in your home decor. It creates a versatile space for notes, reminders, artwork, or inspirational quotes, all while serving as a decorative element.
This idea is perfect for those wanting a low-cost, customizable solution that adds character and practicality. Visualize a framed chalkboard or corkboard mounted on a wall—perhaps painted in a trendy matte black or soft pastel shade to match your decor.
You could decorate the frame with washi tape, paint, or reclaimed wood for a rustic look. The surface itself is perfect for handwritten notes, daily affirmations, or displaying photos and keepsakes.
Surrounding elements like small shelves or decorative pins enhance its visual appeal. The overall effect is a lively, personalized display that adapts to your mood and needs.
Getting started is simple: purchase a large sheet of corkboard or chalkboard paint from a craft store or hardware store. Cut it to your desired size and frame it with inexpensive materials like reclaimed wood, painted cardboard, or even a decorated picture frame.
Mount it on the wall using nails, adhesive strips, or hooks. Customize it further with washi tape borders, stickers, or painted accents to suit your style. It’s a practical DIY upgrade that keeps your space organized and visually interesting.
14. Style Shelves with DIY Candle Holders and Decorative Bottles

Decorative shelves become statement pieces when styled with DIY candle holders and repurposed bottles, creating a warm and inviting display that’s both functional and artistic. This idea leverages everyday items, turning them into charming accents that elevate your home’s aesthetic on a tight budget.
It’s perfect for those who love to mix and match textures and vintage finds. Picture open shelves adorned with a variety of candle holders—perhaps repurposed teacups, tin cans painted in metallic shades, or small glass jars.
These hold simple candles, pillar candles, or tealights, casting a cozy glow. Intermixed are decorative bottles or vases—such as clear glass bottles with cork stoppers or painted jars—filled with fairy lights, dried flowers, or left empty for minimalist charm.
The overall look is eclectic, with a mix of textures, transparent and opaque surfaces, and subtle color accents like gold, blush, or deep blues. To style your shelves, gather materials like empty glass bottles, jars, or tins, along with candles—either store-bought or DIY from beeswax sheets or old candle stubs.
Create your candle holders by painting, decoupaging, or wrapping them in twine for added texture. Arrange your items in a balanced way, mixing heights and shapes for visual interest.
Add small decorative objects like framed photos or plants (if desired) for variety. With a little creativity, you can craft a beautifully curated display that adds warmth and personality to any room.
15. Make Your Own Decorative Trays with Painted Cardboard or Wooden Pieces
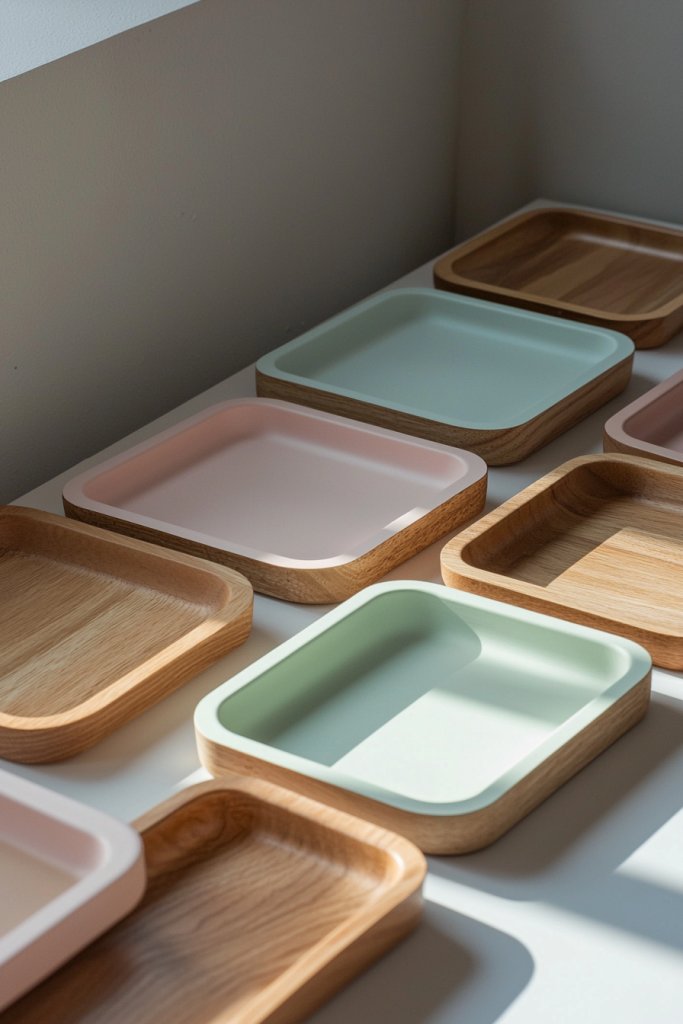
Decorative trays are versatile accents that help organize and showcase your favorite items, and making them yourself adds a personal touch. Using inexpensive materials like painted cardboard or reclaimed wood, you can craft unique trays that serve as centerpieces, catch-all spots, or serving dishes.
This project is ideal for DIY enthusiasts seeking stylish yet practical decor. Imagine a sleek, rectangular tray with a painted geometric pattern in bold colors like navy, gold, and white.
Or a rustic, distressed wooden tray with handles, perfect for serving breakfast in bed or displaying candles and small plants. The textures range from smooth painted surfaces to rough, natural wood grain, creating visual interest.
The size can be customized to fit your space, and the design can be tailored to match your decor theme—modern, boho, farmhouse, or minimalist. To create your own tray, start with sturdy cardboard boxes, wooden planks, or scrap wood sourced from thrift stores or leftover projects.
Cut to your desired size, then paint or stain using acrylic paints, spray paint, or wood stain—consider stencils for patterns or metallic accents for a chic look. Attach small handles made from rope, drawer pulls, or wire for easy carrying.
Seal the surface with a clear acrylic spray if using paint, and let everything dry thoroughly before use. These handmade trays will add a custom, stylish touch to your home while being budget-friendly and fun to make.
16. Create an Artistic Wall Mural with Stencils or Tape
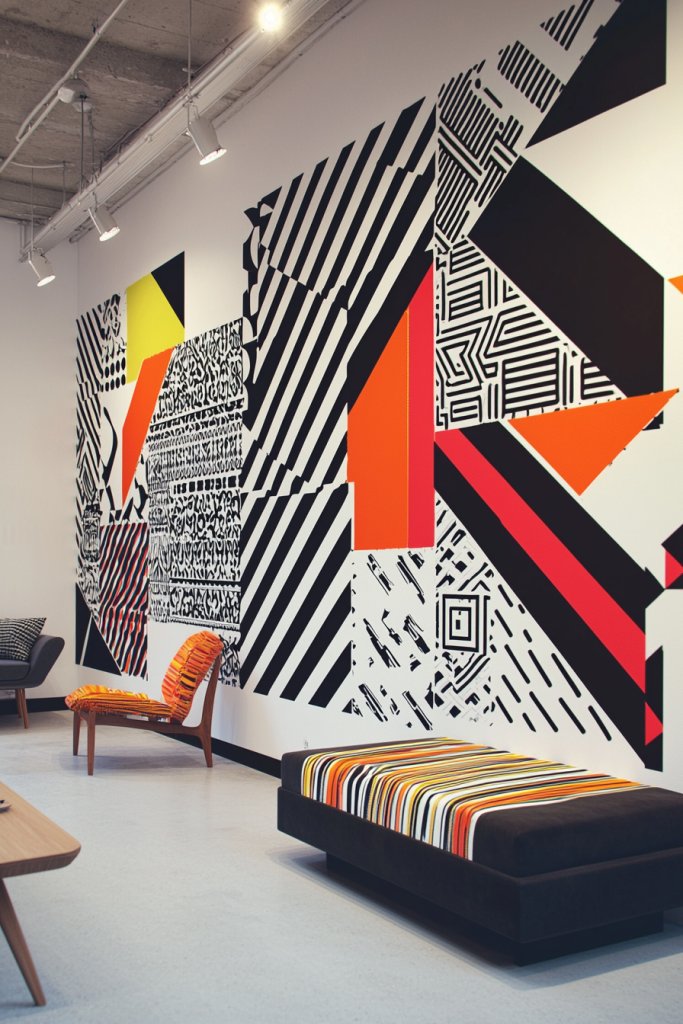
Transforming a plain wall into a striking focal point can dramatically elevate your space without breaking the bank. A DIY wall mural using stencils or painter’s tape offers a creative, customizable way to add personality and visual interest, making your home feel more vibrant and curated.
Imagine a large wall painted with bold geometric shapes in shades of navy, blush, and gold, with crisp lines and clean edges. The mural might feature repeating patterns or abstract designs that stretch across the surface, creating a sense of movement and depth.
The tactile contrast between matte and glossy paints, combined with the visual pattern, draws the eye and adds dimension to your room. This approach works well in modern, boho, or eclectic styles and can be tailored to any color scheme or room size, making the space feel more dynamic and personalized.
Getting started is simple and budget-friendly. First, choose your design and gather supplies: painter’s tape, stencils (or create your own using cardboard), acrylic or latex paints, and a level for accuracy.
Prepare the wall by cleaning it thoroughly, then sketch your pattern lightly with a pencil. Use painter’s tape to outline geometric shapes or sections, filling them in with your chosen colors.
Allow the paint to dry completely before removing the tape, revealing sharp, professional-looking lines. This project can be completed in a weekend and transforms an ordinary wall into an eye-catching masterpiece.
17. Decorate with Handmade Sculptures or Decorative Objects from Recyclables
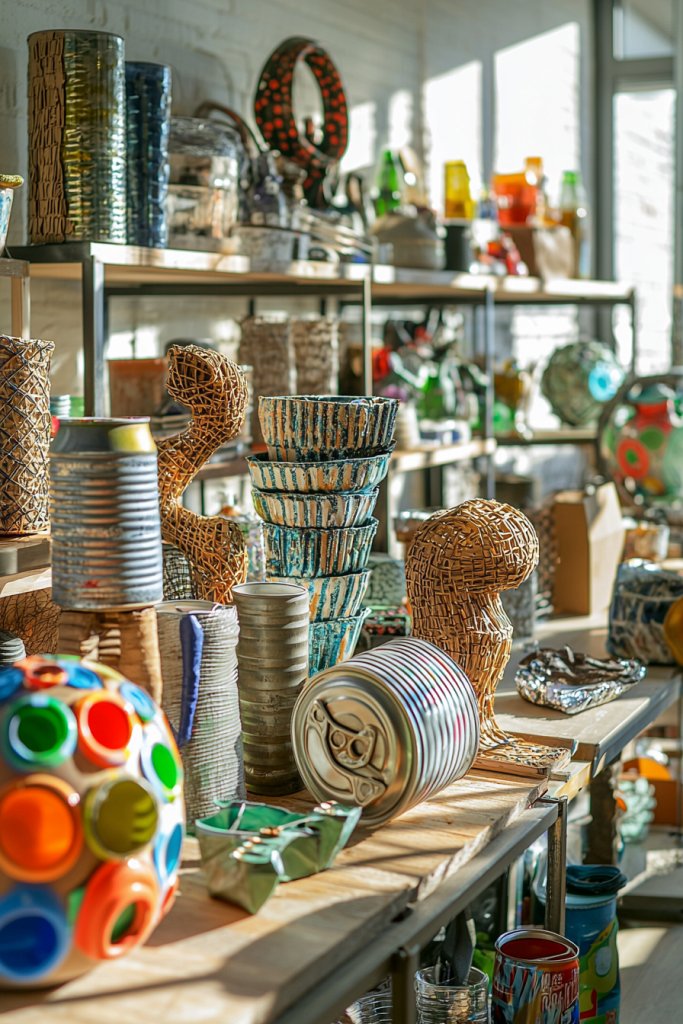
Adding unique, eco-friendly decor to your home can be both fun and budget-conscious, with handmade sculptures or decorative objects crafted from everyday recyclables. This approach not only boosts creativity but also promotes sustainability while giving your space a truly one-of-a-kind vibe.
Picture small sculptures made from aluminum cans, bottle caps, or cardboard boxes, painted in metallic shades or vibrant colors to enhance their visual appeal. For example, a cluster of painted tin can planters arranged on a shelf can serve as eye-catching decor, while a wire sculpture from recycled coat hangers adds a whimsical touch.
These items can be placed on mantels, coffee tables, or hung on walls, adding texture and a playful, artistic element. The colors can be coordinated with your existing palette—think metallics, bright primaries, or monochrome schemes—to match your aesthetic.
These creative objects evoke a sense of ingenuity and environmental consciousness, making them conversation starters. To create your own recycled decor, gather materials like plastic bottles, cardboard, metal scraps, or paper tubes.
Use basic tools such as scissors, hot glue, or simple wire bending techniques. Start by designing simple shapes or figures, then assemble and paint or decorate them to your liking.
For instance, turn empty tin cans into sleek, painted candle holders or stack cardboard to form geometric sculptures. The process is accessible for beginners and can be completed in a few hours, resulting in charming, personalized decor that adds character and eco-friendly flair to your home.
Conclusion
With these 17 budget-friendly DIY home decor ideas, transforming your space has never been easier or more fun. From personalized gallery walls and repurposed furniture to creative wall art and cozy nooks, there’s something for every style and skill level. So why not roll up your sleeves and start creating a beautiful, unique home that reflects your personality—all without breaking the bank? Your stylish, customized space is just a DIY project away!
Leave a Reply