Canning is more than just a preservation method—it’s a way to connect with tradition, enjoy homemade flavors year-round, and add a charming touch to your kitchen. As more people embrace the art of canning, the need for clever and efficient storage solutions has skyrocketed. Creative canning storage ideas not only keep your preserves organized but also turn your pantry into a visual delight.
In this article, you’ll find a variety of practical and stylish storage ideas that will elevate your canning game. From space-saving racks to decorative jars and innovative shelving, these tips will help you showcase your preserves beautifully while keeping everything tidy and accessible. Get ready to transform your storage space into a delightful showcase of your hard-earned bounty!
1. Rustic Wooden Crate Shelves for Vintage Charm
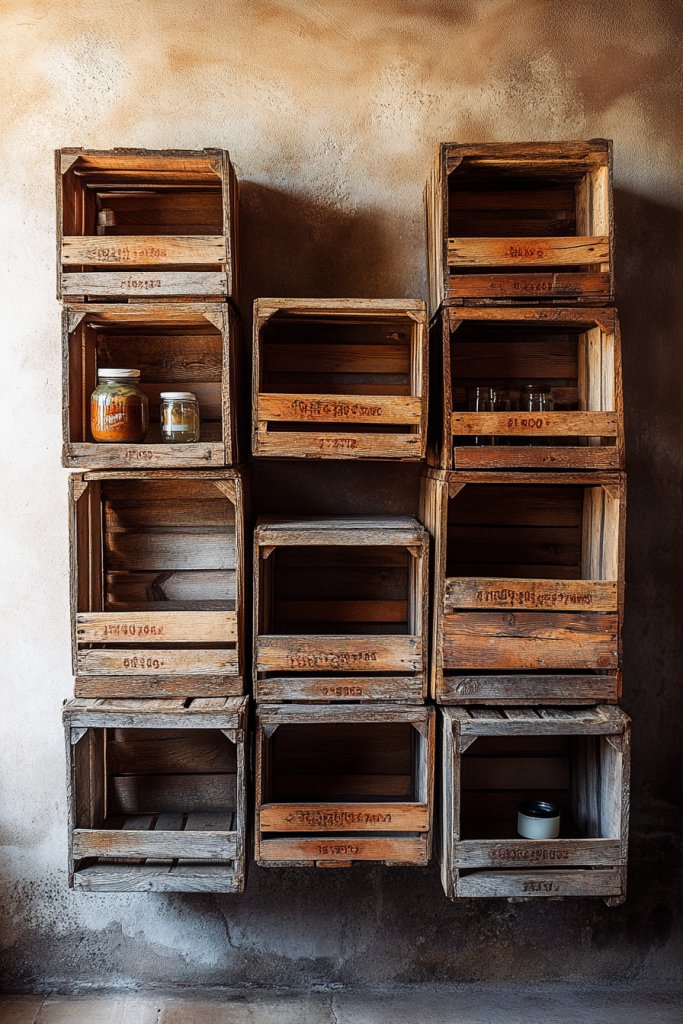
Ever struggle to keep your canning supplies organized without sacrificing style? Rustic wooden crate shelves offer a charming solution that combines practicality with vintage appeal. They transform a cluttered pantry into a cozy, inviting space that feels like a step back in time. If you love the idea of displaying your preserves in a way that’s both functional and aesthetically pleasing, this idea is your new best friend.
Imagine weathered wooden crates mounted on a whitewashed wall, their rough textures contrasting beautifully with glass jars filled with colorful preserves. The open design allows you to see every jar at a glance, while the natural wood tones add warmth and character. Soft sunlight filters in, highlighting the rustic charm and making your kitchen feel like a farmhouse retreat. This setup invites you to grab a jar and enjoy a moment of nostalgic comfort.
You can paint or stain the crates to match your decor, from shabby chic pastels to dark, rich woods. For small spaces, stack crates vertically for a compact yet impactful display. Add decorative tags or vintage labels for a personalized touch. Seasonal swaps, like adding evergreen sprigs or faux berries, can refresh the look during holidays without much effort. These shelves adapt effortlessly to any style, from farmhouse to industrial.
Start by sourcing sturdy wooden crates, either repurposed or new with a distressed finish. Mount them securely on the wall using heavy-duty brackets or screws, ensuring they can hold the weight of filled jars. Arrange them in a pattern that maximizes space and accessibility, perhaps in a staggered or grid layout. Seal the wood with a protective finish if desired, and add small hooks or labels for extra organization. Keep safety in mind by anchoring crates properly to prevent accidents.
Personalize your crates with painted initials, decorative decals, or vintage-inspired hardware. Incorporate small chalkboards or metal tags for easy labeling of different preserves and flavors. Use colorful ribbons or twine to tie around the jars for a festive look or gift-ready presentation. You could even add mini potted herbs or dried flowers on top for added visual interest. Let your personality shine through in every detail.
Rustic crate shelves make your kitchen feel warm and welcoming, proving that organization can be both functional and beautiful. They’re perfect for DIY enthusiasts eager to add a personal touch. With a little effort, you can create a standout display that impresses guests and keeps your preserves easy to find. Ready to turn your storage into a charming feature? Let the rustic vibe take over and enjoy the process!
2. Mason Jar Pendant Light Display
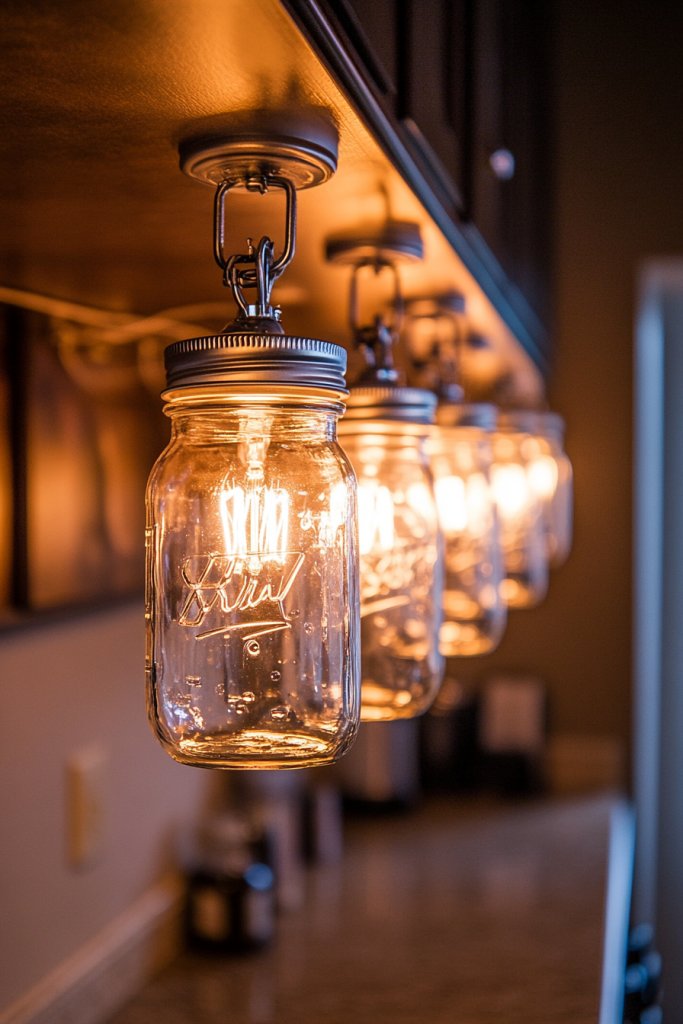
Struggling to find a stylish way to illuminate your pantry or kitchen corner while showcasing your preserves? Mason jar pendant lights merge lighting with a unique display, turning simple jars into eye-catching fixtures. They add a cozy glow and a touch of nostalgia, making your space feel warm and inviting. If you love DIY projects that combine form and function, this idea hits all the right notes.
Picture an array of clear mason jars hanging at varying heights from a rustic metal pipe or wooden beam. Inside each jar, LED string lights cast a gentle, flickering glow that dances across your countertops. The transparent glass amplifies the light, creating a magical ambiance reminiscent of vintage lanterns. The jars’ smooth curves and the soft illumination evoke a cozy, inviting atmosphere perfect for relaxed evenings.
You can paint the lids in coordinating colors or leave them metallic for a sleek look. For a more industrial vibe, incorporate exposed Edison bulbs or blackened hardware. During holidays, swap the LED strings for fairy lights with tiny ornaments or ribbons. For smaller spaces, cluster a few jars together for a subtle glow, while larger kitchens can handle a grander display with multiple tiers.
Begin by selecting sturdy mason jars and appropriate lighting. String LED fairy lights or small filament bulbs inside the jars, ensuring the wiring is safe and concealed. Mount a horizontal pipe or wooden plank securely to the ceiling, attaching hooks or brackets to hang the jars. Adjust the height for visual interest and safety, and test the lighting before final installation. Use dimmers if possible for adjustable brightness, creating the perfect mood. Regularly check wiring for safety and functionality.
Use colorful or patterned jar lids to match your decor theme. Add decorative beads or fabric around the jar necks for a personalized touch. For a more eclectic look, mix vintage and modern jars, or incorporate small decorative elements inside the jars like faux greenery or craft supplies. Change the light colors seasonally for a fresh vibe or add a decorative cord wrap around the hanging fixtures. Make it uniquely yours.
This lighting idea proves that you don’t need fancy fixtures to create stunning ambiance. It’s easy to customize and perfect for DIY lovers looking to add charm and function. Plus, it’s a conversation starter—who wouldn’t love the nostalgic glow of mason jars? Get creative, and soon you’ll have a gorgeous, functional display that brightens your space and your mood.
3. Clear Acrylic Stackable Bins for Modern Minimalism

Fed up with rummaging through cluttered cabinets for that one jar? Clear acrylic stackable bins make organization straightforward and stylish, especially if you love a clean, modern look. They transform chaos into order, letting you see exactly what you have without digging around. If you crave simplicity and efficiency, this is your new best friend for canned goods and preserves.
Envision sleek, transparent bins neatly stacked on your pantry shelves, each filled with vibrantly colored jams and pickles. The see-through design means no more guessing which jar is which—everything is visible at a glance. Their minimalist aesthetic complements contemporary kitchens, reflecting light and making the space feel larger. The uniformity of the bins creates a calm, organized vibe that’s both functional and visually pleasing.
Choose different sizes to accommodate various jar heights, or add labels directly on the bins for even quicker identification. Stack them vertically or line them up side by side, adapting to your available space. For seasonal changes, swap out contents or rearrange the bins for a refreshed look. You can also add decorative elements like colorful liners or fabric inserts for a softer touch in more rustic settings.
Start by measuring your shelf space and selecting suitable bin sizes. Clean and dry your jars thoroughly before filling them to prevent sticking or mold. Label each bin for easy identification, either with adhesive labels or a whiteboard surface. Stack the bins securely, ensuring they are stable and won’t topple when loaded. Regularly review contents to keep everything current, and wipe down the acrylic surfaces to maintain clarity. This setup is easy to expand as your collection grows.
Add colorful stickers or custom labels for a personalized touch. Use decorative shelf liners underneath the bins to tie into your decor. Incorporate small baskets or dividers inside the bins if you want to separate different flavors or types. For a pop of color, choose acrylic bins in tinted shades or with frosted textures. Personal tweaks like these make organization both functional and fun.
Modern minimalism doesn’t mean boring—it means smart, sleek, and stress-free. These bins help you stay organized while maintaining a high-end look that elevates your entire kitchen. Once set up, you’ll wonder how you ever managed without this clarity and order. It’s a simple upgrade with a big payoff—enjoy your beautifully organized preserves!
4. Repurposed Ladder as a Canning Jar Rack
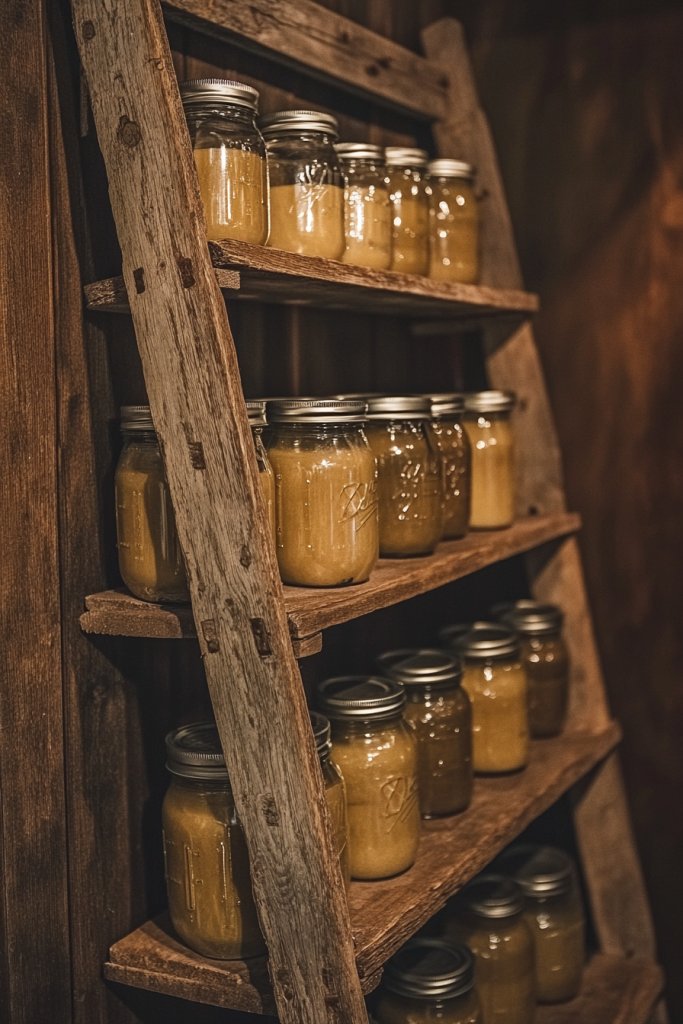
Ever wish you had more space to display your canned treasures without cluttering your counters? Repurposing an old ladder into a jar rack combines storage with a rustic decor statement. It’s a clever way to add vertical storage and showcase your preserves proudly. If you love upcycling and creating focal points, this idea is a win-win.
Picture a vintage wooden ladder leaning against a kitchen wall, its rungs transformed into shelves or hooks holding rows of colorful jars. The weathered paint and natural wood add charm, especially when contrasted with bright preserves inside. The open design invites you to browse your collection effortlessly, turning storage into decor. Light filters through, highlighting each jar like a gallery exhibit, making your kitchen feel warm and inviting.
You can attach wooden planks or wire baskets across the rungs for more stability or to add shelves. Use hooks or S-hooks for hanging jars, or simply rest them on the rungs if weight allows. Paint or stain the ladder to match your theme, from distressed chic to polished farmhouse. Seasonal accents like greenery or fairy lights can be added without cluttering the space. This adaptable piece suits small apartments or large kitchens alike.
Select a sturdy, preferably old ladder that can handle the weight of your jars. Securely fix hooks or crossbars on the rungs to hold jars or baskets. Lean the ladder against the wall at a comfortable angle, making sure it’s stable and won’t slip. Organize jars by size and type, and label them for quick access. Reinforce the ladder if needed with wall anchors for extra safety. Regularly check stability, especially if you move or rearrange.
Decorate the ladder with painted patterns, stenciled labels, or vintage hardware for added character. Use colorful or themed ribbons to tie around jar lids or handles. Incorporate small decorative elements like vintage signs or metal accents for a personalized touch. You could also add hooks for utensils or tools, turning it into a multi-purpose station. Let your creativity turn a simple ladder into a feature piece.
This upcycling project proves that you don’t need new furniture to create functional beauty. It’s budget-friendly, eco-conscious, and highly customizable. Once finished, your kitchen gains both storage and personality—plus it’s a conversation starter. Embrace the charm of vintage and make your preserves part of your decor story. Just a ladder away from a more organized, stylish space!
5. Magnetic Spice Jars on Metal Boards for Compact Storage
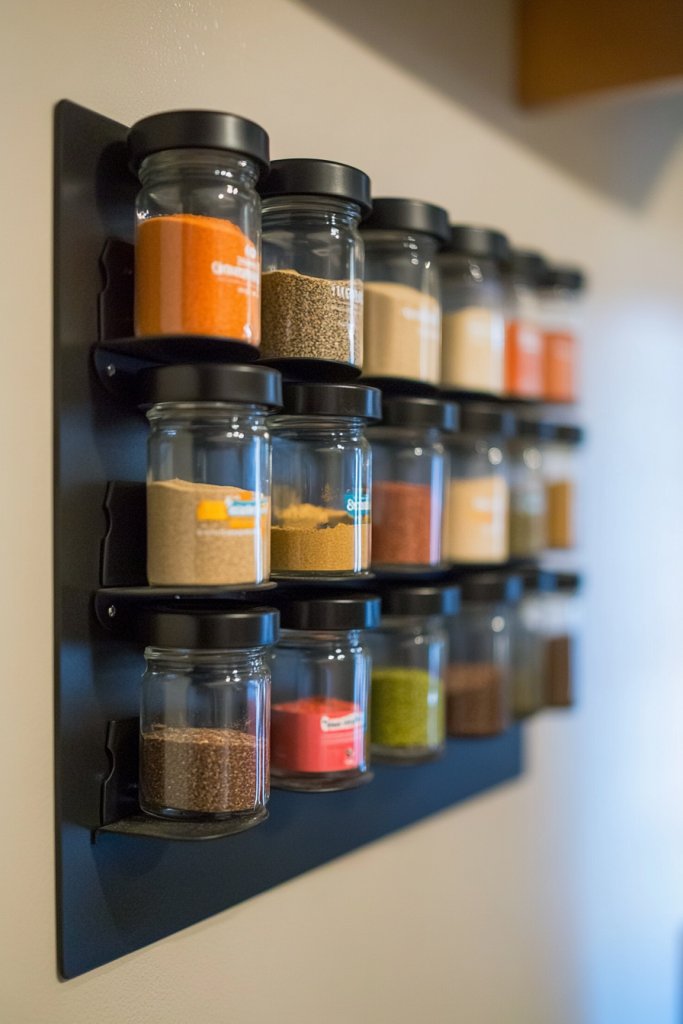
Tired of digging through cluttered cabinets for that tiny jar of spice? Magnetic spice jars on a metal board turn your spice storage into a sleek, space-saving display. They keep your ingredients within reach while freeing up precious cabinet space. If you love organized kitchens with a modern twist, this idea is a game-changer.
Visualize a matte black metal board mounted on your wall, with small magnetic jars lined up in perfect rows. Each jar is labeled with clear, minimalist tags, and their shiny lids catch the light beautifully. The magnets hold jars securely, creating a clean and uncluttered look. Bright spices inside stand out against the dark background, making your cooking space both functional and stylish. The setup invites you to experiment with flavors easily.
Choose jars with airtight lids and labels that match your decor style—minimalist, vintage, or colorful. Arrange them in patterns or alphabetically for quick access. For seasonal updates, swap spices or labels depending on your cooking plans. You can also add small hooks for utensils or tools nearby to create a complete culinary station. This flexible system works well in open kitchens, pantries, or even on appliance fronts.
Start with a durable metal board, ensuring it’s properly anchored to the wall. Purchase small magnetic jars with screw-top lids; label each with permanent markers or adhesive labels. Fill the jars with your favorite spices or small preserves, then attach them to the board. Position the jars for easy reach and visual balance. Keep a small cloth nearby for quick cleaning, and periodically check magnet strength to prevent accidental falls. It’s a simple, effective upgrade.
Use custom labels or color-code your jars for different types of preserves or spice categories. Incorporate decorative elements like patterned tapes or stickers on the lids. For a touch of elegance, mount the board with a decorative frame or add under-cabinet lighting. You could also swap out jars for larger containers during holiday seasons or special occasions. Personal touches make the system uniquely yours.
This setup elevates your kitchen’s organization while showcasing your preserves creatively. It’s perfect for small spaces and encourages you to be more adventurous in your cooking. With everything visible and accessible, meal prep becomes a breeze. Get inspired and take control of your storage—your kitchen will thank you!
6. Vintage Suitcase Turned Canning Supply Organizer
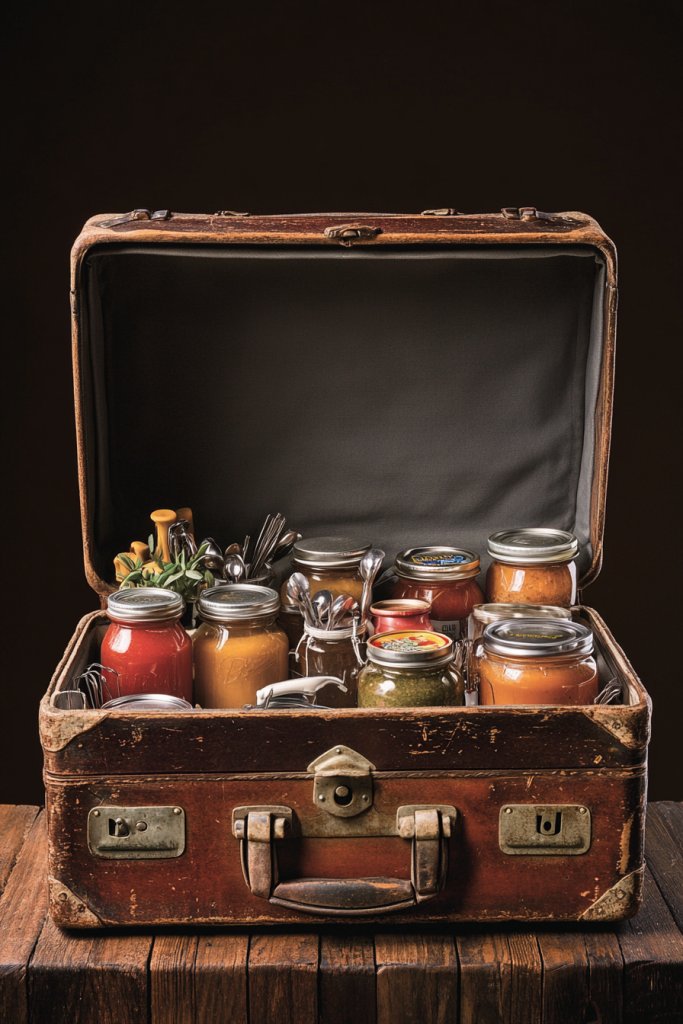
Looking for a portable, stylish way to store your canning tools and jars? Vintage suitcases are perfect for turning clutter into a charming, mobile storage solution. They add a nostalgic touch while keeping everything you need within reach. If you love repurposing and want to add character to your kitchen, this idea is just the ticket.
Imagine an old leather or fabric suitcase opened to reveal neatly organized jars, lids, and canning utensils. The aged hardware and distressed exterior give it a storied look, making it a statement piece on your countertop or table. Inside, compartments or fabric pockets hold small items, while larger spaces accommodate jars. The suitcase’s portability means you can move your supplies easily or take them on outdoor picnics or markets.
Line the interior with fabric or decorative paper to add a pop of color or pattern. Use small baskets or dividers inside to keep items separated and tidy. During different seasons or events, refill or rearrange contents for fresh appeal. For a more modern twist, paint the suitcase in bold colors or metallic finishes. This adaptable storage can serve as a coffee table centerpiece with added decorative elements.
Start by selecting a vintage suitcase sturdy enough to hold your supplies. Clean and disinfect thoroughly before use. Organize jars by size or type, stacking or lining them up inside. Use small containers or fabric pockets for lids, tools, and tags. Place the suitcase on a sturdy surface, ensuring it’s stable. Periodically review and reorganize to keep everything accessible. For extra durability, reinforce handles or corners.
Decorate the exterior with paint, stencils, or vintage decals for a personalized look. Label compartments or add chalkboard tags for easy identification. Incorporate decorative elements like faux flowers or fabric trims to match your theme. For a functional upgrade, add a portable tray or stand to elevate the suitcase. Make it uniquely yours with items that reflect your style.
This repurposed suitcase combines storage with decor, making your kitchen or pantry more inviting. It’s a fun, creative project that adds personality and practicality. Plus, it’s portable, so you can take your supplies anywhere—ideal for outdoor gatherings or markets. Embrace the charm of vintage and enjoy your organized, stylish space!
7. Floating Shelves with Baskets for a Scandinavian Look
Tired of cluttered counters and cramped cabinets? Floating shelves paired with baskets offer a clean, airy storage solution that keeps your preserves accessible and your space looking sleek. They bring a Scandinavian-inspired minimalism that feels calming and organized. If simplicity and function are your goals, this setup fits perfectly into your aesthetic.
Visualize slim, white or light-colored floating shelves mounted evenly along a wall, with woven baskets underneath. The baskets hold jars of preserves, keeping them within easy reach while adding texture and warmth. The open design allows you to see everything at once, reducing clutter and making your kitchen feel more spacious. Natural light enhances the soft tones, creating a peaceful, Scandinavian vibe that invites you to relax.
Choose baskets in neutral or pastel colors to match your decor, or go for natural wicker for a more rustic touch. Mix different sizes for visual interest, and add labels or tags for quick identification. Adjust the shelf height based on your jar sizes or add a third row for extra storage. During holidays, swap out baskets or add decorative elements like greenery or candles for seasonal flair.
Install floating shelves with sturdy brackets, ensuring they are level and securely anchored. Select baskets that fit comfortably underneath, with handles for easy removal. Arrange jars neatly inside the baskets, grouping similar flavors or colors together. Label jars with minimalist tags or directly on the glass. Keep the setup clean by wiping down shelves regularly and replacing baskets as needed. This system is easy to expand or reconfigure.
Incorporate decorative labels or stencil your jars for a cohesive look. Use textiles like linen or burlap liners inside baskets for added softness. Personalize with small ornaments, seasonal decor, or custom tags. You can also add a small chalkboard or whiteboard nearby for notes or upcoming preserves. This setup is as functional as it is stylish, reflecting your taste.
Floating shelves with baskets create a clutter-free, stylish kitchen that feels spacious and welcoming. They’re perfect for minimalist lovers and those who want to showcase their preserves beautifully. Once installed, this system makes your storage feel intentional and curated. Enjoy the serenity of a tidy, well-designed space—your preserves will shine in their new home!
8. Repurposed Coffee Cans as Labelled Storage Containers
Looking for a budget-friendly, eco-conscious way to organize your preserves? Repurposed coffee cans are a perfect solution—affordable, customizable, and surprisingly charming. They keep your jars sorted and accessible while adding a rustic, handmade touch to your space. If sustainability and simplicity appeal to you, this idea is worth trying.
Imagine empty coffee cans painted in soft pastel or bold hues, with handwritten or printed labels clearly indicating the contents. Stacked neatly on a shelf or inside a cabinet, they create a colorful, organized display. The cans’ cylindrical shape offers a compact way to store lids, labels, or small utensils. The DIY aesthetic adds character, making your storage both functional and decorative.
Personalize cans with stencils, stickers, or decoupage to match your decor theme. Use different sizes or add handles for portability. Label each can with chalk, markers, or labels with adhesive backing for easy updates. During holidays or special occasions, decorate cans with seasonal motifs. Mix with other repurposed containers like jars or baskets for variety.
Clean and dry cans thoroughly before decorating. Paint or decorate the exterior, then add labels for clarity. Fill the cans with small accessories like jar lids, corks, or canning tools. Arrange them on open shelves, inside cabinets, or in drawers for easy access. Use a marker or label maker for clear, durable labels. Regularly review and update contents to keep everything current. This approach is simple, customizable, and budget-friendly.
Create themed labels for holidays or special flavors. Add decorative washi tape or fabric wraps for extra flair. Incorporate small charms or tags for a whimsical touch. Consider stacking cans or using tiered trays to maximize space. Personalize further with hand-painted designs or inspirational quotes for a charming, crafty vibe. This DIY project reflects your personality and resourcefulness.
Repurposed coffee cans prove that organization doesn’t have to be expensive or complicated. They encourage creative thinking and sustainability. Your kitchen will feel more organized and inviting, plus you’ll enjoy the satisfaction of making something yourself. It’s a small change with a big impact—start stacking and labeling today!
9. Under-Cabinet Pull-Out Drawers for Hidden Storage
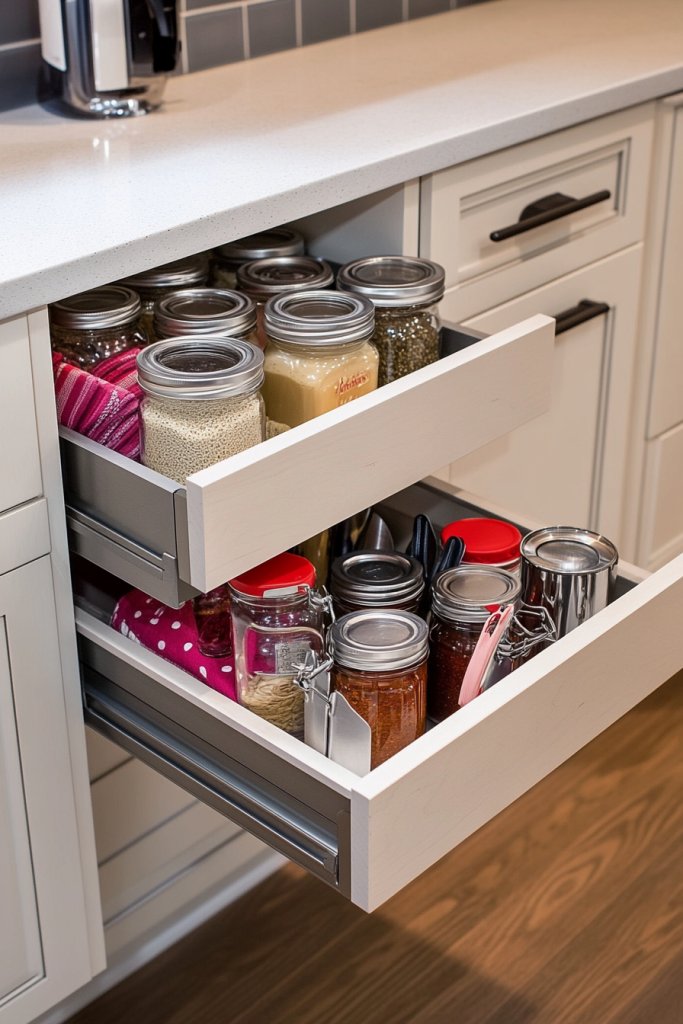
Struggling with cluttered countertops and inaccessible cabinet spaces? Under-cabinet pull-out drawers turn tight spots into organized storage, hiding jars and tools away yet keeping them within reach. They make your kitchen more efficient and streamline your workflow. If you’re tired of crawling on all fours to find that elusive jar, this idea is your solution.
Picture a sleek, slim drawer sliding smoothly out from beneath your cabinets, revealing a neatly arranged row of preserves. The drawer’s interior is lined with non-slip mats or dividers, preventing jars from shifting. When closed, it’s virtually invisible, keeping your kitchen looking tidy. Soft lighting inside the cabinet emphasizes accessibility, and the entire setup exudes a modern, minimalist vibe.
Choose drawers with adjustable dividers to customize storage based on jar sizes. Use labels or color-coded stickers to identify contents at a glance. Incorporate small compartments for lids, utensils, or canning accessories. For a more rustic feel, opt for wood or painted finishes that complement your decor. This system works well in both small apartments and large kitchens, adaptable to your space constraints.
Start by measuring the space beneath your cabinets to select the right-sized drawers. Remove existing panels or modify cabinetry if needed. Install the drawers on smooth gliding tracks, ensuring they operate quietly and smoothly. Organize your jars inside, labeling them for quick identification. Regularly check for debris or wear, lubricating tracks as necessary. This upgrade requires some basic carpentry skills or professional help for best results.
Decorate drawer fronts with paint, stencils, or decals matching your kitchen’s theme. Use small baskets or dividers inside for extra organization. Add labels for different preserve types or flavors to keep everything tidy. Incorporate a small LED light strip inside the cabinet for better visibility. Personal touches like these make the storage truly your own.
This hidden storage solution boosts your kitchen’s functionality while maintaining a clean look. It’s perfect for maximizing space and reducing clutter. Once installed, you’ll love how easy it is to access your preserves and supplies. Upgrade your kitchen quietly and efficiently—your organized space will motivate you to try new recipes and preserve more!
10. Pegboard Wall with Hooks for Customizable Display
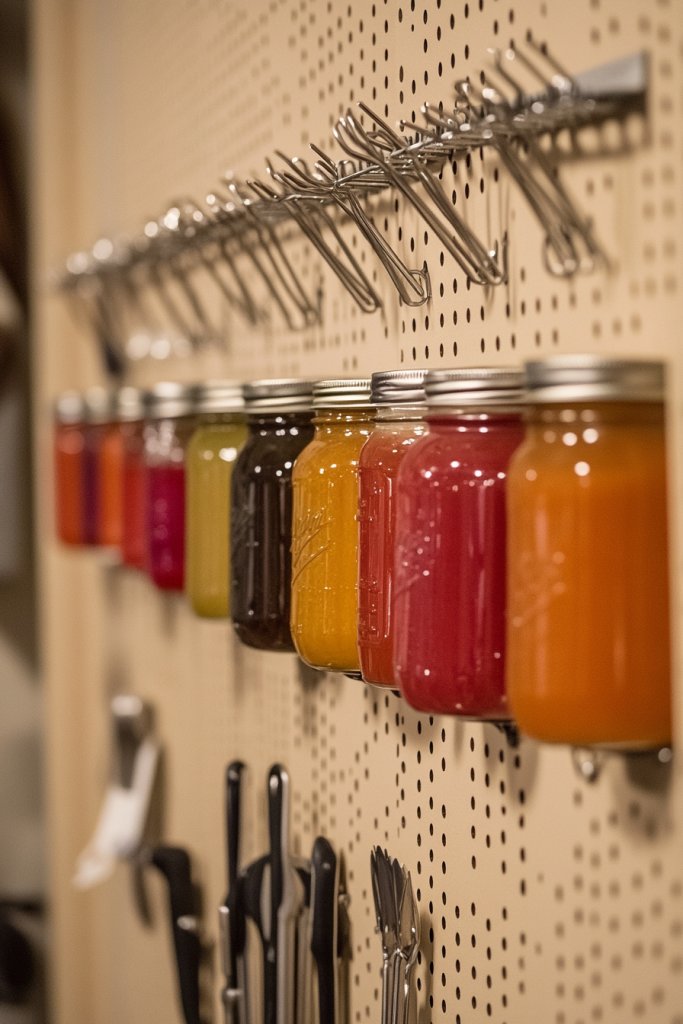
Ever wish your preserves and canning tools were more accessible and visually organized? A pegboard wall with hooks creates a flexible, customizable display that keeps everything within arm’s reach. It’s perfect for a busy kitchen where practicality meets style. If you love DIY projects and versatile storage, this idea will make you smile.
Imagine a sturdy pegboard mounted on a blank wall, with rows of hooks holding jars, utensils, and small baskets. The open grid design allows for easy rearrangement and personalization, whether you prefer a tidy or eclectic look. Jars of preserves shine brightly against a painted or natural wood backdrop, while hooks hold tools or tasting spoons. The setup feels dynamic and approachable, inviting you to organize with ease.
Paint the pegboard in your favorite color or leave it raw for a rustic look. Use a mix of hooks, baskets, and clips to accommodate various items. Label jars directly on the pegboard or with tags hanging from hooks. For seasonal updates, swap out hooks or add decorative elements like faux herbs or vintage signs. This system easily adapts to your evolving needs and style preferences.
Choose a durable pegboard that can handle the weight of your jars and tools. Mount it securely on the wall using appropriate anchors or screws. Arrange hooks and baskets in a pattern that balances accessibility with aesthetics. Hang your jars and supplies, labeling as needed for quick identification. Regularly review and update the setup to keep it fresh and functional. A little planning goes a long way in creating an effective display.
Decorate the pegboard with painted accents, decorative hooks, or themed tags. Add small potted herbs or faux greenery nearby for a touch of freshness (without violating restrictions). Incorporate labeled bins or small containers for loose items like caps or tags. Use chalk or whiteboard labels for easy updates. Personal touches will make your storage both practical and charming.
A pegboard wall turns a blank space into a personalized storage gallery, inspiring you to keep things organized. It’s a flexible system that grows with your collection and style. Once set up, it simplifies daily routines and adds a creative element to your kitchen. Embrace the DIY spirit and enjoy a more efficient, attractive space—your preserves will thank you!
11. Vintage Crate Wall Grid with Chalkboard Labels
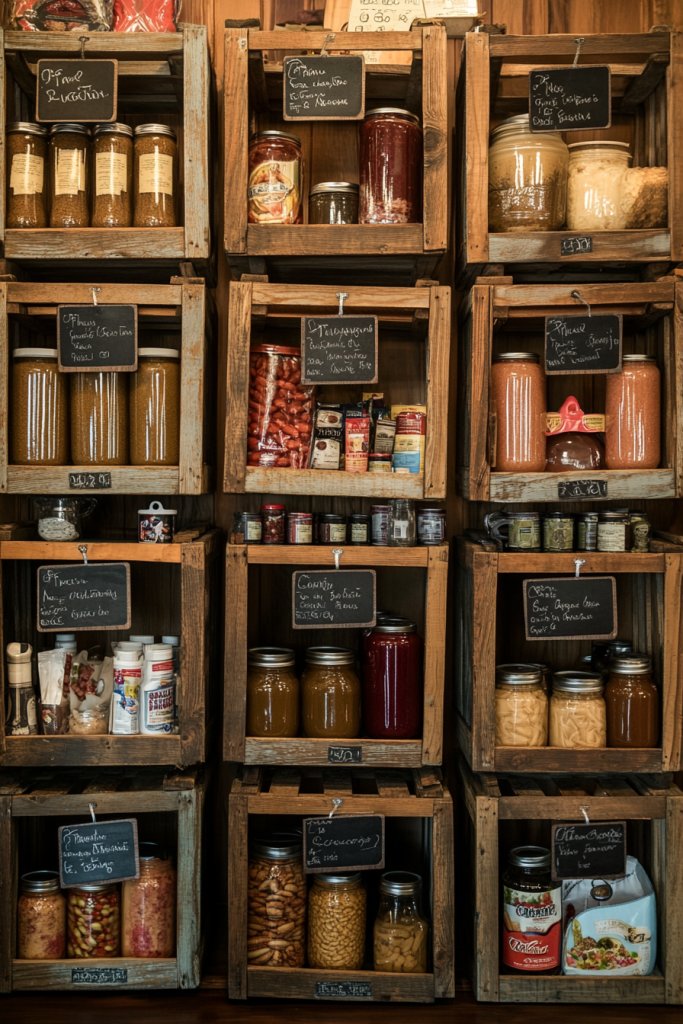
Feeling overwhelmed by cluttered pantry shelves? A vintage crate wall grid with chalkboard labels offers a rustic, organized solution that’s both functional and charming. It keeps your preserves visible and accessible while adding a touch of farmhouse flair. If you love a blend of practicality and style, this idea will inspire your inner decorator.
Picture a grid of vintage wooden crates mounted on your kitchen wall, each labeled with chalk for easy updates. Inside, jars of preserves are neatly arranged, their vibrant colors visible through open fronts. The distressed wood and chalkboard accents create a cozy, nostalgic vibe that invites you to browse and select your favorite flavors. This setup turns storage into a decorative feature that feels warm and welcoming.
Paint or stain the crates to match your decor, from distressed white to dark walnut. Use different sizes for variety, or add decorative tags and ribbons to enhance the rustic appeal. Update labels seasonally or for different collections, and incorporate small accessories like miniature signs or vintage tools for added character. The grid can be expanded or reconfigured as your collection grows.
Securely mount each crate on the wall using appropriate hardware, ensuring they are level and stable. Label each crate with chalk or erasable markers for flexibility. Organize jars by flavor, size, or frequency of use, and keep labels clear for quick access. Regularly clean and maintain the setup, re-staining or repainting crates as needed. This project combines DIY effort with a charming aesthetic.
Decorate the chalkboard labels with doodles, seasonally themed drawings, or handwritten quotes. Add small decorative elements like tiny lanterns or vintage knobs for extra charm. You could also incorporate a small shelf for utensils or a spice rack. Personalize each crate with painted initials or motifs that reflect your style. The result is both practical and a visual feast.
This vintage crate grid elevates your storage space into a stylish, functional gallery. It’s a wonderful way to showcase your preserves while keeping everything organized. It encourages creativity and makes everyday routines more enjoyable. Embrace the charm of vintage, and turn your pantry into a cozy, curated space!
12. Open Cube Shelves with Built-In Jars Display
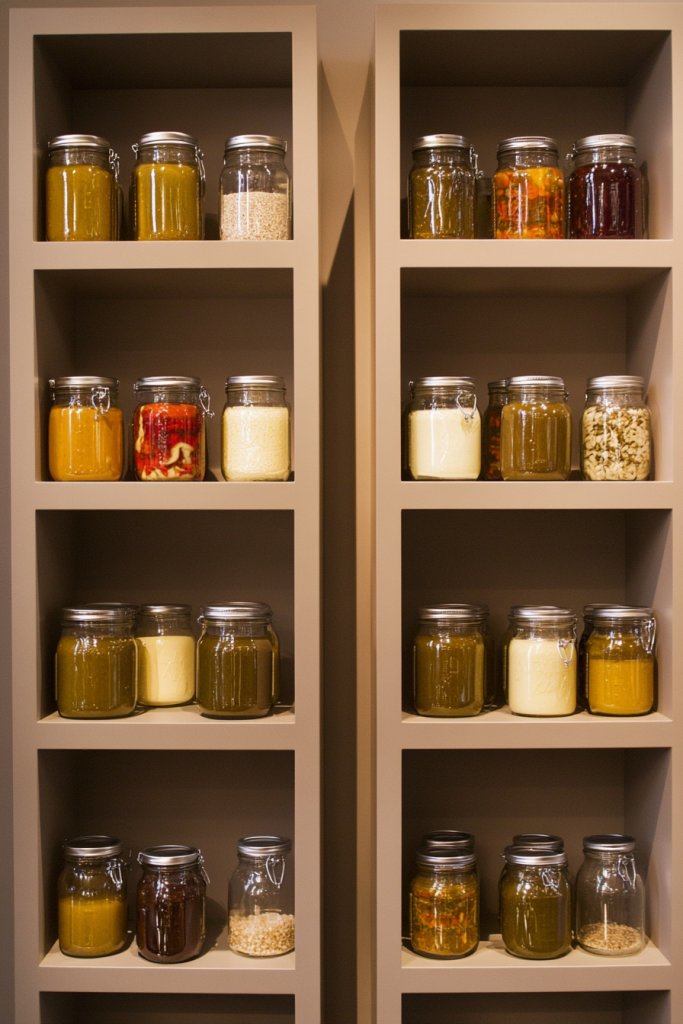
Want your preserves to be both accessible and part of your decor? Open cube shelves with dedicated spots for jars create an organized display that showcases your handiwork. They bring a modern, geometric vibe while keeping everything within view. If you love clean lines and functional design, this idea will fit right into your kitchen.
Imagine a series of cube-shaped shelving units mounted on the wall, each compartment filled with colorful jars of jams, sauces, and pickles. The open design allows for easy browsing, and the uniform cubes create a pleasing pattern. Bright preserves contrast beautifully against neutral shelving, turning your storage into a visual celebration of your efforts. The overall look is sleek, organized, and inviting.
Use different colors or finishes for the cubes—white, natural wood, or painted in bold hues. Incorporate labels or transparent containers within the cubes for added organization. Mix in decorative elements like small plants or books if space allows (avoiding restricted items). Change the arrangement seasonally or to highlight particular preserves. This flexible system can be tailored to any space or style.
Select sturdy, modular cube shelves suitable for your wall space. Install them securely with anchors, ensuring they can bear the weight of filled jars. Arrange the jars neatly inside each cube, labeling the contents for quick identification. Keep the shelves clean and dust-free, and periodically reorganize to refresh the look. For added stability, glue or secure the jars inside if necessary. This setup is both stylish and practical.
Label each jar with custom tags or stickers that match your decor theme. Incorporate small decorative accents like fabric liners or patterned paper inside the cubes. Use different jar shapes or colors to add visual interest. Consider adding a small chalkboard or dry erase panel nearby for notes or upcoming preserves. Personal touches help you enjoy your storage more.
Open cube shelves turn your preserves into part of your home’s artful display, inspiring pride in your work. They’re easy to update and adapt as your collection grows. Once set up, you’ll find it effortless to access and showcase your favorite flavors. It’s a modern, attractive way to keep your kitchen both organized and stylish—enjoy the view!
13. Tiered Lazy Susan for Easy Access and Display
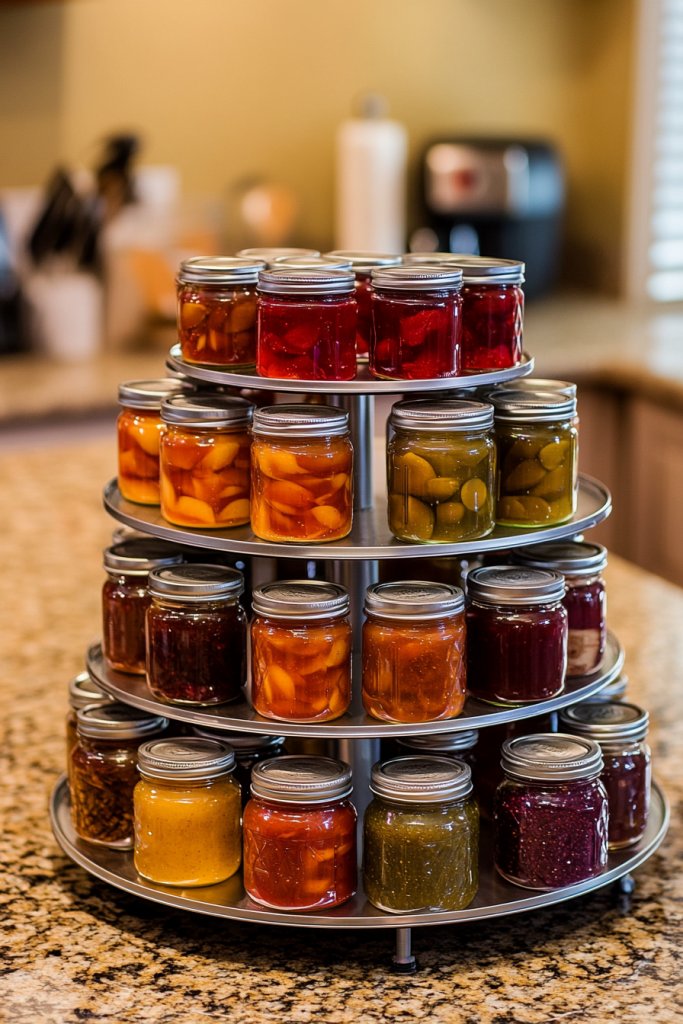
Constantly twisting and reaching for that jar at the back of the shelf? A tiered Lazy Susan solves this problem by bringing your preserves right to your fingertips. It’s perfect for maximizing space on countertops or inside cabinets, especially if you have a collection of small jars. If convenience and organization are your goals, this idea is a must-try.
Visualize a multi-layered spinning tray filled with vibrant jars of jams, sauces, and pickles. The tiers rotate smoothly, allowing you to browse your preserves effortlessly. The metallic or wooden base adds a sleek or rustic touch, while the clear lids or labels keep contents visible. The spinning feature makes it both functional and fun, turning storage into a mini display case. It’s a practical focal point in any kitchen.
Choose different sizes or materials—metal, bamboo, or painted wood—to match your decor. Use labels or color-coded caps for quick identification. For holidays or special occasions, decorate the tiers with seasonal accents or themed labels. You can also add small bowls or utensils on the sides for tasting or serving. This setup works well on countertops, island carts, or inside cabinets.
Select a sturdy, smooth-rotating Lazy Susan with enough clearance for your jars. Arrange your jars in a balanced manner, grouping similar types or flavors. Label jars clearly, and ensure lids are secure. Place the Lazy Susan in a convenient spot, such as the center of your countertop or inside a cabinet. Regularly clean and check for smooth rotation, and refill as needed. This is an easy upgrade for quick access.
Decorate the edges or top with washi tape, paint, or decals for a personalized touch. Add small decorative elements like faux herbs or mini signs to highlight special preserves. For a more festive look, swap labels or jars seasonally. Use a non-slip pad underneath to prevent sliding, and consider adding a handle or knob for easier spinning. Make it uniquely yours.
A Lazy Susan combines practicality with a touch of fun, encouraging you to explore your preserves more often. It’s an efficient way to organize and display without sacrificing style. Once you spin your way to a well-stocked collection, you’ll feel more confident in your preserving skills. Enjoy the convenience and charm of this classic solution!
14. Repurposed Window Frame as a Canning Wall Organizer
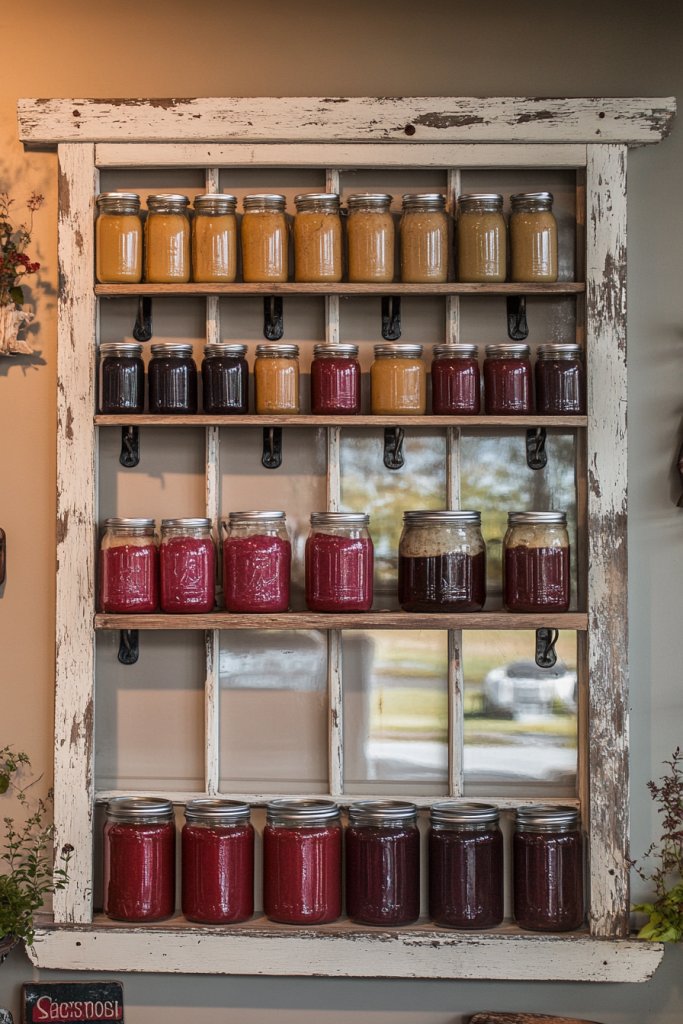
Looking for a charming way to organize your canning supplies without sacrificing style? Repurposing an old window frame into a wall organizer adds vintage flair while creating practical storage. It turns a simple frame into a focal point that showcases your preserves and tools with character. If you love upcycling and rustic decor, this idea is perfect.
Picture an antique window frame hung on your kitchen wall, with small hooks and baskets attached within each pane. Jars of preserves sit neatly inside, their colorful contents visible through the glass. The distressed paint and weathered wood give it a storybook charm, making your storage feel warm and lived-in. Decorative elements like fairy lights or fabric curtains can enhance its appeal without cluttering the space.
Paint or stain the frame to match your decor, from shabby chic whites to darker tones. Attach small metal baskets or wire racks inside the panes for additional storage. Decorate with vintage hardware, or add small chalkboard signs for labels. Change the contents seasonally or for special occasions to keep it fresh. It’s adaptable to various wall sizes and styles.
Select a sturdy, vintage window frame, clean and repair as needed. Attach hooks, baskets, or wire grids securely within each pane. Mount the frame on your wall using appropriate hardware, ensuring it’s level and stable. Arrange jars and tools thoughtfully, labeling items for quick access. Regularly dust and maintain the frame, replacing or repainting as needed. This project blends decor with organization seamlessly.
Decorate signs or tags with chalk or paint to add a personal touch. Incorporate seasonal accents like faux greenery or small ornaments. Use different colors or labels to categorize contents. Add a small shelf or hooks for utensils or towels nearby. Personal touches turn a simple window frame into a meaningful display that reflects your style.
This vintage window frame transforms storage into a creative focal point, inspiring pride in your organization. It’s a beautiful way to showcase your preserves while adding a nostalgic vibe. Once installed, it encourages you to keep your supplies tidy and accessible. Embrace the charm and enjoy your beautifully curated space!
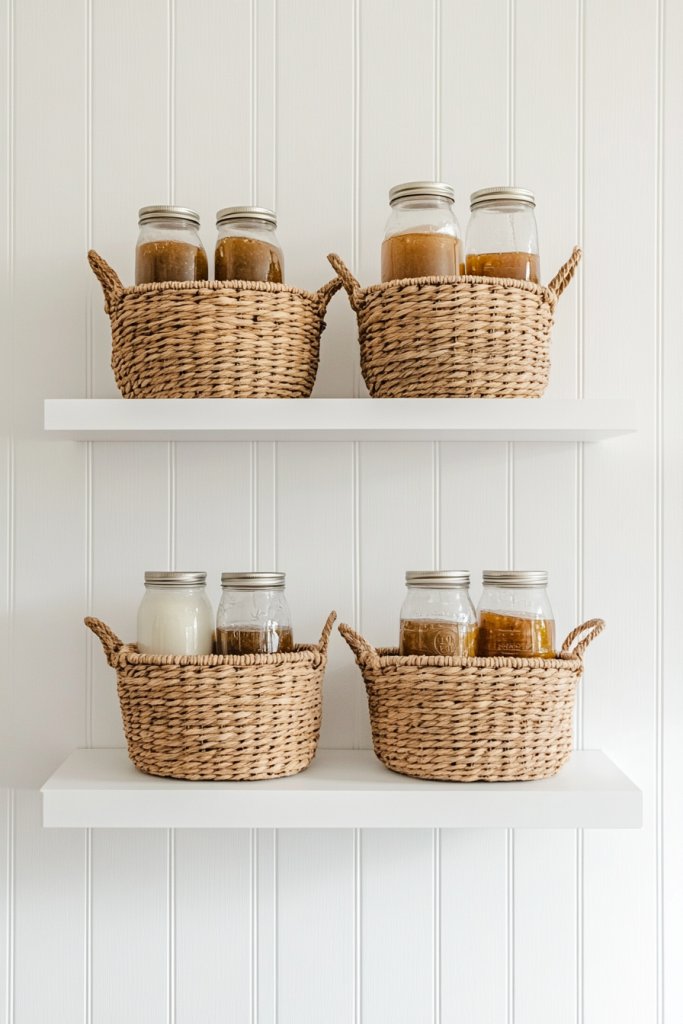
15. Under-Shelf Hanging Baskets in Pantry Cabinets
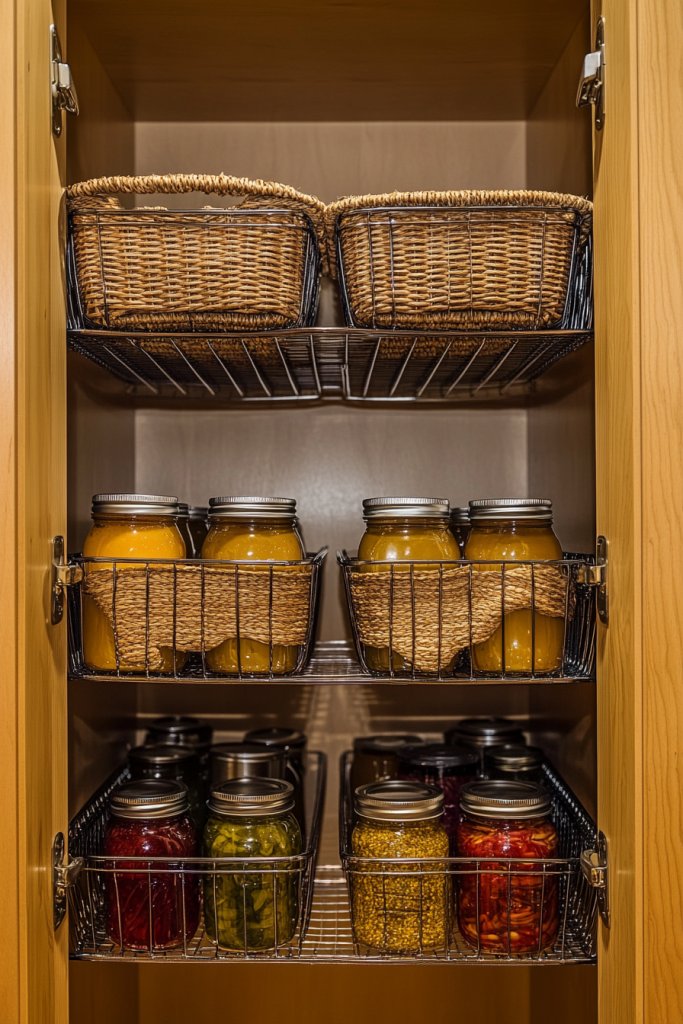
Struggling to find space for your jars in a crowded pantry? Under-shelf hanging baskets add extra storage without taking up additional room. They’re perfect for small kitchens or tight spaces where every inch counts. If you love clever solutions that maximize efficiency, this idea is a game-changer.
Visualize a sturdy wire or fabric basket hanging beneath an existing shelf, filled with small jars of preserves. The basket hangs securely, making use of otherwise unused space and keeping jars within easy reach. The open design allows you to see contents at a glance, while the baskets add a layer of organized depth to your pantry. It’s a neat, functional addition that feels almost invisible but highly effective.
Select baskets in materials and colors that match your pantry decor—metal, woven, or fabric. Use hooks or clips to hang them securely, and add labels or tags for quick identification. Adjust the length to fit your needs, and combine multiple baskets for different categories. Seasonal or holiday-themed baskets can add a festive touch without cluttering your space.
Install sturdy brackets or hooks on the underside of your existing shelves, ensuring they can support the weight of filled baskets. Attach baskets with secure fasteners, checking stability before loading. Organize jars inside, labeling them for easy access. Regularly clean and reorganize to keep the system functional. This solution makes use of vertical space in a smart, discreet way.
Decorate baskets with fabric liners, paint, or labels to match your kitchen style. Use color-coding or themed tags for different types of preserves. Incorporate small decorative touches like ribbons or stickers for a personalized look. Keep a marker nearby to update labels as needed. Personal touches make this practical idea feel uniquely yours.
Under-shelf baskets turn wasted space into valuable storage, helping you stay organized effortlessly. They’re a simple upgrade that can be added to almost any pantry. Once in place, they encourage you to keep everything tidy and accessible. Enjoy a more efficient, clutter-free kitchen that’s ready for your next batch of preserves!
16. DIY Pallet Wall with Clamps for a Casual Look
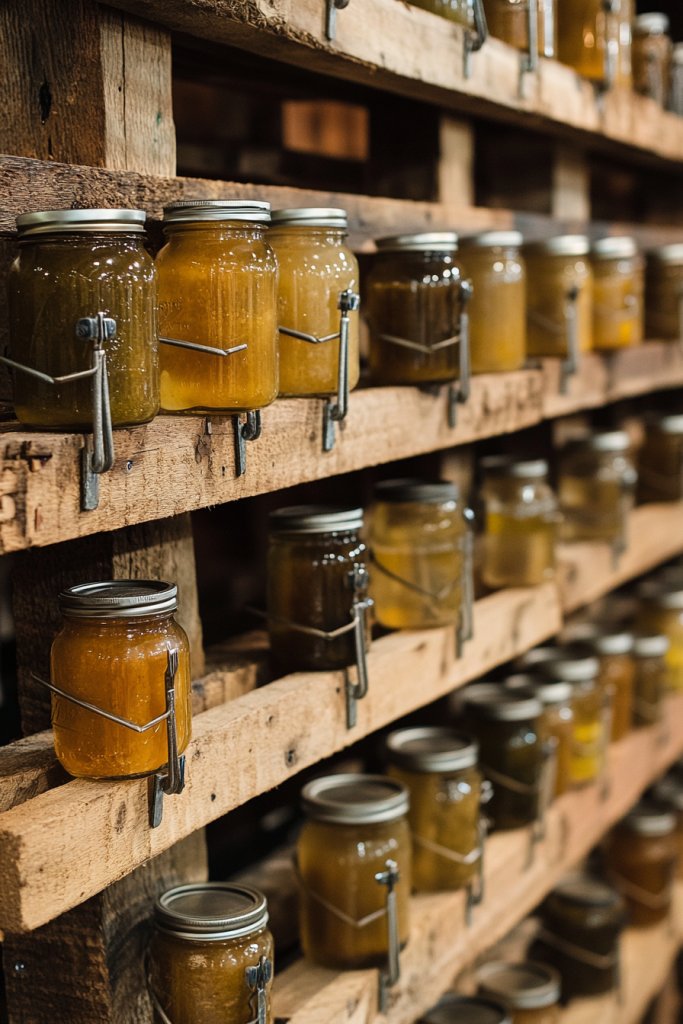
Craving a laid-back, rustic vibe for your preserves? A DIY pallet wall with clamps creates a casual, easy-to-maintain display that’s both practical and charming. It’s perfect for those who love a hands-on project and want a focal point that’s full of character. If you’re into upcycling and creative storage, this one’s for you.
Imagine a wall decorated with horizontally mounted pallet boards, each holding jars of preserves clipped securely with simple clamps. The rough textures and uneven paint add to the rustic appeal, while the jars shine with their colorful contents. The design feels relaxed and approachable, like a cozy country kitchen. The natural wood tones and simple hardware make the display feel effortless yet inviting.
Paint or stain the pallets for different effects—weathered, whitewashed, or dark. Use different sizes of clamps or add decorative elements like twine or ribbons for a personalized touch. Incorporate small shelves or hooks for utensils or tools. Seasonal decorations or labels can be clipped on for variety. This adaptable display can fit any space, from a small corner to a large wall.
Securely mount pallet boards onto your wall using heavy-duty brackets or screws. Attach clamps at regular intervals, making sure they’re evenly spaced and stable. Fill jars with your preserves, then clip them into place, ensuring they’re secure. Organize by flavor or color for visual harmony. Regularly check clamps for tightness, and refresh the display seasonally. This DIY project is straightforward with basic tools and a little patience.
Decorate the pallets with stencils, painted patterns, or personalized signs. Use different clamp styles to add variety or a handmade feel. Incorporate small decorative elements like faux herbs or vintage tags for extra charm. Change the arrangement or labels depending on your collection. Personal touches make your display both functional and uniquely yours.
This pallet wall project emphasizes creativity and resourcefulness, transforming simple materials into a beautiful display. It encourages you to embrace a casual, rustic aesthetic while staying organized. Once finished, you’ll love how it adds personality and practicality to your kitchen. Dive into your DIY spirit and enjoy your new, stylish preserves wall!
17. Tiered Metal Canning Rack for Space Efficiency
Running out of space to store your growing collection of preserves? A tiered metal canning rack offers vertical, space-saving storage that keeps jars organized and easily accessible. It’s ideal for maximizing pantry or countertop real estate. If efficiency and durability are your priorities, this setup is a smart choice.
Picture a sturdy, multi-tiered metal rack with several levels, each filled with rows of colorful jars. The open design allows you to see everything at once, while the tiered arrangement makes the most of vertical space. The metallic finish adds a sleek, industrial vibe, contrasting nicely with vibrant preserves. It’s a practical yet attractive display that invites you to browse and serve.
Choose racks with adjustable or removable tiers to customize height and capacity. Match the finish—black, bronze, or galvanized—to your decor. Add labels or tags for quick identification of flavors or types. For seasonal or themed displays, incorporate decorative elements like ribbons or small signs. This system adapts easily to different kitchen styles and space limitations.
Select a durable, rust-resistant metal rack suitable for your space. Assemble it according to instructions, ensuring all tiers are secure. Organize jars by size, flavor, or frequency of use, labeling as needed. Place the rack in a convenient spot, such as a pantry corner or on a countertop. Regularly wipe down the metal to prevent dust and rust, and update contents as you preserve new batches. This setup combines practicality with longevity.
Decorate the rack with paint, decals, or decorative tape that complements your decor. Use colorful or themed labels on jars for a cohesive look. Incorporate small decorative touches like faux greenery or vintage signs nearby. Adjust the arrangement seasonally or for holidays to keep it lively. Personalization makes this storage both functional and fun.
A tiered metal rack streamlines your storage, making your preserves easy to find and serve. It’s a durable, space-efficient solution that grows with your collection. Once set up, you’ll feel more organized and motivated to experiment with new recipes. Embrace the efficiency and style—your preserved bounty deserves a prominent place.
18. Repurposed Breadbox as a Canning Preserves Organizer
Searching for a charming, compact way to store your jars? A repurposed breadbox offers a nostalgic, space-efficient solution that keeps your preserves protected and neatly arranged. It’s perfect for small kitchens or as a decorative accent. If you love vintage finds and smart organization, this idea will delight you.
Imagine an old wooden or metal breadbox, cleaned and repainted if needed, sitting on your countertop or open shelf. Inside, jars of preserves are stacked or lined up in a tidy row, their labels facing outward. The lid, possibly decorated or painted, adds a cozy, retro touch. The compact size and classic design bring warmth and personality to your kitchen while keeping your supplies organized.
Paint or stencil the breadbox for a custom look—vintage, shabby chic, or modern. Use small dividers or a tray inside to separate jars by flavor or size. Decorate the exterior with stickers, labels, or fabric touches. During holidays, add seasonal accents or labels for special preserves. This versatile piece adapts well to different decor themes and space constraints.
Clean the breadbox thoroughly and repair any damage. Organize your jars inside, stacking or lining them neatly. Label each jar for quick identification, using waterproof markers or adhesive labels. Place the breadbox on a countertop, shelf, or inside a cabinet if space is tight. Regularly check for dust or spills, and update labels as needed. It’s a simple, stylish upgrade for your storage needs.
Add decorative elements like fabric liners or painted patterns to the exterior. Use themed labels for holidays or seasons to keep it fresh. Incorporate small vintage accessories, like a spoon or tiny sign, to enhance the nostalgic appeal. Personal touches like hand-painted initials or motifs make it uniquely yours. This piece becomes both storage and decor.
A repurposed breadbox combines practicality with a charming aesthetic, proving that less can be more. It encourages eco-friendly upcycling and adds personality to your kitchen. Once organized, you’ll enjoy quick access and a delightful visual. It’s a small project with a big impact—preserve in style and keep it fun!
19. Magnetic Spice Rack with Custom Labels for Small Jars
Ever wish your small jars of preserves and spices were easier to find and identify? A magnetic spice rack on the fridge or wall provides a sleek, efficient solution that keeps everything visible and within reach. It’s perfect for a tidy, modern kitchen where space is at a premium. If quick access and clear labeling are your goals, this idea is a must.
Visualize a slim magnetic strip or board mounted on your fridge or wall, with tiny jars securely attached via metal lids or magnets. Each jar is labeled with clear, durable tags, making it easy to spot your favorites. The shiny lids and minimalist labels create a clean, organized look that’s both functional and attractive. The setup invites spontaneous cooking and tasting, turning your storage into a visual feast.
Use jars with uniform lids or labels that match your decor style—minimalist, colorful, or vintage-inspired. Arrange jars alphabetically, by flavor, or in seasonal groupings. You can also incorporate small magnetic tools or utensils nearby for a complete culinary station. Seasonal or themed labels add a festive touch without cluttering your space. This flexible system adapts well to any kitchen environment.
Purchase a magnetic strip or board sturdy enough to hold your jars. Label each jar with waterproof, fade-proof labels or handwritten tags. Fill the jars with your preserved goods or spices, then attach them to the rack, arranging for ease of use. Mount the rack at a convenient height, ensuring stability and accessibility. Regularly check and replace labels or contents as needed. It’s quick to set up and easy to maintain.
Decorate labels with colors, patterns, or handwritten notes to suit your style. Incorporate small decorative magnets or charms for a personalized touch. Use themed labels for holidays or special collections. Keep a marker or chalk nearby for quick updates. Personal touches make this system both practical and a reflection of your personality.
This magnetic rack turns your storage into a stylish, efficient display that encourages you to experiment and organize more often. It’s a space-saving option that makes your preserves accessible and attractive. Once in place, you’ll wonder how you ever managed without it. Enjoy the convenience and aesthetic appeal of your neatly labeled, easily accessible jars!
Conclusion
With a diverse array of canning storage ideas, you now have the tools to organize your preserves with style and practicality. Whether you prefer rustic wooden racks, sleek modern shelves, or charming labeled jars, these ideas can be tailored to suit any space and taste. Don’t hesitate to try out these creative solutions and turn your pantry into a stunning, organized haven. Start today and celebrate your love for canning with a beautifully arranged storage system!
Leave a Reply