Imagine transforming your bedroom into a personal sanctuary that truly reflects your artistic soul—wall paintings are the perfect way to do just that! These creative expressions are gaining immense popularity because they allow you to add color, personality, and style to your space effortlessly. Whether you prefer bold murals or subtle designs, wall painting ideas make it easy to turn a blank canvas into a masterpiece that sparks joy every day.
In this article, you’ll discover a diverse array of bedroom wall painting ideas that cater to every taste and style, from minimalist geometric patterns to vibrant abstract art. Each idea is designed to inspire you to get creative and make your bedroom uniquely yours. Dive in and find the perfect inspiration to transform your space into an artistic haven that energizes and relaxes you simultaneously!
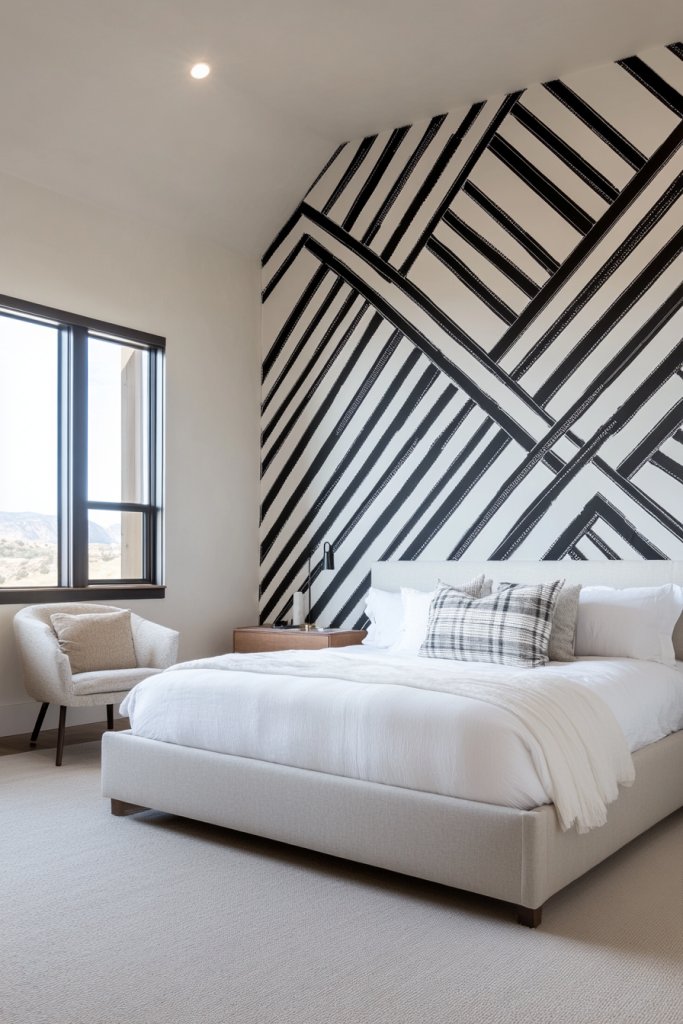
1. Bold Geometric Murals for Modern Impact
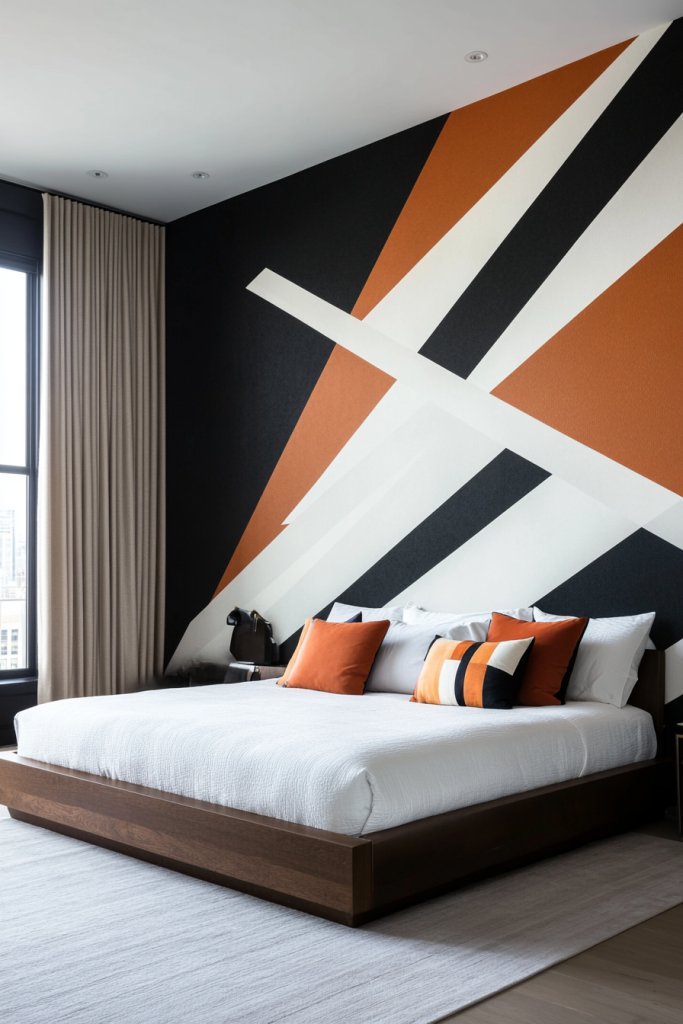
Ever feel like your bedroom is missing that wow factor? A dull wall can make even the coziest space feel uninspired. You want your room to reflect your personality and wow guests without spending a fortune. Geometric murals are a quick, impactful way to inject modern style and energy into any bedroom.
Imagine crisp, clean lines forming triangles, squares, and polygons across your wall. Bright, contrasting colors like navy and mustard or blush and charcoal create a lively, contemporary vibe. The textured tape lines give a sharp edge, while the vibrant hues catch your eye from every angle. It feels like a piece of abstract art that you can walk into.
You can customize shapes and colors to match your decor or mood. For a softer look, opt for pastel shades and rounded shapes; for a bolder impact, go for dark tones and sharp angles. Small rooms benefit from subtle, monochromatic patterns, while larger spaces can handle expansive, colorful murals. Seasonal tweaks like metallic gold or silver accents can add festive flair.
Start by sketching your design or using painter’s tape to outline shapes directly on the wall. Choose vivid, high-quality paints or special mural wall coatings for durability. Use straightedges and stencils for precision, and tape everything securely before painting. For a clean finish, remove tape while paint is still slightly wet. You can do this yourself or hire a mural artist for intricate designs.
Add metallic or neon paint accents for extra pop, or incorporate your favorite colors to make it uniquely yours. Consider adding textured elements like raised tape or 3D decals for a layered effect. Framing parts of the mural with LED strip lighting can create a stunning glow at night. Personal touches like initials or symbols embedded within the shapes add sentimental value.
Bold geometric murals turn boring walls into statement pieces. They reflect a modern, artistic spirit and show off your creative side. With a little patience, you can create a striking impact that transforms your entire space into a gallery. Ready to give your bedroom that contemporary edge? You totally should!
2. Ombre Gradient Walls for a Soft, Artistic Touch
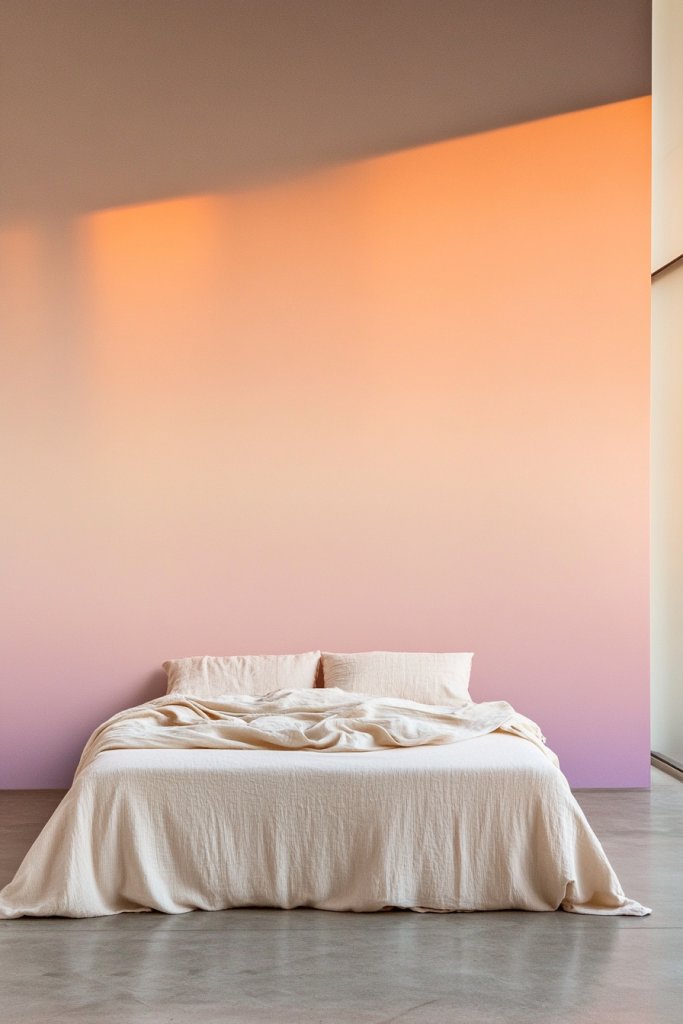
Does your bedroom need a calming, stylish makeover? Plain painted walls can feel flat and uninspiring after a while. An ombre gradient offers a subtle yet captivating way to add depth and artistry to your space. It’s perfect if you crave a soothing atmosphere but still want something visually interesting.
Visualize a wall fading from a soft blush pink at the top to a warm coral at the bottom. The smooth transition creates a dreamy, cloud-like effect that draws your eye upward or downward. The velvety blend of colors adds a tactile richness, making the wall feel almost alive. Light bounces gently off the gradient, giving your room a warm glow.
Choose colors that match your mood or seasonal palette—cool blues and purples for winter, warm oranges and yellows for summer. You can create a subtle, monochromatic fade or a vibrant rainbow blend for a playful look. Smaller rooms benefit from gentle, pastel gradients that open up the space, while larger rooms can handle bold, contrasting shades.
Start by selecting your color palette and priming the wall. Use high-quality paints designed for blending, or dilute acrylics with water for a softer effect. Blend the colors while still wet using a large sponge or a soft brush, working in sections. Keep a clean, damp cloth handy for blending edges seamlessly. Multiple coats may be necessary for depth; patience is key.
Incorporate metallic or glitter accents into the gradient for a hint of glamour. Pair the wall with textured textiles like a plush throw or velvet curtains to enhance the softness. Embedding fairy lights or soft LED strips around the edges can add a magical glow. Personalize further with symbols or initials subtly painted into the gradient.
Ombre walls are a timeless way to make your space feel calm yet artistic. They show that you can create a high-end look with simple techniques and patience. Once finished, your bedroom will radiate serenity and style, inspiring you daily. Ready to embrace the gentle beauty of gradients? Go for it!
3. Abstract Expressionist Brushstrokes for Dynamic Energy

Feeling like your bedroom decor is stuck in a rut? Sometimes, plain walls just don’t cut it anymore. If you crave a space that bursts with energy and personality, abstract expressionist brushstrokes might be your new best friend. They add a spontaneous, artistic vibe that energizes any room.
Picture large, sweeping strokes of bold colors like fiery reds, deep blues, and vibrant yellows layered across a neutral background. The messy, free-flowing paint creates a sense of movement and emotion—like a visual dance. The textures of thick brushwork invite you to touch, making the wall a tactile experience. It’s as if an artist splattered their passion directly onto your wall.
You can go all out with chaotic, overlapping strokes or keep it more contained with deliberate, bold lines. Use a limited palette for a cohesive look or mix multiple colors for a lively, chaotic effect. This style works well in eclectic or modern spaces and can even complement industrial decor with raw textures. Adjust the scale of strokes depending on wall size for maximum impact.
Start with a neutral base coat to make your strokes pop. Use large brushes, palette knives, or even sponges to create spontaneous marks. Layer and blend colors directly on the wall, embracing imperfections as part of the charm. For precision, sketch faint guidelines but let the paint flow naturally. Finish with a clear matte varnish to protect your artwork.
Incorporate metallic or neon paints for extra punch. Add textured elements like splatters or drips for a raw, energetic feel. You could also add abstract shapes or symbols to personalize it further. Pair with minimalist furniture to let the wall be the star, or add sculptural decor to match the artistic chaos.
This style celebrates individuality and raw emotion. It’s perfect for anyone who wants a space that visually expresses their personality. With a bit of courage and freehand confidence, you’ll create a dynamic focal point that sparks conversation and creativity. Dive in and make your wall a masterpiece!
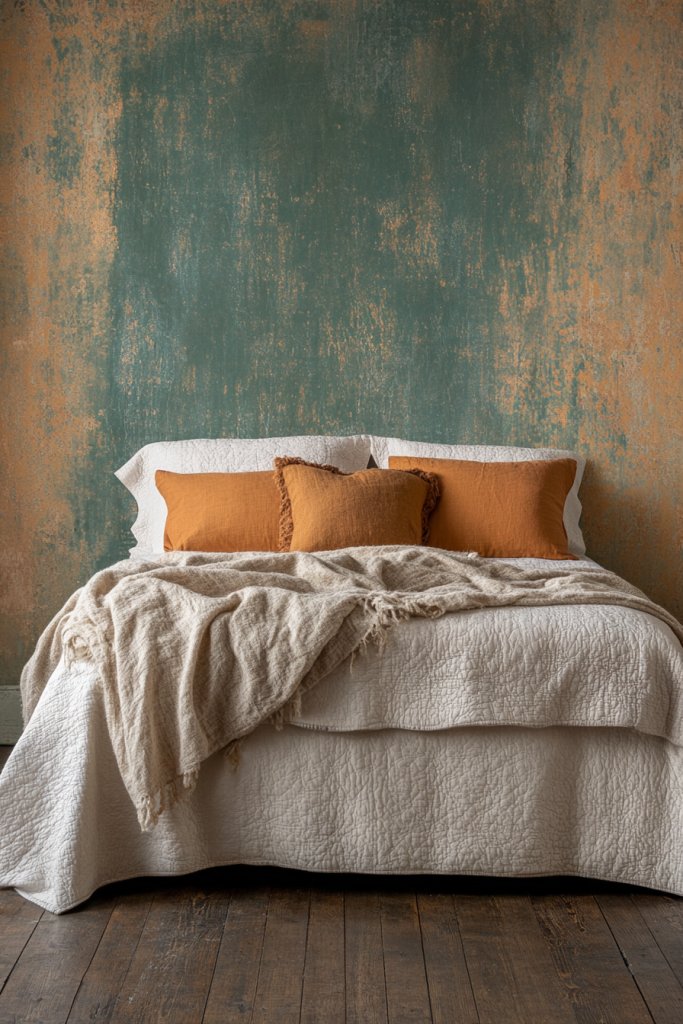
4. Metallic Accents with Gold or Silver Leaf Highlights
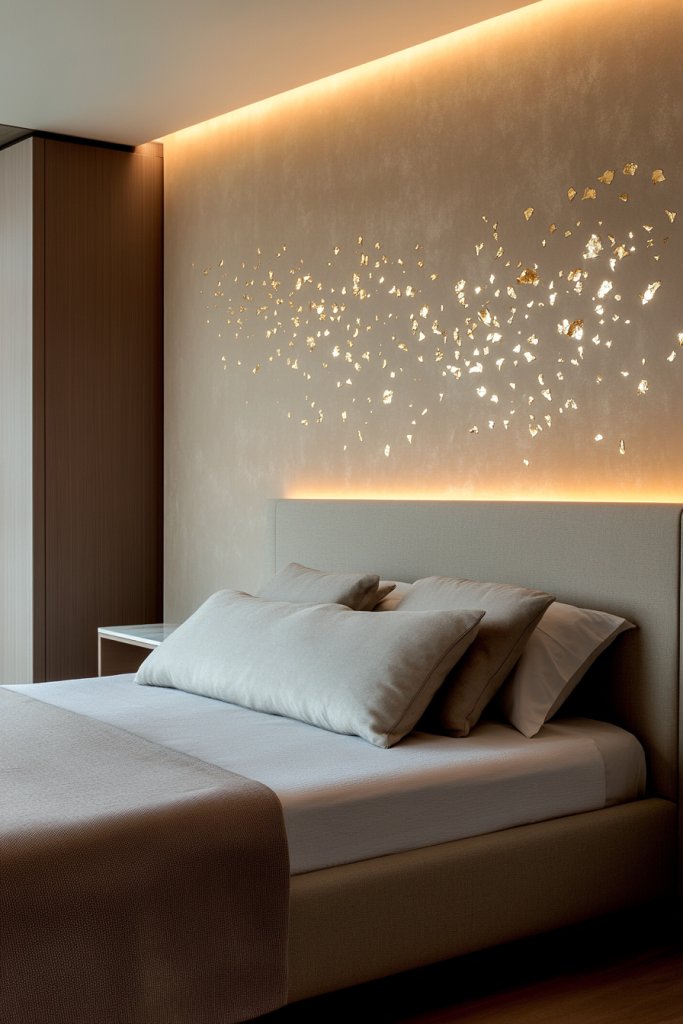
Tired of a wall that feels flat or dull? Want to add a touch of luxury without remodeling your entire bedroom? Metallic accents, especially gold or silver leaf highlights, can instantly elevate your space into a glamorous retreat. They bring a shimmer and elegance that catches the light and the eye.
Imagine a deep matte-colored wall with strategic patches of gold leaf that catch the glow of candlelight or ambient lamps. The reflective surfaces add depth, making the wall appear more textured and rich. Silver accents can create a sleek, modern vibe, while gold offers warmth and opulence. The contrast between matte and metallic creates a sophisticated visual play.
Apply metallic accents as subtle borders, geometric shapes, or random patches for a more eclectic look. For a modern aesthetic, keep metallic details minimal and precise; for a boho vibe, go for more organic, layered applications. Combine with textured paint or matte finishes to enhance the metallic shimmer. Seasonal additions like gold leaf snowflakes or starbursts work beautifully for holidays.
Use high-quality metallic leaf or metallic paint for best results. Clean and prime the wall, then apply adhesive size where you want the metallic accents. Carefully lay the leaf onto the adhesive, pressing gently to avoid wrinkles. Seal the leaf with a clear protective coat to prevent tarnishing. For a more controlled look, use stencils or painter’s tape to create sharp shapes.
Mix metallic elements with textured wall finishes, like plaster or stucco, for a layered look. Add decorative molding or architectural details around metallic patches to emphasize them. Incorporate your favorite symbols or initials within the metallic sections for a personal touch. Use lighting to highlight metallic details and create a continuously shifting shimmer.
Metallic accents bring a luxe vibe that’s surprisingly easy to achieve. The shimmer and shine make your wall feel like a piece of art or jewelry. It’s an effortless way to upgrade your bedroom’s style quotient and impress at the next gathering. Ready to add some sparkle? Go for it!
5. Chalkboard Wall for Creative Doodling and Messages
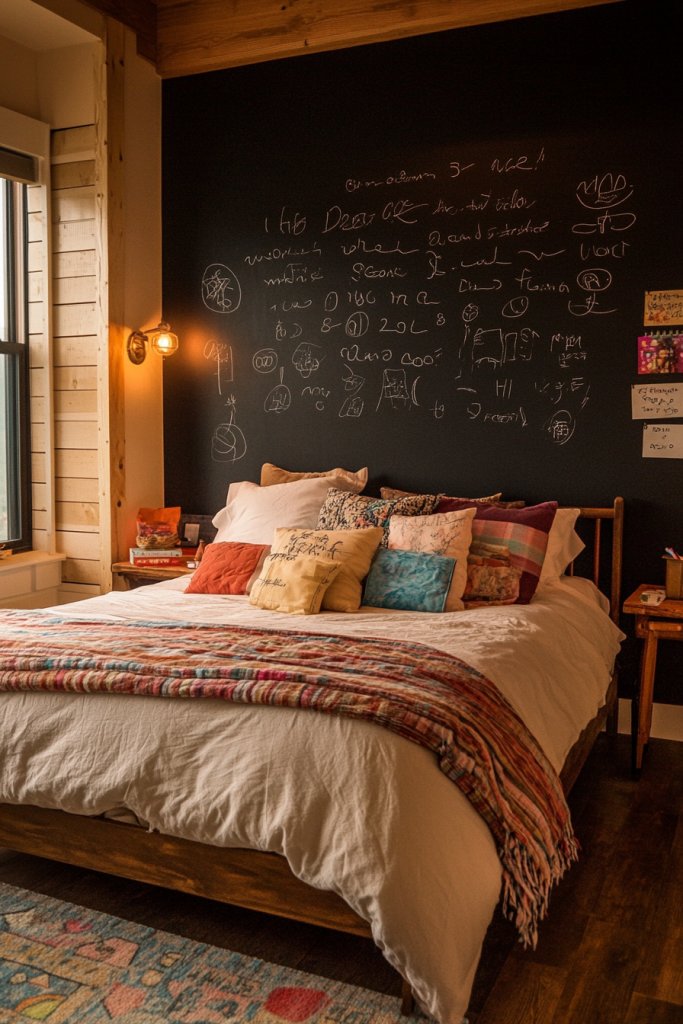
Looking for a fun and functional way to spice up your bedroom walls? A chalkboard wall offers endless opportunities for personal expression and organization. It’s perfect if you love doodling, leaving messages, or just need a space to brainstorm. Plus, it adds a playful, interactive element to your room.
Visualize a matte black wall with colorful chalk sketches, inspirational quotes, or daily reminders. The textured surface invites you to draw or write, changing constantly with your mood. Bright chalk colors pop against the dark background, creating a lively, artistic atmosphere. It feels like a giant sketchpad that’s always ready for your next masterpiece.
Designate a full wall or just a section for your chalkboard. Use decorative frames or borders to make it stand out or blend seamlessly. Incorporate magnetic paint underneath for added functionality like pinning photos or notes (though avoid mounting frames or artwork here). Seasonal themes or color schemes keep it fresh and engaging.
Start by cleaning and priming the wall with chalkboard paint, applying multiple thin coats for a smooth finish. Use painter’s tape to create clean edges if you want a geometric shape. Once dry, start doodling or writing with chalk—opt for high-quality, dustless options. Seal with a clear coat if you want easier cleaning, but regular chalk dust is harmless. Keep chalk and erasers handy.
Personalize your chalkboard with custom stencils, decorative borders, or themed colors. Add small shelves or magnetic strips nearby for chalk and erasers. Change your messages seasonally or with your mood—like motivational quotes or fun doodles. Use colorful chalks to make it more vibrant and engaging.
A chalkboard wall transforms your bedroom into a creative hub. It encourages self-expression and can boost your mood daily. Plus, it’s a practical way to organize thoughts or leave love notes. Ready to turn your wall into a giant canvas? Grab some chalk and start doodling!
6. Mandala or Zentangle Designs for Intricate Visuals
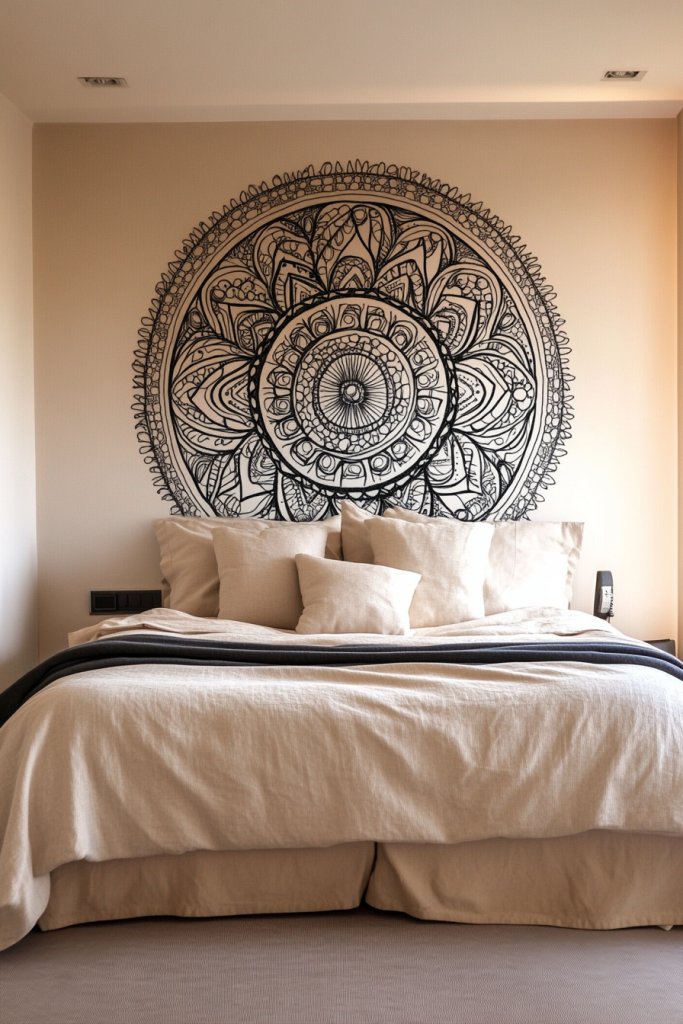
Ever wish your bedroom had a calming focal point that also sparks your creativity? Mandala and Zentangle patterns are perfect for adding intricate, meditative art to your walls. They invite mindfulness and focus, making your space feel both peaceful and inspiring. Plus, they’re surprisingly easy to customize.
Picture a large, detailed mandala radiating from the center of a wall, with symmetrical patterns of loops, swirls, and geometric shapes. The black-and-white or subtle color schemes create a hypnotic visual effect. The repetitive, detailed designs draw you in and encourage a moment of calm amid daily chaos. The textured, layered look can be achieved with fine brushes or stencils.
Opt for monochrome for a sleek, modern look, or add muted colors for a softer vibe. Small, repetitive Zentangle patterns can fill a corner or frame, while a large mandala acts as a statement piece. Combine with textured wall finishes or metallic accents for extra depth. These designs work well in boho, minimalist, or eclectic styles.
Start by sketching your pattern lightly with a pencil. Use fine brushes, markers, or stencils to fill in details. For symmetry, fold or grid your design before painting. Use high-contrast black or metallic pens for sharp lines, or soft watercolors for subtle shading. Seal your work with a matte varnish to protect delicate details. Take your time—this isn’t a rush project.
Add personal symbols or initials within the design for a unique touch. Incorporate metallic or pastel accents to highlight specific areas. Frame your artwork with decorative molding or paint a contrasting border. Display smaller tangles in other parts of the room for a cohesive artistic theme. It’s all about your personal zen.
Mandala and Zentangle art provide a calming, visually stunning centerpiece. They inspire mindfulness and patience, turning your wall into a reflective space. With simple tools and a bit of practice, you can create intricate designs that make your bedroom uniquely yours. Ready to craft your own meditative masterpiece?
7. Watercolor Washes for a Soft, Dreamy Atmosphere
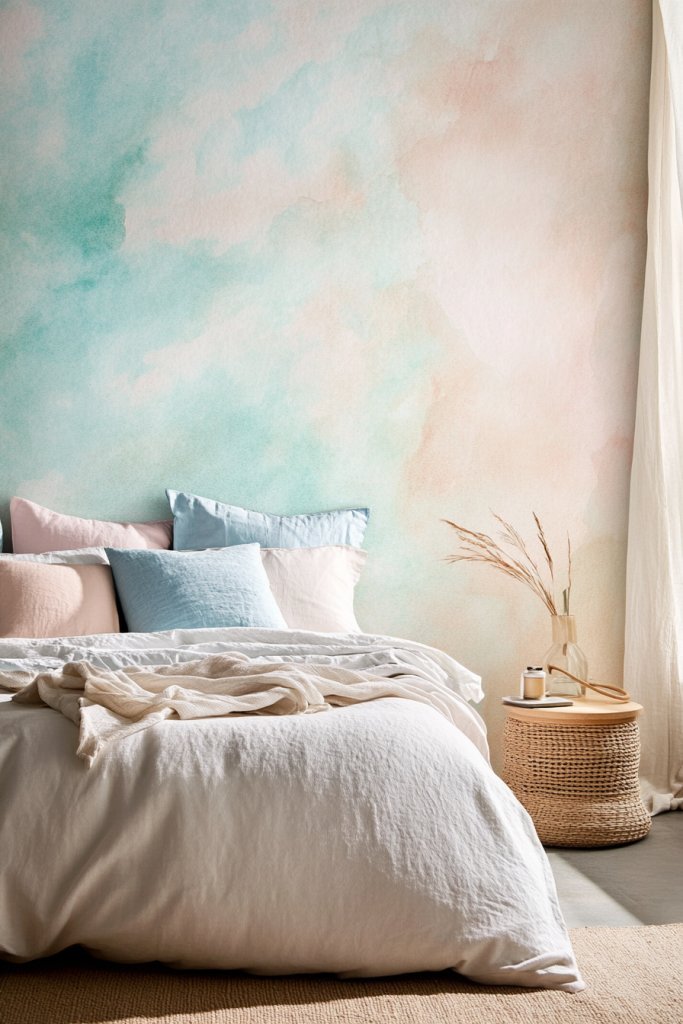
Ever wish your bedroom walls could feel like a calming, artistic retreat? Sometimes, plain paint just doesn’t cut it when you’re craving a touch of serenity and creative flair. Watercolor washes are perfect for those who want a subtle yet stunning backdrop that sparks relaxation. They transform a boring wall into a gentle canvas for your personal oasis.
Imagine a wall where shades of soft cream, blush, and muted blue blend seamlessly into each other, creating a fluid, almost ethereal landscape. The translucent layers give the illusion of depth, like peering into a watercolor painting. The gentle gradation of colors catches the light softly, making the space feel airy and peaceful. It’s like bringing a piece of a tranquil sky indoors.
You can tailor watercolor effects to match your mood—go bold with vibrant hues or keep it muted for a minimalist vibe. Seasonal changes might inspire you to swap warm tones for cool blues or earthy greens. For small rooms, a delicate wash adds depth without overwhelming, while larger walls can handle more dramatic, layered gradients. It’s flexible enough to suit any style.
Start by choosing high-quality watercolor paints or even diluted acrylics for durability. Prep your wall with a smooth primer to ensure the colors blend well. Use large, soft brushes or sponges for a fluid application, working in sections to maintain control. Work from light to dark, layering translucent colors and allowing each layer to dry. For a seamless look, blend the colors softly at the edges, mimicking watercolor techniques. Seal the finish with a matte clear coat to protect your art.
Add metallic or glitter accents sparingly to catch the light and add interest. Incorporate textured elements like a soft throw blanket or plush pillows that complement the watercolor palette. Personalize further by painting subtle, abstract shapes or gentle patterns over the wash. You could also frame a small section as a focal point with a simple wooden or metallic frame, creating a gallery-like effect.
Watercolor walls are a fantastic way to express your artistic side without needing advanced skills. They create a soothing environment that promotes relaxation and creativity. Plus, they’re easy to update—simply add new washes or change the color palette over time. Your bedroom can become a personal art piece that evolves with your style.
8. Stenciled Artistic Patterns for Precision and Style
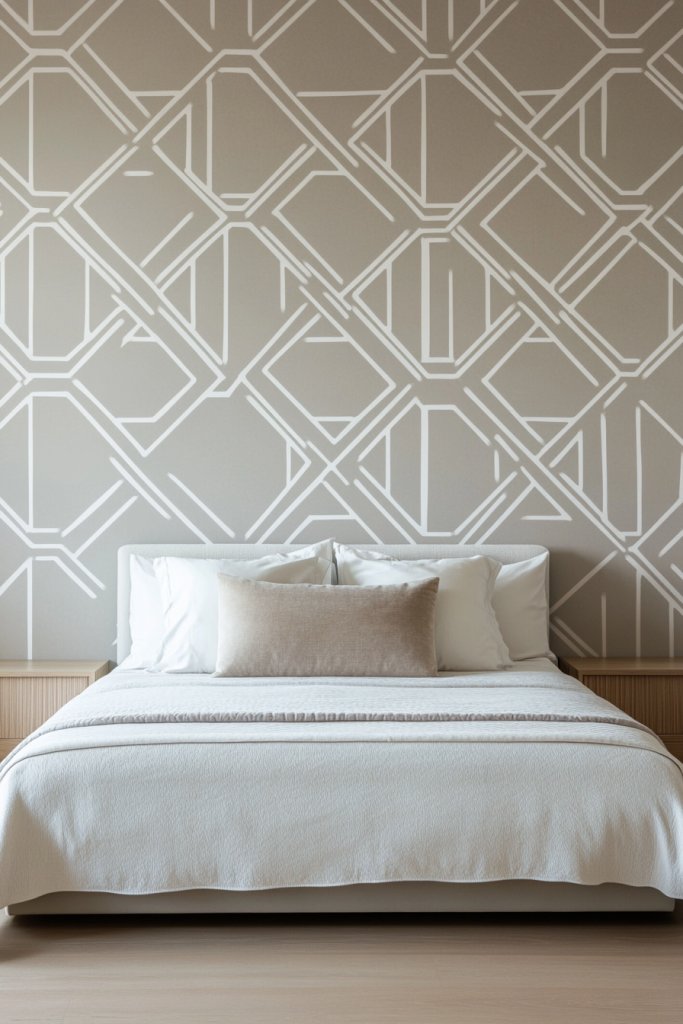
Tired of plain walls but hesitant to dive into freehand painting? Stenciling offers a perfect solution for those who want a polished, artistic look without the mess or stress. It allows you to create consistent, intricate patterns that elevate your space effortlessly. If you want a chic, professional vibe, stenciled designs are your best friend.
Visualize a wall adorned with sharp, repeating geometric shapes or delicate floral motifs, all precisely stamped using a stencil. The pattern might be bold and modern, like large tribal motifs, or subtle and detailed, like lace or damask. The crisp edges and repetitive motifs give a sense of order and sophistication. When light hits this textured pattern, it highlights the depth and craftsmanship, making your wall a true focal point.
Choose stencils that match your aesthetic—minimalist lines for modern decor, ornate designs for vintage charm, or playful motifs for a whimsical touch. Use contrasting paint colors to enhance the pattern’s visibility, or keep it subtle with tone-on-tone shades. For seasonal updates, swap out the color palette or layer different patterns for a personalized collage effect. It adapts easily to small accent walls or large feature sections.
Begin by cleaning and priming your wall to ensure the stencil adheres properly. Secure your stencil with painter’s tape, making sure it’s flat and firmly in place. Use a sponge or small roller to dab paint over the stencil, avoiding excess to prevent bleed. Carefully lift the stencil after each application to maintain crisp edges and reposition for continuous patterns. Repeat across the wall, filling in gaps as needed. For added durability, seal the finished pattern with a clear matte topcoat.
Mix and match different stencil patterns for a custom look, or add metallic or gloss paints to make the design pop. Incorporate textured paints or layered shades for depth. Personalize by painting initials, symbols, or motifs that hold personal meaning. Frame or carve out sections of the pattern with decorative tape or molding for a layered, architectural feel. Use stenciled designs as a backdrop for shelves or floating units.
Stenciling is a budget-friendly way to achieve high-end looks, perfect for DIY enthusiasts. It’s a forgiving technique that lets you experiment without fear of mistakes—just reapply or correct as needed. Over time, you can build a collection of stencils and develop your personal style. Your wall will look professionally designed, boosting your confidence in creative projects.
9. Color Blocking with Contrasting Shades for Visual Drama
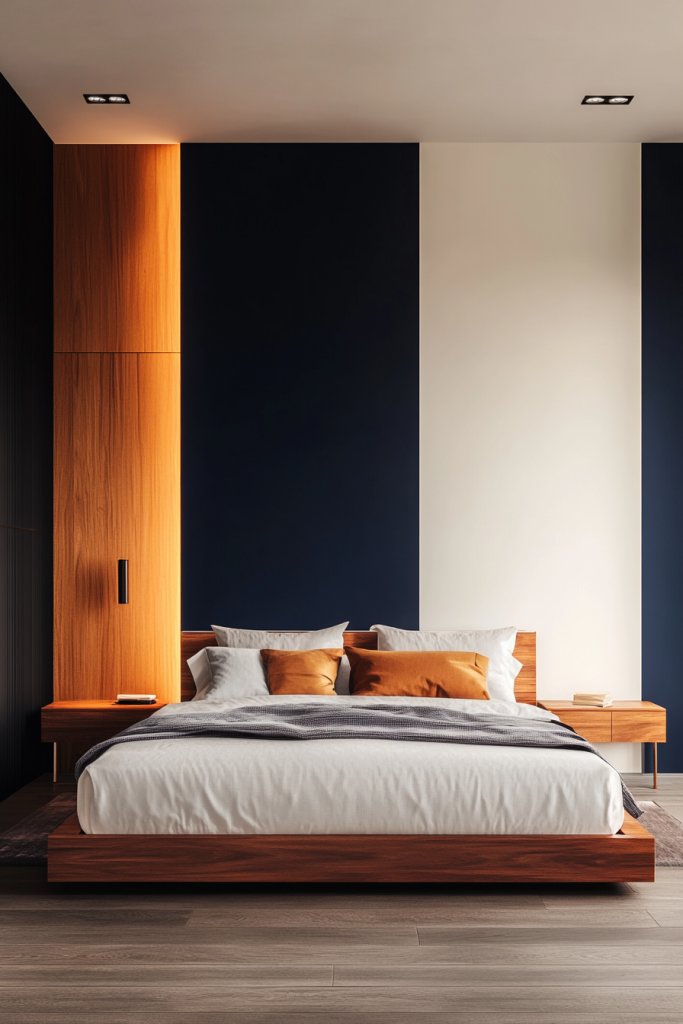
Feeling like your bedroom lacks impact? Sometimes, a splash of bold color can transform a dull space into something vibrant and lively. Color blocking is a simple yet powerful way to add visual interest and modern edge without a lot of fuss. It’s perfect for those who want to make a statement or define different zones within a room.
Imagine a wall divided into large, clean sections of contrasting shades—deep navy and crisp white, or warm terracotta and soft blush. The sharp lines and bold color combinations create a dynamic visual rhythm that immediately draws the eye. It’s like a piece of abstract art that energizes the entire room. When natural light hits the contrasting colors, it amplifies their vibrancy, making the space feel lively and fresh.
Opt for horizontal, vertical, or even diagonal divisions depending on your room’s shape and style. Choose colors that complement your existing furniture, or go for unexpected pairings for maximum impact. For smaller rooms, focus on one accent wall with color blocks, while larger spaces can handle multiple sections. Seasonal updates could include switching to warmer tones or cooler shades for a different mood.
Start by planning your layout with painter’s tape, marking out your sections carefully. Use a level or straightedge to keep lines crisp, especially for large or diagonal designs. Paint each section with high-quality, matte or satin finishes, allowing each color to dry thoroughly before removing tape. For added sharpness, apply a second coat if needed. Clean up edges with a small brush for any touch-ups, and consider sealing with a clear protective finish to maintain vibrancy.
Customize your color blocks by adding textured paint, metallic accents, or subtle patterns within the sections. Incorporate decorative molding or trim to frame the color blocks and add depth. Use different finishes—glossy, matte, or satin—to create variety and tactile interest. You can also add personal touches like wall decals or subtle motifs within some sections to make it uniquely yours.
Color blocking is a bold choice that instantly elevates your decor game. It’s a versatile technique that suits both minimalists and maximalists. Once you master the basics, you’ll feel confident experimenting with new color combos and patterns. Your room becomes a personal gallery that reflects your style and daring spirit.
10. DIY Tape Art with Sharp Lines and Creative Shapes
Ever wanted to add a bold, artistic touch to your bedroom wall without breaking the bank or hiring a pro? DIY tape art is the perfect solution for creating sharp, eye-catching designs that reflect your personality. It’s a way to make your space uniquely yours while keeping things simple and affordable. Plus, it’s surprisingly fun and satisfying to see your ideas come to life.
Picture a wall decorated with crisp stripes, chevrons, or geometric shapes—clean lines that look professionally painted but are actually achieved with painter’s tape. Imagine the contrast of vibrant colors peeking through the tape edges, giving a modern, graphic vibe. The texture is smooth, with perfectly straight lines that seem to pop out from the wall. It’s like having a mini art gallery right in your bedroom, all DIY and totally customizable.
You can choose bold, contrasting color combos or soft pastel palettes, depending on your mood or season. For a boho style, layer tapes in irregular patterns with textured textiles nearby. In small rooms, vertical or horizontal lines can visually expand space, while zigzags add energy. You can also switch up the shapes—try circles, triangles, or even abstract blobs—whenever you feel like a quick refresh.
Start by sketching your design on paper or lightly marking the wall with a pencil. Use painter’s tape to outline your shapes, pressing down firmly to prevent bleeding. Choose your paint colors, preferably with low VOC for a healthier space. Carefully fill in the taped areas with a roller or brush, then peel the tape away once dry for crisp edges. For best results, work in sections and keep your tools clean to maintain sharp lines. This method requires patience but is straightforward enough for beginners.
Add metallic or neon tapes for extra flair, or layer different shapes for a complex, mosaic effect. Incorporate your favorite patterns—stripes, chevrons, or waves—matching your room’s theme. For an even more personalized touch, include initials, symbols, or doodles within the geometric framework. You can also create an accent wall by combining tape art with textured paint or metallic accents for depth.
DIY tape art empowers you to experiment and express yourself without fear of mistakes. Once you master the technique, it opens the door to endless creative possibilities. Your space will look fresh, modern, and totally customized, boosting your confidence in your decorating skills. Ready to tape your way to a stunning, personalized bedroom? Just grab some tape and paint—your art awaits!
11. Faux Textured Effects with Sponging or Rag Rolling
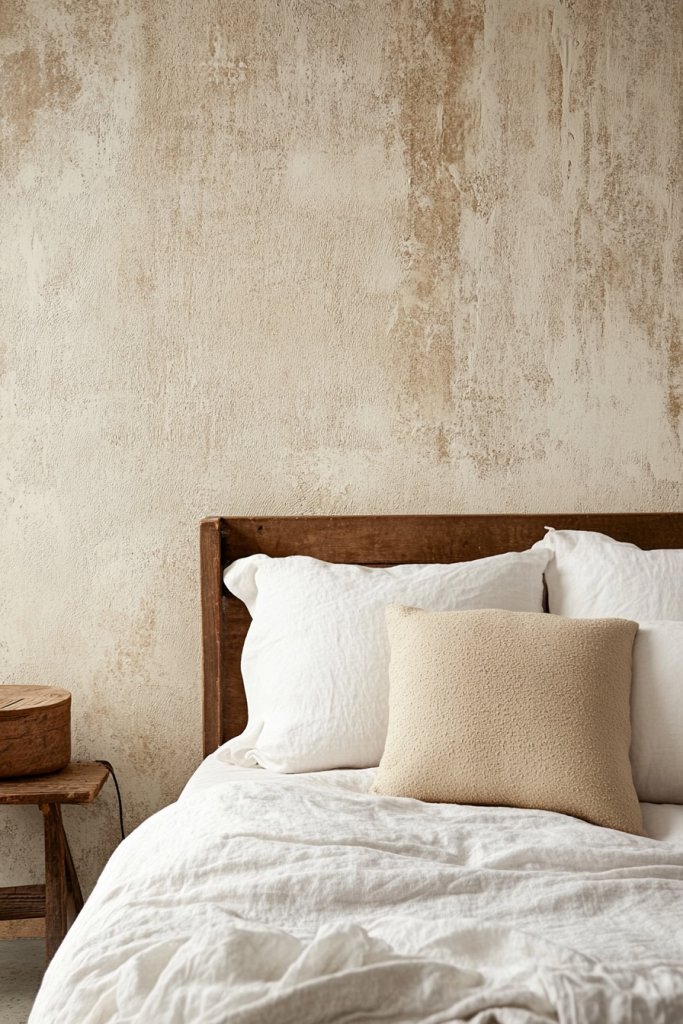
Do flat, dull walls leave your bedroom feeling uninspired? Faux textured effects are the secret to adding depth and personality without the hassle or mess of real plaster or fabric. These techniques mimic luxurious surfaces and bring a tactile dimension to your space. It’s a simple way to upgrade your walls and impress visitors—without the hefty price tag.
Imagine a wall with a soft, plaster-like finish or a subtle fabric texture, created with just a sponge or rag. The surface feels inviting, with a layered, dimensional look that catches light beautifully. You might see a gentle mottling or rippling effect, giving your room a cozy, handcrafted vibe. These textures can be subtle or bold, depending on your preference, and instantly add richness to your decor.
Choose muted tones for a sophisticated, understated look or go for vibrant shades with textured patterns for a lively feel. Rag rolling pairs well with vintage or rustic styles, while sponging adds a more modern, abstract touch. You can also combine techniques—try sponging over a base color with rag rolling for extra depth. Seasonal color shifts, like warm tones in winter or cool shades in summer, keep your walls feeling fresh.
Start with a primer if your wall has a glossy or uneven finish. Use a natural sea sponge or a rag, dipping lightly into your chosen paint or glaze. Dab or roll to create random, organic patterns—don’t overthink it. For rag rolling, apply a base color first, then quickly roll a damp rag over the wet paint in a rolling motion to create ripples. Work in manageable sections, blending edges to avoid harsh lines. Finish with a sealer for durability and easy cleaning. Practice on cardboard first to perfect your technique.
Experiment with metallic or pearlized paints for a subtle shimmer. Layer multiple colors or textures for a more complex effect, like a faux silk or linen look. Add decorative stencils or patterns for more visual interest, or incorporate light-colored highlights to accentuate the texture. You can also use this method on furniture or accent pieces to create a cohesive design theme.
Faux textured walls make your space feel rich and handcrafted, boosting your confidence in DIY decor. The techniques are forgiving and adaptable, so don’t worry about imperfections—they add charm! Plus, these effects are easily reversible or changeable, giving you flexibility to evolve your style. Ready to give your walls a tactile makeover? Grab a sponge or rag and start experimenting!
12. Landscape or Nature-Inspired Murals for Tranquility
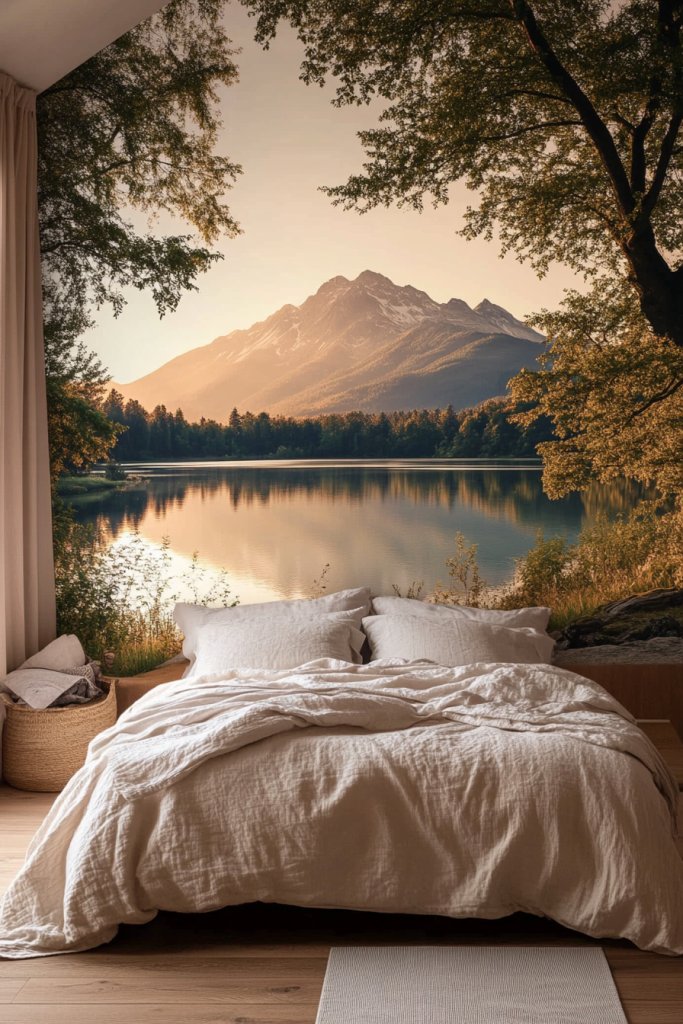
Feeling disconnected from nature while stuck indoors? A landscape or nature-inspired mural can bring calming energy and serenity into your bedroom. It’s a way to create a peaceful retreat that feels like a mini escape from everyday stress. Plus, a good mural can serve as a stunning focal point that transforms your entire space.
Imagine a sweeping mountain vista, a lush forest, or gentle waves lapping a sandy shore—your wall becomes a window to the outdoors. Soft, muted colors evoke tranquility, while vibrant tones energize a lively room. The details—like wispy clouds or textured tree bark—add depth and realism, making you feel immersed in nature. The scene stretches across the wall, creating a sense of openness and calm that lasts day and night.
Choose a scene that matches your mood or room theme—serene lakes, tropical jungles, or minimalist mountain ranges. Seasonal themes can be swapped out with removable panels or decals for variety. Smaller murals work well in compact spaces, while large-scale scenes are ideal for bigger rooms. You can also incorporate abstract natural elements like leaf patterns or flowing water lines for a more stylized look.
Start by selecting a high-quality mural wallpaper or a large canvas print. If painting freehand, sketch your scene lightly with a pencil first. Use acrylics or washable paints for easy corrections, layering colors to add depth. For wallpaper, prep the wall thoroughly, then carefully align and smooth the mural to avoid bubbles. Consider adding textured elements like fabric or textured paint to enhance realism. Seal the mural with a matte finish to reduce glare and protect your artwork.
Add personal touches by including silhouettes of your favorite animals or landmarks. Use lighting—like LED backlights or soft spotlights—to highlight the mural’s details. Incorporate small decorative elements like driftwood or stones around the base for a natural vignette. Change the mood seasonally by adjusting surrounding textiles and accessories, keeping your nature scene feeling fresh and inspiring.
A nature-inspired mural creates a calming sanctuary that refreshes your spirit. It demonstrates how art can elevate a simple space into a retreat. Plus, tackling a large-scale project like this boosts confidence in your decorating skills. Ready to bring the outdoors inside? Your tranquil escape is just a brushstroke away!
13. Monochromatic Art with Varying Shades for Subtle Elegance
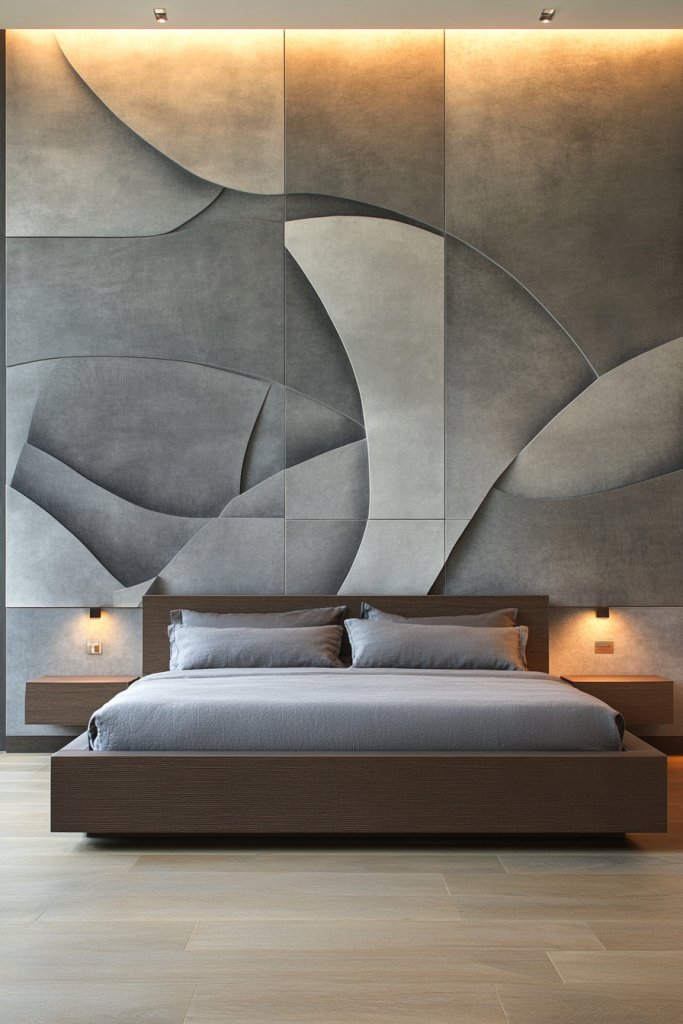
Looking for a sophisticated way to decorate without overwhelming your space? Monochromatic art offers a sleek, unified look that exudes elegance and calm. It’s perfect for those who prefer subtlety over loud patterns, creating a refined atmosphere. Plus, it’s surprisingly versatile and easy to coordinate with other decor elements.
Imagine a wall painted in shades of soft gray, deep navy, or warm beige—every tone blending seamlessly. Textured brushstrokes or layered paint create depth and interest within the same color family. The subtle variations catch light differently throughout the day, giving your wall a dynamic yet understated appearance. It feels polished, timeless, and effortlessly chic, making your entire room feel more spacious and harmonious.
Opt for a monochrome palette that complements your room’s mood—cool tones for tranquility, warm shades for coziness. You can add depth with matte, satin, or gloss finishes, or incorporate subtle patterns in the same color spectrum. For smaller spaces, light shades open up the room; darker tones add coziness. Layering different textures—like velvet, linen, or silk—within the same color scheme enhances richness without distraction.
Start by choosing your base color and collecting a range of shades—darker, lighter, and mid-tones. Use painter’s tape or stencils to add simple geometric or abstract patterns, or opt for a smooth, gradient wash for a seamless effect. Use a high-quality brush or sponge to blend shades smoothly. Apply primer if needed, then layer your shades carefully, working in sections. Finish with a protective sealant to ensure longevity. Keep your workspace well-lit to see subtle color differences clearly.
Incorporate metallic or pearl accents in select areas for a hint of shimmer. Use textured paints or plaster techniques to add tactile interest. Hang minimalist frames with monochrome prints or photographs that match the color scheme, or add fabric wall hangings for additional texture. Personalize further by integrating flat or raised patterns that echo your style, keeping everything cohesive and refined.
Monochromatic art proves that less is more, helping you achieve a sophisticated look with ease. It’s a great way to develop your skills in blending and layering, boosting your confidence in DIY projects. Your room will feel calmer, more cohesive, and effortlessly stylish. Ready to explore the subtle art of monochrome? Your elegant wall awaits a simple, stunning transformation.
14. Hand-Painted Quotes or Typography as Art Statements

Ever wanted to turn your bedroom into a sanctuary of inspiration without cluttering the space with framed prints or posters? Hand-painted quotes or typography are the perfect way to add a personal touch that’s both stylish and meaningful. Plus, it’s a fantastic opportunity to showcase your calligraphy skills or experiment with fonts—no art degree required. It’s like giving your wall a voice, minus the noise.
Imagine waking up to a beautifully painted motivational phrase or a favorite lyric rendered directly onto your wall in a chic, casual script. It makes the space feel more intimate and alive, as if your room is speaking directly to you. And the best part? It’s incredibly customizable—pick your words, fonts, and colors to match your mood or season. FYI, no fancy art supplies needed; just some good brushes and a steady hand.
This idea caters to a wide audience, from the minimalistic lover who prefers a sleek monochrome quote to the boho soul who loves colorful, layered typography. Beginners can start with simple stencils or transfer techniques, while seasoned artists might go freehand or add decorative flourishes. Either way, it’s a fun way to inject personality and grow your creative confidence. Pinterest trends show that personalized wall art remains a top choice for bedroom decor—because who doesn’t want their space to reflect their vibe?
Applying this idea is straightforward but requires patience. First, choose your quote or word and plan your layout—use painter’s tape or light pencil marks for guides. Next, pick your paint—acrylics work well for their quick-drying, vibrant finish. Start with the main words, then add decorative elements or flourishes as desired. Remember, uneven strokes can add charm, so don’t stress about perfection. Just keep a steady hand and enjoy the process. Pro tip: seal your work with a clear matte varnish for durability and a polished look.
Personalization shines here—think about adding your favorite colors, mixing fonts for visual interest, or embellishing with subtle patterns around the words. You might even incorporate symbols or icons that hold special meaning—like a tiny heart, star, or smiley face. The sky’s the limit! This DIY approach makes your bedroom truly one-of-a-kind, with a touch of your personality radiating off the wall. Plus, it’s a great conversation starter when friends visit, and you can change it up whenever your mood shifts.
Ultimately, hand-painted quotes turn your wall into a source of daily motivation or a reminder of what’s important. They’re affordable, flexible, and surprisingly easy to update or redo if you grow tired of the design. So, why not pick a phrase that inspires you and start practicing? Remember, even if your lettering isn’t perfect, it’ll still look authentic and heartfelt. Confidence is key—your wall should feel like a warm hug, not a museum exhibit. Ready to get artistic and make your space uniquely yours?
15. Vintage or Retro-inspired Painting Techniques for Nostalgia
Feeling a bit nostalgic or just craving that timeless charm in your bedroom? Vintage or retro-inspired painting techniques can give your walls that warm, slightly imperfect vibe that feels like stepping back into your favorite era. Think sponge painting, glazing, or rag rolling—these methods add layers of history and character that mass-produced art simply can’t match. Plus, they’re a fun way to experiment with textures and colors without breaking the bank.
Picture a cozy room where the walls have a subtle, weathered look—soft pastel shades combined with uneven, layered textures. You might use a sponge to dab on a muted color, then gently glaze over it with a contrasting hue, creating a sense of depth and age that’s perfect for a vintage aesthetic. Rag rolling can add a textured fabric-like finish, giving your wall an almost tactile quality. It’s like giving your room a story, instead of just a fresh coat of paint.
This approach appeals to those who appreciate craftsmanship and want a more personal, handcrafted feel. Beginners can start with simple sponge techniques or faux glazing, while more experienced DIYers might incorporate layering and distressing for a truly authentic look. The beauty of these methods is that they’re forgiving—imperfections add charm, so don’t stress over every stroke or uneven patch. Pinterest is flooded with inspiring vintage wall ideas, proving that this look remains timeless and on-trend.
Implementation involves selecting your base color, then applying your chosen technique. For sponge painting, use a natural sponge and dab it onto a slightly damp wall, blending edges for a soft, mottled effect. For glazing, mix a transparent color with a glazing medium, then brush it over the dried base coat, wiping away excess for a subtle aged appearance. Rag rolling involves rolling a rag dipped in paint or glaze across the wall in a random pattern, creating a fabric-like texture. Just remember to work in sections and step back periodically to assess your progress.
To elevate the vintage feel, incorporate complementary elements like distressed furniture, antique textiles, or decorative trim. You can even add faux crackle effects or lightly sand certain areas to mimic wear and tear, making your wall look like a cherished relic. The key is to embrace imperfections—they’re what give the space authenticity and charm. This technique works especially well in bedrooms with vintage, shabby chic, or rustic themes, but can be adapted to modern spaces for an eclectic twist.
The beauty of these techniques is their versatility and affordability. You don’t need fancy tools—just sponges, rags, brushes, and a bit of patience. Plus, you’ll enjoy the process, and the end result will be uniquely yours, full of personality and history. With a little practice, even beginner painters can master these methods and create stunning, nostalgic walls that make your bedroom feel like a cozy retreat from another time. Ready to channel your inner vintage artist? Let the textures and layers tell your story.
16. Split-tone or Dual-Color Walls for a Trendy Look
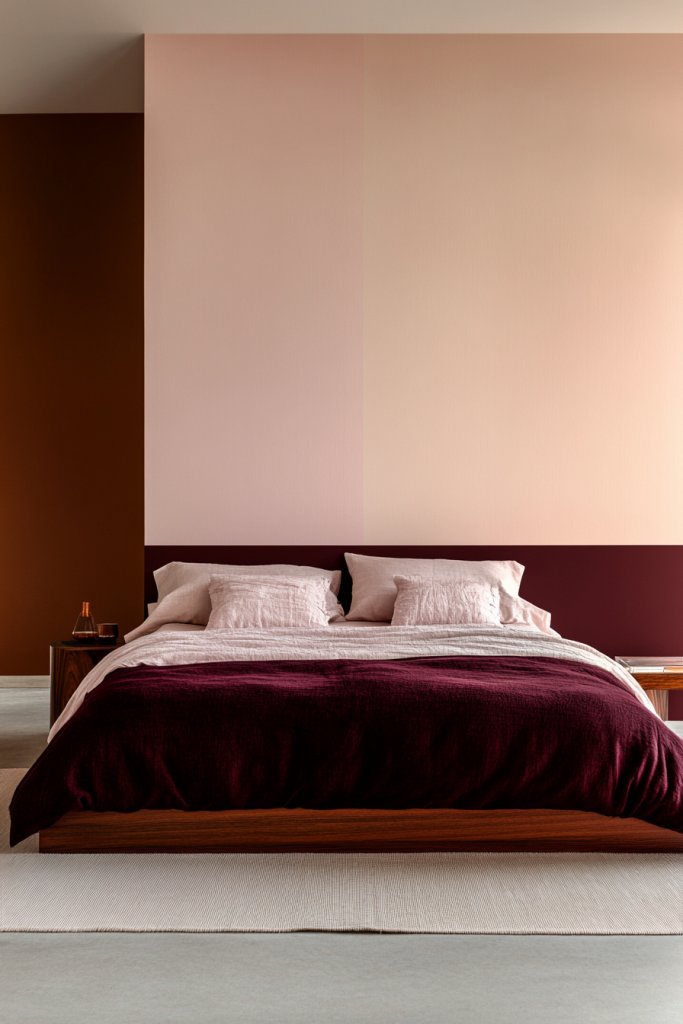
Are you tired of the same old single-color walls? Want to make a bold statement that instantly modernizes your bedroom? Split-tone or dual-color walls are the answer. This trend involves dividing your wall into two contrasting or complementary shades—either horizontally, vertically, or even diagonally—for a striking visual effect. It’s like giving your room a fresh haircut but for your walls, and trust me, the results are pretty eye-catching.
Visualize a sleek bedroom where the upper half of the wall is painted in a soft blush pink, while the bottom is a deep charcoal. The clean line between the two creates a graphic impact that’s both modern and sophisticated. You can also opt for vertical splits, like a bold stripe down the middle, or even a triangle or chevron pattern for added flair. This technique works well in small spaces, making the walls appear taller or wider depending on the orientation.
This idea caters to those who love a bit of drama and want to experiment with color blocking without committing to a full mural or complex design. It’s beginner-friendly, especially with painter’s tape or masking tape to achieve sharp, crisp lines. For a softer look, choose shades within the same color family—like light blue and navy—creating contrast without overwhelming the eye. Pinterest is full of inspiring dual-tone bedroom walls, proving that this trend isn’t going anywhere.
Implementation starts with choosing your color palette—think about the mood you want to evoke. Next, use painter’s tape to mark your dividing line, ensuring it’s level and straight. Paint one section first, let it dry, then carefully tape over it before painting the second section. For a seamless look, remove the tape while the paint is still slightly damp. Consider using semi-gloss or matte finishes to add texture and depth, depending on your style. If you’re feeling adventurous, try a textured paint or metallic accents on one side for extra dimension.
To personalize this look further, add decorative molding or trim along the dividing line—think sleek wood or even LED strip lighting hidden behind a dado rail for a contemporary twist. You can also incorporate different textures, like a matte wall paired with a glossy stripe, to add visual interest. This technique is highly adaptable, fitting both minimalist and maximalist styles, and works well with various furniture choices. Plus, it’s a quick way to elevate your bedroom decor without a complete overhaul.
Ultimately, split-tone walls are all about breaking conventions and showing off your style. They’re bold, customizable, and surprisingly easy to pull off with some patience and tape. Once finished, you’ll have a space that feels fresh, modern, and totally Instagram-worthy. So, why settle for plain walls when you can create a feature that’s as unique as you are? Dare to experiment and give your bedroom that trendy edge it deserves.
17. Faux Gallery Wall with Painted Frames and Artwork
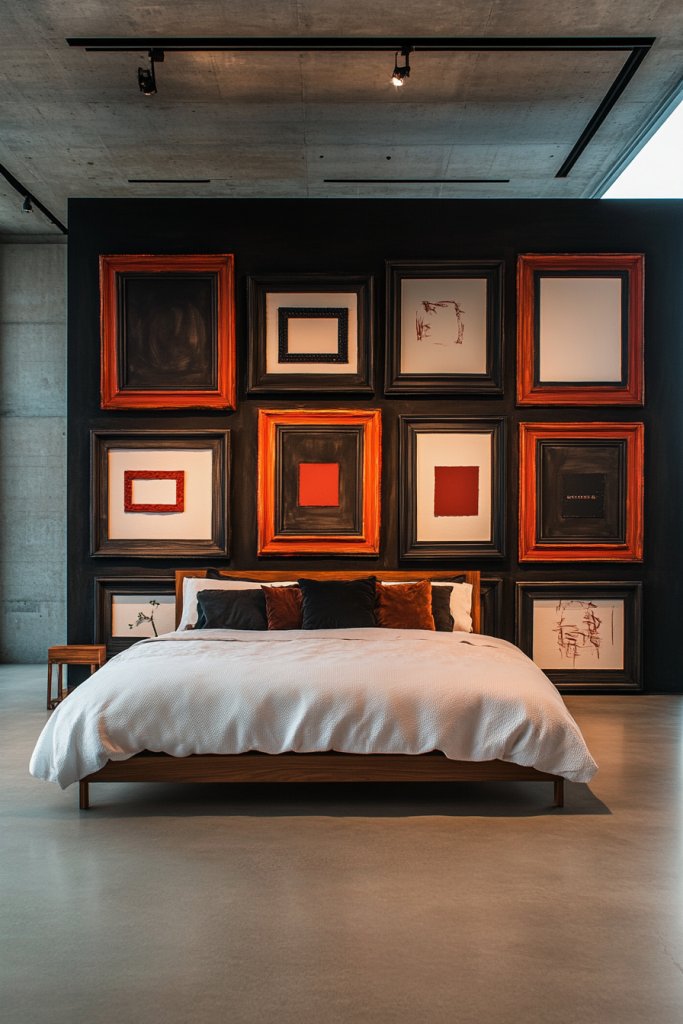
Ever wish you had a gallery wall but hate the clutter or the hassle of hanging dozens of pieces? Enter the faux gallery wall—an innovative way to mimic the look of a curated art display without any nails, hooks, or stress. By painting frames directly onto your wall and adding faux artworks, you create a sleek, personalized art gallery that’s both stylish and low-maintenance. It’s perfect for renters or anyone who wants a bold statement without the commitment.
Visualize a feature wall where painted frames in various sizes and shapes form a cohesive display. Inside each “frame,” you can paint abstract designs, patterns, or even faux photographs (think black-and-white sketches or minimalist line art). The key is to keep the frames consistent in style—such as simple white borders or ornate gold accents—and to vary the interior designs for visual interest. The overall effect looks like a sophisticated, custom gallery, but with a fraction of the effort and damage.
This idea is ideal for those who love a curated look but lack the time or tools for hanging artwork. Beginners can start with simple geometric shapes or freehand designs, while more experienced artists might use stencils or painter’s tape for precision. The beauty of this technique is its flexibility—you can change the “artwork” whenever you want by repainting or updating the designs. Pinterest is full of creative examples that prove this approach can be both elegant and playful, depending on your style.
Implementation involves sketching out your frame layout first—use painter’s tape or a light pencil to map out the shapes. Next, paint the frames with your chosen color—white, black, or metallics are popular choices for a polished look. Then, fill the inside with your preferred designs—layered patterns, abstract shapes, or even faux photographs or quotes (if you’re feeling fancy). Finish with a protective clear coat to prevent smudges or scratches. Voila! You’ve created a high-impact feature wall with minimal effort.
Personalization is what makes this idea so appealing. Mix and match frame styles and sizes, or incorporate different colors within the frames for a playful vibe. You can also add decorative elements like faux mirrors or metallic accents within some frames for extra flair. This technique works beautifully in minimalist, eclectic, or modern bedrooms—just tailor the colors and shapes to your taste. The best part? It’s cost-effective, easy to update, and totally Instagrammable.
In the end, a faux gallery wall offers you the luxury of a gallery-quality look without the hassle of hanging dozens of actual artworks. It’s a smart, stylish solution that saves time, avoids wall damage, and allows for endless customization. Once you see your wall come alive with painted frames and designs, you’ll wonder why you didn’t do it sooner. Ready to turn your blank wall into a masterpiece? Grab your brushes and start designing—your bedroom deserves a bit of gallery glam.
18. Creative Use of Negative Space for Minimalist Art
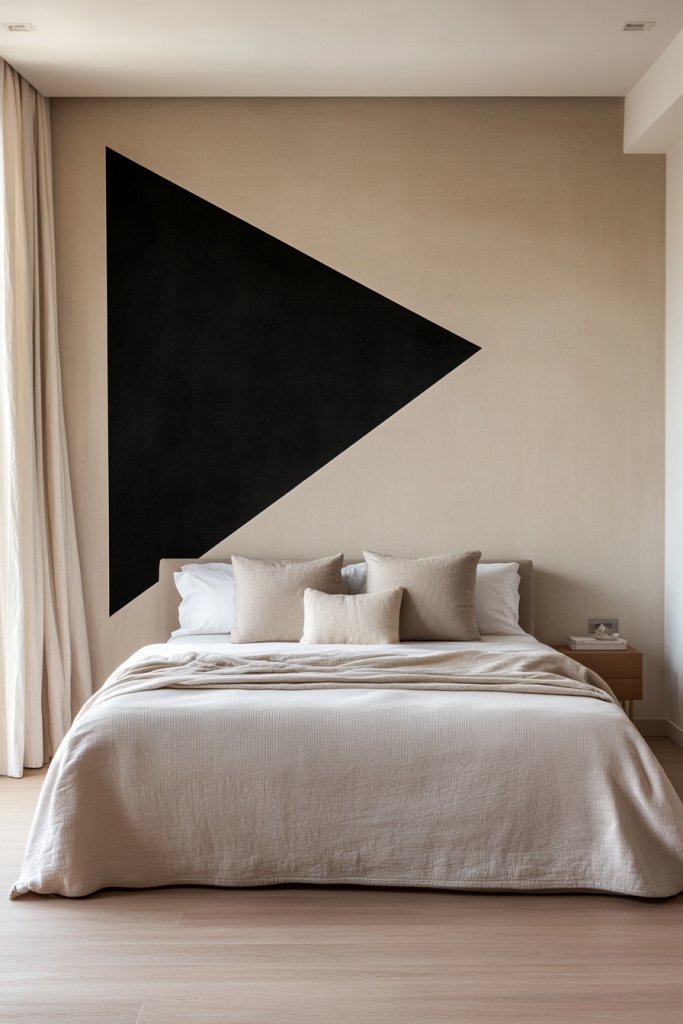
Ever feel overwhelmed by busy, cluttered walls that distract rather than inspire? Minimalist art with clever use of negative space offers a calming escape, creating a sense of balance and sophistication. It appeals to those craving a sleek, modern vibe without sacrificing personality. If your walls feel like they need a breath of fresh air, this idea might be just what you need to breathe new life into your space.
Imagine a wall painted in a soft, muted tone with bold geometric shapes carved out by unpainted sections or contrasting colors. The empty spaces become part of the artwork, guiding your eye and emphasizing the shapes and patterns. It’s like a visual conversation between the painted and unpainted areas, creating a dynamic yet peaceful composition. The play of light and shadow adds depth, making the wall feel expansive and alive.
This technique works wonders in both small and large rooms, adapting easily to various styles from ultra-modern to Scandinavian minimalism. For a cozy bedroom, opt for subtle tones with sparse shapes; for a more dramatic look, use dark backgrounds with stark white cutouts. Seasonal changes can be made by switching out colors or shapes, keeping the look fresh without a total redo. Incorporate textured wall finishes or matte paints to enhance the minimalist aesthetic.
Start by choosing a neutral wall color, then sketch your design with painter’s tape or stencil masks. Select contrasting paints or tones to highlight negative spaces. Use a level and measuring tape to ensure clean lines and symmetry. For sharp edges, a steady hand with painter’s tape and high-quality brushes or rollers is key. Avoid cluttered designs—less is more here. Once painted, remove the tape carefully to reveal crisp, intentional negative spaces. Clean tools and touch-ups finalize the look.
Personalize by adding subtle textured finishes or gloss contrasts within the shapes to create visual interest. Play with different shapes—triangles, circles, or abstract forms—to suit your personality. You can also incorporate metallic or matte finishes for a luxe feel. Framing certain shapes with thin metallic tapes or paints adds a refined detail. Remember, the goal is to keep it simple yet expressive, so don’t overdo it.
Mastering negative space as an art form elevates your wall from mere background to a statement piece. It’s a bold choice that shows confidence in less-is-more design. With a little patience and precision, you can craft a stunning focal point that feels both modern and timeless. Ready to give your walls that sleek, spacious vibe? Your minimalist masterpiece awaits!
19. Personal Artistic Canvas with Handprints or Portraits
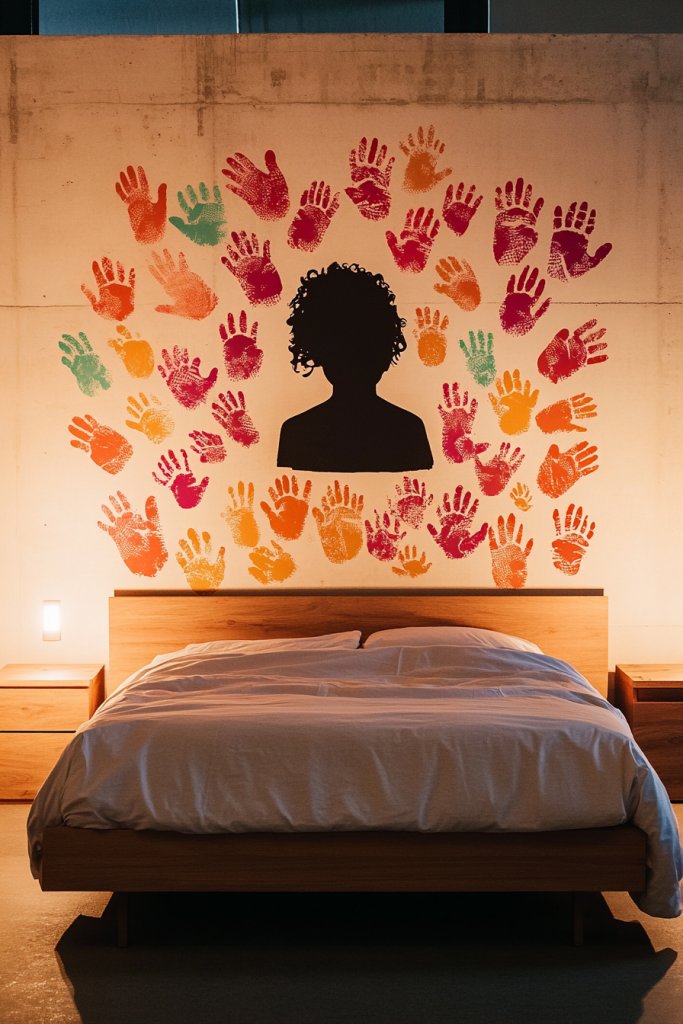
Want a truly unique and heartfelt way to decorate your bedroom wall? Creating a personal artistic canvas with handprints, silhouettes, or portraits transforms your space into a gallery of memories. It’s perfect for those who crave authentic, meaningful decor that tells their story. If your walls seem sterile or uninspired, this approach injects personality, emotion, and a dash of creativity into your sanctuary.
Picture a wall adorned with a series of bold, colorful handprints layered in a playful pattern, or a striking silhouette of a loved one’s profile painted with precision. These personal touches create a visual narrative that’s both artistic and intimate. The textures of handprints or the soft gradients of portraits add depth and warmth. Light catches the raised paint or textured finishes, making the images feel alive and dynamic.
You can customize this idea for any mood or style—bright, playful colors for a fun vibe, or monochrome for elegance. Large-scale portraits work well in spacious rooms, while smaller handprint clusters suit cozy nooks. Seasonal themes, like holiday motifs or family milestones, keep the display fresh. Incorporate different mediums—acrylics, fabric appliques, or even mixed media—to match your aesthetic. This concept adapts easily to various age groups and personal tastes.
Gather supplies such as non-toxic paints, brushes, stencils, or even fabric. For handprints, start with clean hands and choose vibrant colors for a lively effect. Use painter’s tape or masking to create clean boundaries for portraits. Sketch outlines lightly with pencil before filling in with color or detail. Consider framing small sections or mounting them on textured backgrounds to add dimension. For portraits, use tracing or digital tools to get proportions right before painting. Seal the finished art with a clear matte or gloss finish to protect it.
Add personal touches like incorporating favorite quotes, dates, or symbols alongside the images. Use different textures—glitter, metallic paints, or fabric patches—to bring variety. Create a narrative by arranging the images chronologically or thematically. Incorporate small decorative elements like fabric flowers or metallic accents to emphasize certain areas. The goal is to craft a meaningful, eye-catching display that reflects your unique story.
Transforming your wall into a personal art gallery boosts your emotional connection to your space. It’s a creative process that celebrates your individuality and memories. Plus, the finished piece becomes a conversation starter and a source of daily inspiration. Remember, personal art is all about authenticity—so embrace imperfections and let your personality shine through. Ready to turn your walls into a heartfelt masterpiece? Go for it!
Conclusion
With a variety of wall painting ideas at your fingertips, you’re equipped to elevate your bedroom into a stunning reflection of your artistic expression. Whether you choose a bold statement mural or delicate, intricate designs, these ideas are all about personalizing your space with creativity and flair. Don’t hesitate—embrace the opportunity to turn your walls into a captivating work of art and make your bedroom a true sanctuary of style and inspiration!
Leave a Reply