Transforming your bedroom walls into a stunning focal point has never been more exciting thanks to the versatile charm of panelling. This trend has surged in popularity because it effortlessly adds texture, depth, and personality to any space—whether you’re aiming for cozy sophistication or modern sleekness. Panelling offers a creative way to elevate your bedroom’s aesthetic without a complete overhaul, making it a favorite among interior enthusiasts.
In this article, you’ll discover a wide array of bedroom panelling ideas that suit various styles and preferences. From classic wood finishes to bold painted patterns, each idea is designed to inspire you to craft a textured wall that reflects your unique taste. Get ready to transform your space into a beautifully curated retreat with these innovative panelling concepts!
1. Classic Shiplap Paneling for Cozy Charm
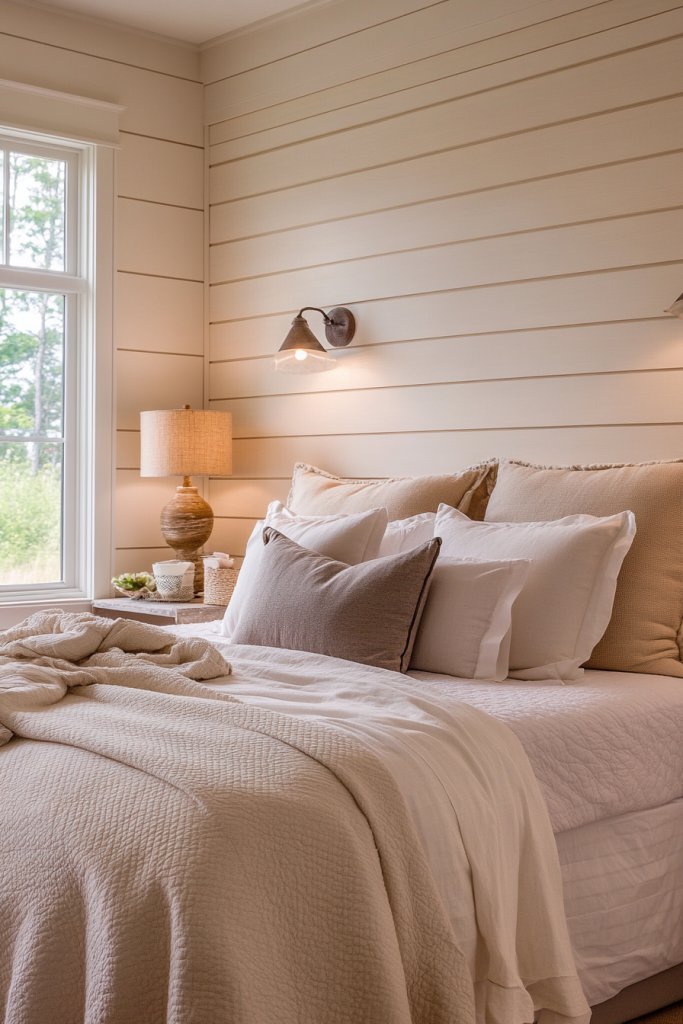
Ever wish your bedroom felt more inviting and warm without overwhelming the space? Classic shiplap paneling offers a timeless way to add coziness and character effortlessly. It transforms bland walls into focal points that feel both fresh and familiar. If you crave that cozy cabin vibe or a rustic chic look, shiplap might just be your new best friend.
Imagine horizontal wooden planks painted in soft cream, muted gray, or bold navy, running across the wall behind your bed. The textured lines add depth and warmth, making the space feel layered and lived-in. Light reflects gently off the surface, emphasizing the subtle grain and finish. It’s like wrapping your walls in a comforting, stylish hug.
You can choose to keep it classic with natural wood finishes or go painted for a more polished look. For a coastal vibe, light colors like whites and blues work wonders, while darker shades add drama. Installing vertical shiplap or mixed widths can dramatically change the aesthetic. Seasonal tweaks, such as adding cozy textiles or throws, further personalize the look.
Start by selecting tongue-and-groove planks or pre-made panels. Measure your wall and decide on the plank width and spacing. Use nails or adhesive for easy installation, ensuring the planks are level. Sand and paint or stain the wood before attaching for a smoother finish. For a seamless look, paint the gaps or install shims. Finish with a protective topcoat if desired.
Add decorative molding or bead details at the top or bottom for a refined touch. Mix shiplap with other wall textures or panels for visual interest. Incorporate warm tones or contrasting colors to reflect your personality. Use textured paint or faux finishes to mimic reclaimed wood or weathered surfaces. Personal touches turn simple paneling into a statement.
Shiplap is a versatile classic that can suit both rustic and modern tastes. Its simplicity makes it a manageable DIY project, even for beginners. Once installed, it elevates your bedroom’s style instantly. Ready to bring cozy charm into your space? It’s easier than you think and endlessly customizable.
2. Reclaimed Wood Wall Panels for Rustic Texture
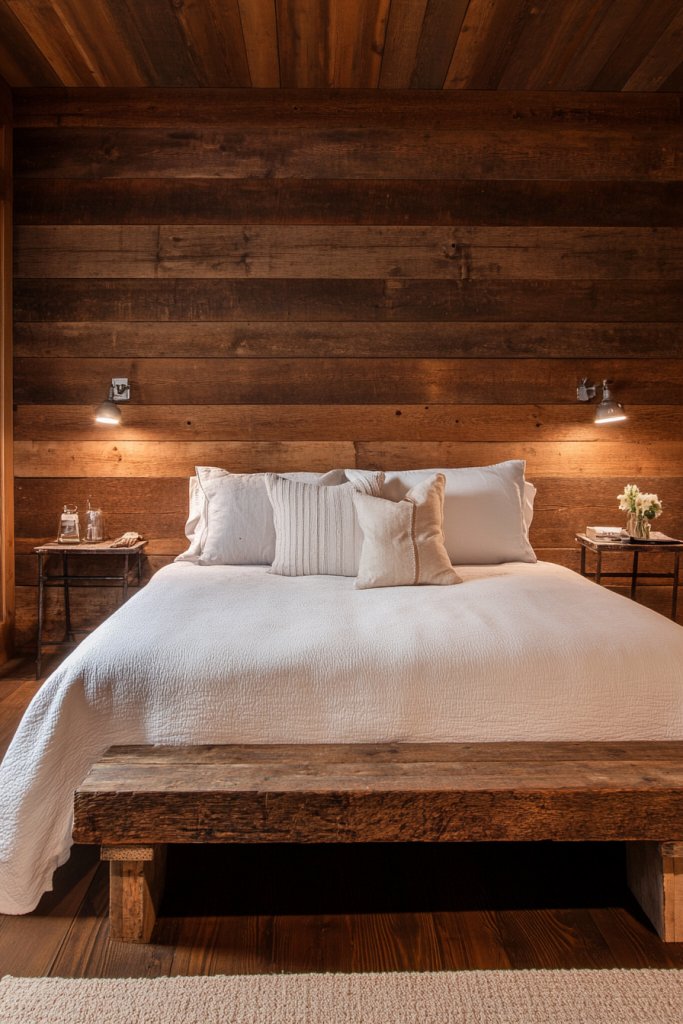
Craving a bedroom that feels rooted in nature and history? Reclaimed wood panels bring a rustic charm that’s full of character and warmth. It’s the perfect way to add texture and a story to your walls while being eco-friendly. If sustainability and style matter to you, this option hits all the right notes.
Imagine weathered, mismatched planks in shades of gray, brown, and faded paint, arranged in a gallery or random pattern. The rough textures and knots create a tactile surface that invites touch. The natural imperfections give each piece a unique personality, making your wall a conversation starter. Soft lighting enhances the aged, rich patina.
Use lighter, bleached woods for a Scandinavian look or darker, stained panels for a more dramatic vibe. Incorporate metal or vintage hardware for industrial flair. Mix reclaimed wood with modern finishes or sleek furniture for contrast. Seasonal accents like cozy throws or vintage decor can complement the rustic theme.
Source reclaimed wood from reputable suppliers or salvage yards, ensuring it’s clean and stable. Plan your layout, whether in large panels or smaller pieces for a patchwork effect. Attach panels using nails or adhesive, making sure to secure each piece well. Sand lightly to smooth rough edges, but keep the weathered look intact. Finish with a matte sealant to protect against wear.
Personalize with painted or stained accents, or add decorative metal brackets for an industrial twist. Incorporate vintage or handcrafted shelves made from reclaimed wood. Layering textiles like a woven blanket or rustic rugs enhances the cozy atmosphere. Your walls become a canvas for your eco-friendly, stylish lifestyle.
Reclaimed wood panels turn your bedroom into a warm, inviting retreat with a story. They’re perfect for those who love history, sustainability, or just want a naturally beautiful space. Easy to install and endlessly adaptable, this look makes a bold statement of character and care. Ready to embrace rustic elegance? It’s more accessible than you think.
3. Geometric 3D Wall Panels for Sculptural Impact
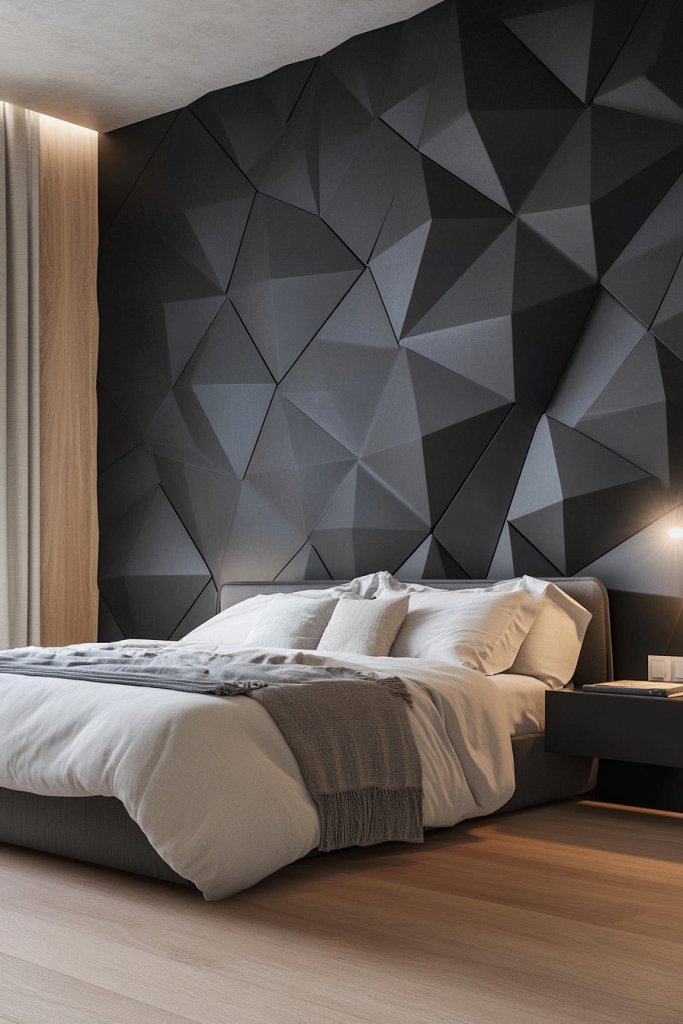
Want to make your bedroom walls pop with modern art and texture? Geometric 3D wall panels create a sculptural effect that adds depth and visual intrigue. They turn flat walls into eye-catching focal points that elevate your entire space. If you’re after a bold, contemporary vibe, these panels are a game-changer.
Picture panels in bold shapes like hexagons, triangles, or irregular patterns, made from MDF or foam. The three-dimensional layers cast shadows that shift with the light throughout the day. The glossy or matte finishes enhance the abstract, modern aesthetic. It’s like turning your wall into a piece of abstract sculpture.
Opt for monochrome colors for a sleek look, or vibrant hues for a dynamic statement. Mix different shapes and depths for a more eclectic effect. Install these panels in a single accent wall or across the entire room for maximum impact. They pair well with minimalist furniture or bold accent pieces.
Decide on the pattern and size, then measure your wall carefully. Attach the panels using adhesive or screws, ensuring they are tightly secured and aligned. Use spacers or templates for consistent placement. Finish with paint or lacquer to enhance durability and appearance. Consider lighting effects like wall washers to emphasize shadows.
Add metallic accents or reflective surfaces within the panels for extra flair. Combine with textured textiles or plush bedding to balance the sculptural design. Incorporate LED strip lighting to highlight the geometric shapes at night. Personal touches like custom colors or mixed materials create a unique statement.
Geometric 3D panels turn your bedroom into a modern art gallery. They’re perfect for those who love bold, statement-making decor. Easy to install with a professional touch, they offer a sculptural impact that’s hard to ignore. Ready to redefine your walls? This innovative look is just a panel away.
4. Wainscoting with Decorative Molding for Classic Refinement
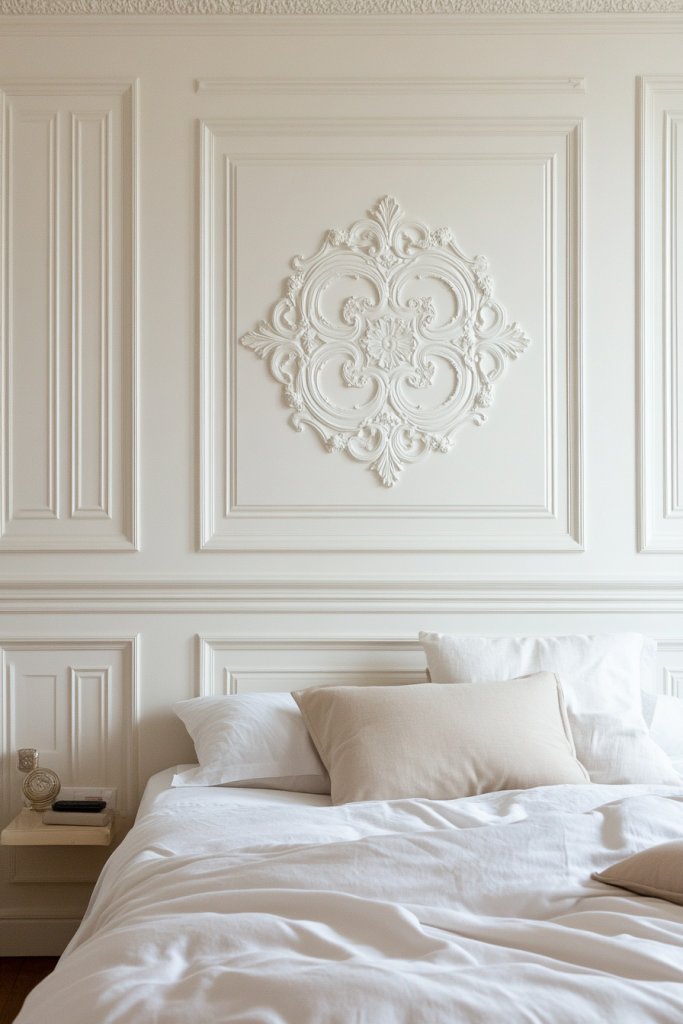
Looking to add a touch of timeless elegance to your bedroom? Wainscoting with decorative molding offers a classic, polished look that elevates your walls instantly. It’s perfect if you want a refined, architectural vibe without overhauling your entire space. Who said traditional can’t be stylish?
Imagine painted paneling in crisp whites or muted pastels, topped with intricate crown or chair rail moldings. The textured panels contrast beautifully with smooth wall surfaces, adding depth and character. The detailed molding captures the eye, framing your space like a piece of fine furniture. It’s a look that whispers sophistication.
Choose different heights for the wainscoting to suit your ceiling height and room size. For a modern twist, opt for sleek, simple moldings instead of ornate designs. Paint the panels a contrasting color for a bold statement, or keep everything monochrome for subtle elegance. Molding styles can range from traditional to contemporary, depending on your taste.
Start by measuring your wall and deciding on the panel height and width. Attach the lower wainscoting panels using nails or adhesive, ensuring they are level. Install decorative molding along the top edge, using a miter saw for precise cuts. Fill gaps with caulk and paint or stain for a finished look. Finishing touches like corner blocks or accents can enhance the detail.
Add decorative trim or rosettes at corners for extra flair. Customize with a two-tone paint scheme or metallic accents on the molding. Incorporate wallpaper or textured finishes within panels for variety. Personal touches like subtle lighting or artless decor highlight the architectural detail without clutter.
Wainscoting with decorative molding is a versatile way to add elegance and structure. It works well with both traditional and modern decor, proving its timeless appeal. Easy to DIY with patience, it transforms your bedroom into a refined retreat. Ready to craft a classic look? This style is a smart, stylish investment.
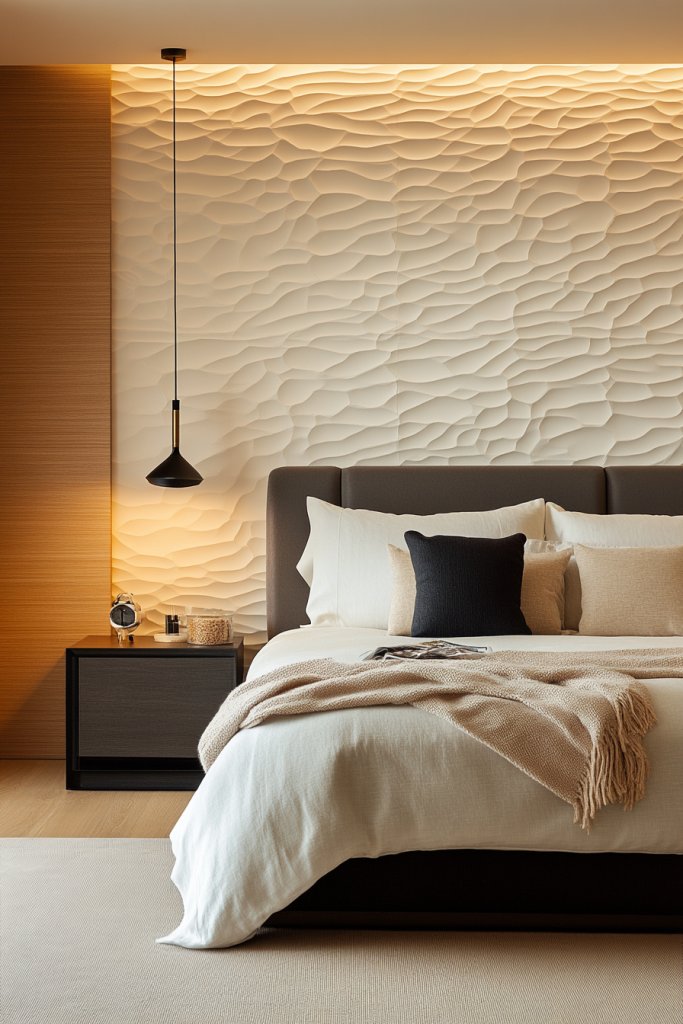
5. Paneled Headboard Wall for a Focal Point
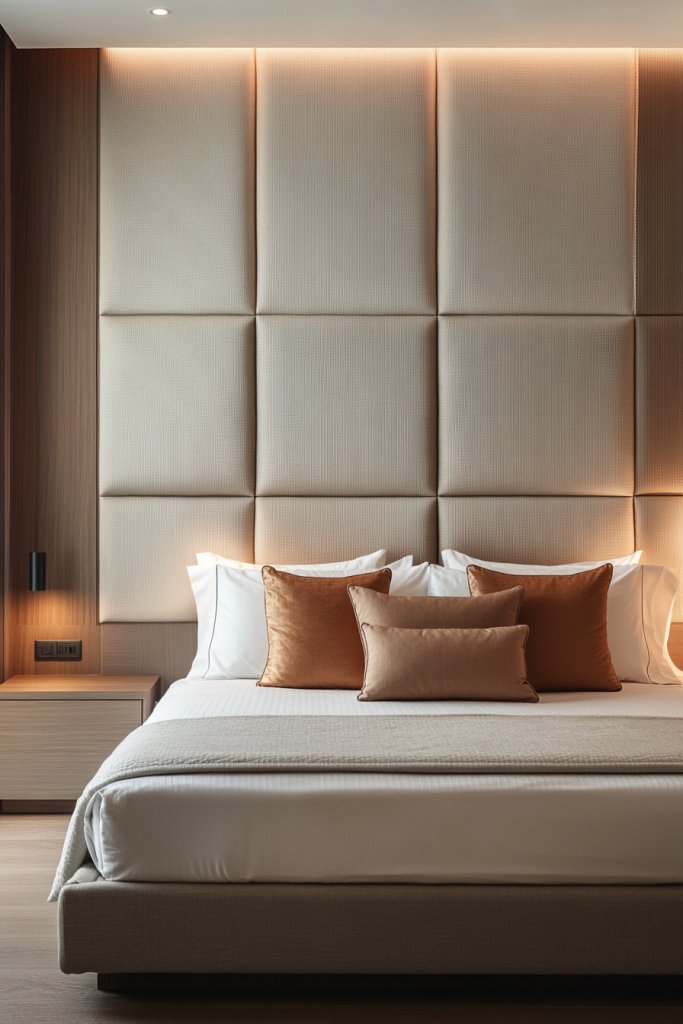
Ever wanted a headboard that’s more than just a piece of furniture? A paneled wall behind your bed creates a stunning focal point that anchors the room. It adds architectural interest and can be customized to match your style. If you crave a bedroom that feels designed and cohesive, this idea is a winner.
Picture a wall covered with rectangular or square panels in coordinating colors or textures. The panels extend from the bed frame to the ceiling, creating a dramatic backdrop. Subtle detailing like beveled edges or decorative trims enhances the visual impact. Soft lighting can accentuate the depth, making your bed the star of the room.
Choose painted panels for a sleek, modern look or upholstered options for softness. Mix materials like wood and fabric for texture. Keep the design simple for a minimalist vibe or add intricate moldings for a luxurious feel. The size and shape of panels can be tailored to suit your space and taste.
Begin by measuring the headboard area and planning your panel layout. Attach the panels to the wall with nails or adhesive, ensuring they are level and evenly spaced. Add decorative trim or molding for a finished look. Finish with paint, stain, or fabric covering, depending on your design choice. Lighting fixtures can be installed for dramatic effect.
Add textured or patterned wallpaper within the panels for extra depth. Incorporate LED lighting or sconces to highlight the wall. Personalize with custom colors or finishes that match your decor. Embellish with your favorite textiles or throw pillows for comfort and style.
A paneled headboard wall instantly elevates your bedroom’s appeal and creates an intimate, cozy atmosphere. It’s a versatile design that can grow with your style preferences. Easy to customize and install, it’s a practical way to make your space uniquely yours. Ready to make your bed the room’s centerpiece? Go for it.
6. Beadboard Paneling for Cottage-Inspired Comfort
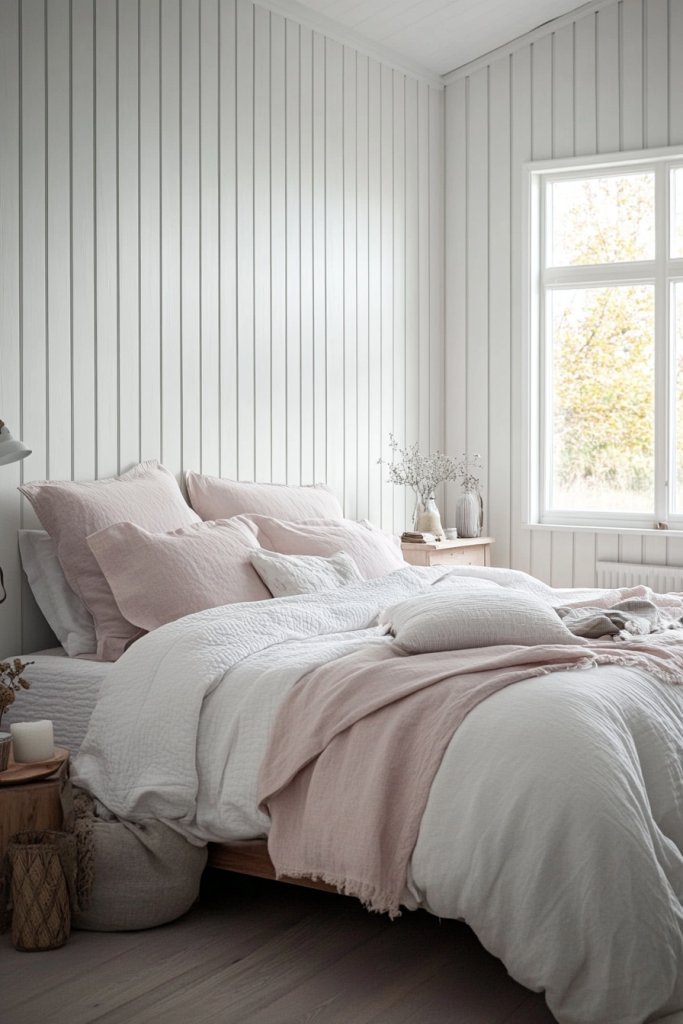
Craving a bedroom that feels charming and inviting like a cozy cottage? Beadboard paneling offers that classic, nostalgic look with its narrow, vertical planks and distinctive ridges. It instantly adds comfort and character, making your space feel warm and lived-in. Who doesn’t want a little cottage magic?
Imagine soft white beadboard running from floor to ceiling or halfway up the wall, with a simple chair rail separating the two. The vertical lines add height while the textured ridges create subtle shadow play. Pair it with pastel bedding and woven textiles for a true cottage vibe. The overall effect is charming, fresh, and timeless.
Paint beadboard in traditional white, or go for soft pastel shades like mint or blush. For a more rustic look, stain the wood in warm tones. You can install it on all walls or just as an accent behind the bed or along a single wall. Incorporate decorative hooks or vintage-inspired accessories to enhance the charm.
Measure your wall and cut beadboard panels to size. Attach panels with nails or adhesive, making sure the ridges are aligned vertically. Fill nail holes and seams with putty, then sand smoothly. Paint or stain the panels before or after installation for a uniform finish. Finish with a clear sealer for protection.
Layer with textured bedding, ruffled curtains, or woven baskets to emphasize the cottage feel. Add a soft cream throw blanket with chunky knit texture. Incorporate vintage or distressed furniture for an authentic look. Personal touches like floral accents or small decorative mirrors elevate the space.
Beadboard paneling creates a cozy, inviting retreat perfect for relaxation. Its simple installation makes it accessible for DIYers, and its charm is timeless. Transform your bedroom into a charming cottage haven that feels warm and welcoming. Ready to add some rustic elegance? It’s easier than you think.
7. Mirrored Panel Walls for Light and Illusion
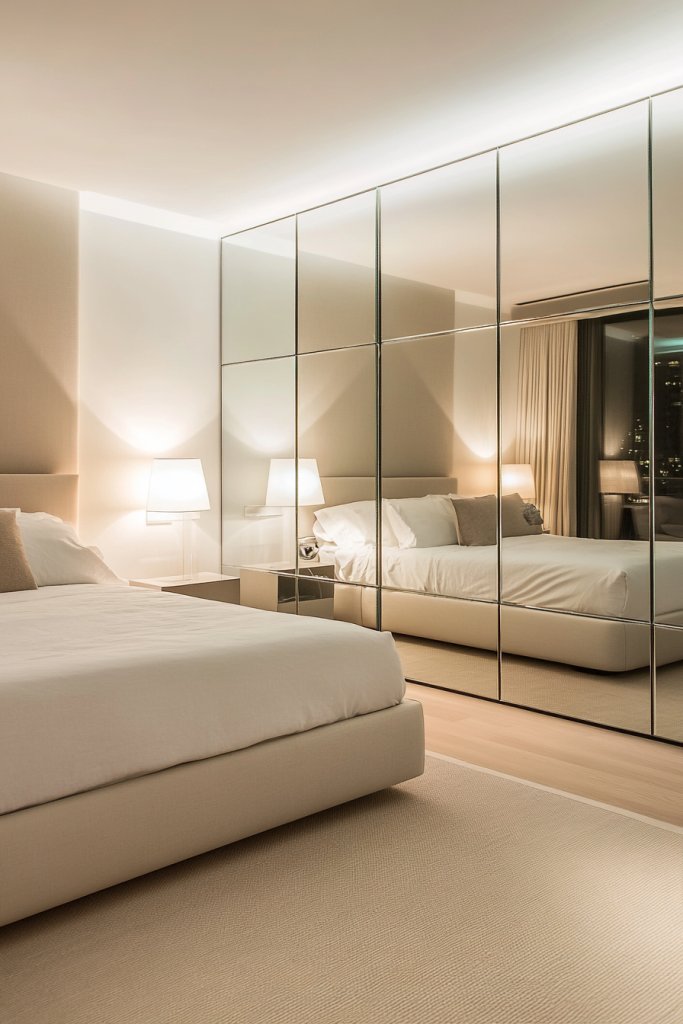
Feeling like your bedroom could use a boost of brightness and space? Mirrored panel walls reflect light and create the illusion of a larger room. They add a glamorous, modern touch while making your space feel airy and open. If you’re tired of feeling boxed in, this idea will change your perspective.
Visualize a wall covered with large, frameless or decorative-framed mirrors arranged in a geometric pattern. The reflective surfaces bounce natural and artificial light, filling the room with brightness. The mirror frames can be sleek metal, ornate wood, or minimalist designs, depending on your style. The overall effect is luminous and sophisticated.
Use full-height mirrors for maximum impact or smaller, framed panels for subtle elegance. Combine mirrored panels with painted or textured surfaces for contrast. Incorporate lighting fixtures like sconces or LED strips to enhance the reflective quality. This look pairs well with modern, glam, or eclectic decor.
Plan your layout carefully, marking where each mirror will go. Attach the mirrors to the wall with proper hardware, ensuring they are level. Use shims or spacers for flush mounting. Seal gaps with appropriate caulking or framing. Clean the mirrors thoroughly for a streak-free finish, and consider adding LED backlighting for extra glow.
Frame the mirrors with decorative moldings or paint the frames in bold colors to add personality. Incorporate textured or velvet bedding to complement the reflective surfaces. Add subtle accent lighting or statement fixtures nearby for a luxe feel. Your bedroom becomes a bright, stylish retreat.
Mirrored wall panels instantly amplify light and space, giving your bedroom a fresh, upscale look. They’re a smart choice for smaller rooms or dark spaces. Easy to install with proper planning, this style transforms your room into a bright, glamorous haven. Now, who wouldn’t want that?
8. Mixed Material Panels for Eclectic Texture
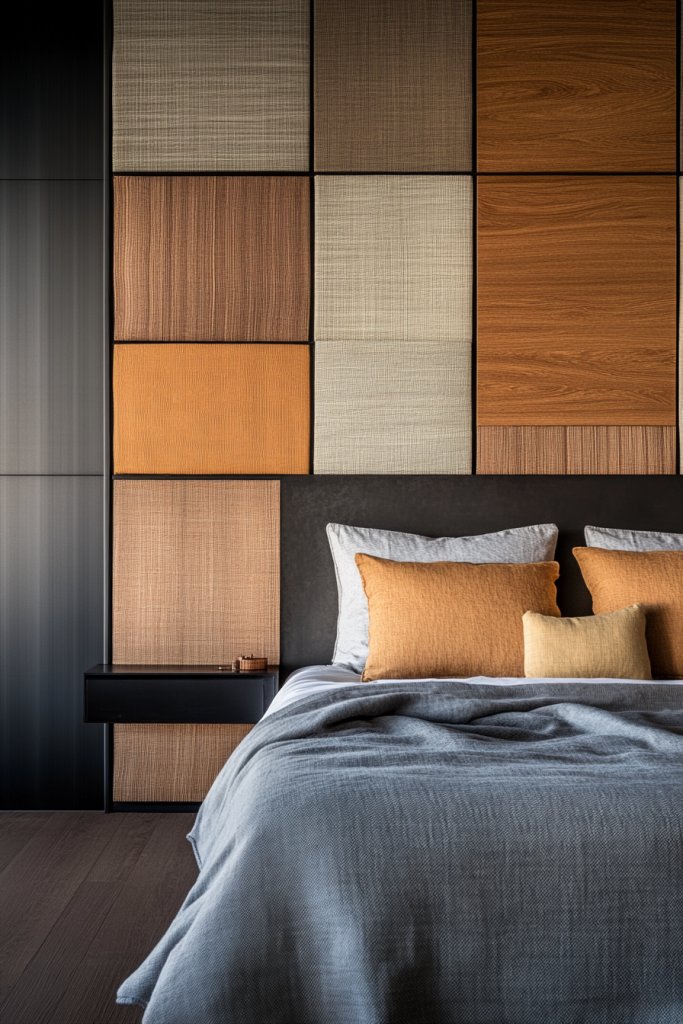
Bored of uniform walls? Mixing materials creates a textured, layered look that’s full of personality. Combining wood, fabric, metal, or even stone produces a rich, eclectic vibe that breaks the monotony. If you love a curated, boho-inspired aesthetic, this approach is perfect for you.
Imagine a wall where reclaimed wood panels are juxtaposed with fabric-covered sections or metallic accents. The contrast in textures and finishes adds visual depth and invites touch. Layering different materials creates a dynamic backdrop that feels curated and intentional. It’s like turning your wall into a piece of art.
Use natural wood in warm tones combined with woven textiles or textured wallpaper for a bohemian look. Metallic panels or accents can add a touch of glam. Mix rough and smooth surfaces, matte and gloss finishes, for a balanced, curated look. This style adapts easily to small or large walls, depending on your taste.
Start by selecting your materials and measuring your wall. Attach each material separately, using appropriate fasteners—nails, adhesive, or specialized clips. Ensure transitions between materials are seamless or intentionally layered. Finish with a protective coating or paint to unify the look where necessary. Consider lighting to highlight the different textures.
Incorporate personal touches like handcrafted textiles or vintage hardware. Use decorative trims or borders to define material sections. Add small shelves or hooks made from mixed materials for extra function. Layering textiles or decorative accents enhances the eclectic, personalized vibe.
Mixed material panels give your bedroom a curated, gallery-like feel that’s full of character. They’re perfect for showcasing your love for diverse textures and styles. Easy to customize, they turn a plain wall into a statement piece. Ready to embrace eclectic charm? Let your wall tell your story.
9. Faux Paneling with 3D Wallpaper for Easy Texture
Want the look of textured panels without the hassle? Faux paneling combined with 3D wallpaper offers a quick, budget-friendly way to add depth and interest. It’s ideal if you’re short on time or budget but crave a high-impact look. Who says you need to spend a fortune or days installing?
Picture a wall with a faux wood paneling effect created by peel-and-stick tiles or decals, topped with 3D wallpaper featuring geometric or organic textures. The layered textures add dimension and shine, creating a tactile surface that catches light beautifully. It’s like a mini architectural feature at a fraction of the cost.
Choose wallpaper patterns that mimic stone, brick, or textured plaster for variety. Use neutral tones for subtle elegance or bold colors for a statement. Combine with painted or smooth surfaces for contrast. This approach suits renters or those who love changing styles frequently.
Start by cleaning and priming your wall. Apply peel-and-stick faux paneling in your desired pattern, ensuring no air bubbles. Overlay with textured 3D wallpaper, smoothing out wrinkles. Seal edges with clear adhesive or trim for a finished look. Regular maintenance involves cleaning with a damp cloth.
Add LED strip lighting behind the panels for a soft glow. Incorporate textured textiles or layered bedding to complement the wall’s tactile feel. Personalize with metallic accents or custom paint to match your decor. This method offers endless opportunities for quick upgrades.
Faux paneling paired with 3D wallpaper makes a bold statement with minimal effort. It’s perfect for DIYers and renters wanting style without permanence. The layered textures add sophistication and depth, transforming your bedroom into a modern sanctuary quickly. Ready to get creative?
10. Dark Paneling for Dramatic, Modern Style
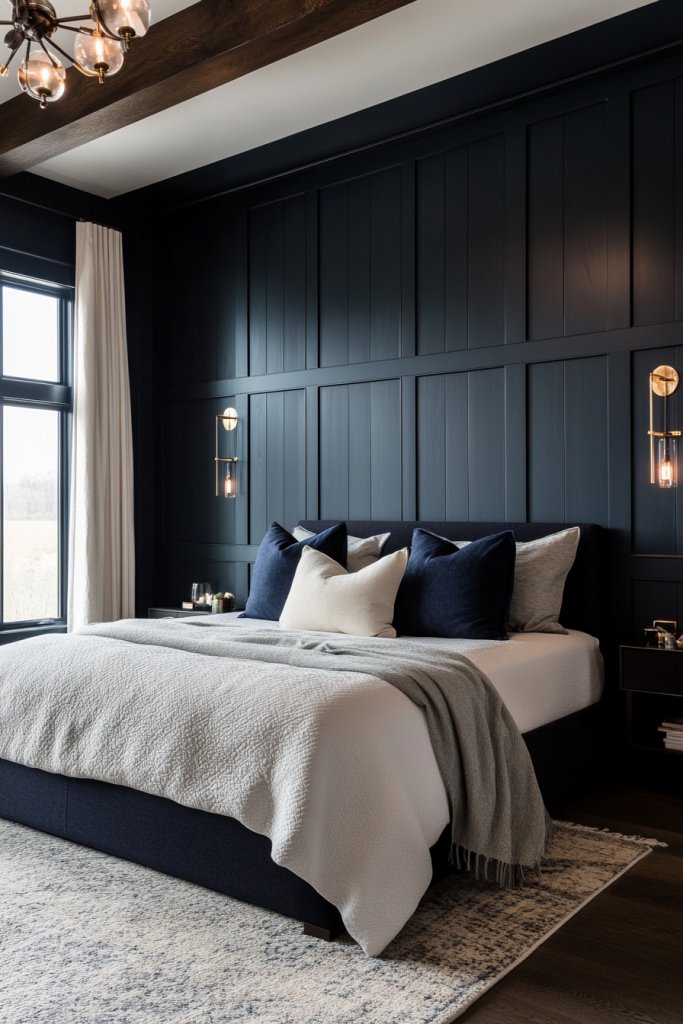
Seeking a bedroom that oozes luxury and drama? Dark paneling in deep navy, charcoal, or espresso can instantly elevate your space to a sophisticated, modern realm. It’s perfect if you want bold, statement walls that command attention and create a cozy, intimate vibe.
Visualize sleek, matte dark panels covering the entire wall or just behind the bed. The rich hues absorb light, creating a moody, luxurious atmosphere. Pair with metallic accents or light-colored bedding for contrast, making the dark backdrop truly pop. Shadows and highlights dance across the textured surface, adding depth.
Balance dark paneling with lighter bedding, plush rugs, or metallic fixtures. Incorporate gloss or satin finishes for a subtle sheen. Use paneling on just one wall for a dramatic focal point or wrap the entire room for maximum impact. Add textured textiles to soften the look.
Select high-quality MDF or wood panels finished in your chosen dark hue. Measure and cut panels to fit your wall, then attach securely with nails or adhesive. Fill and sand gaps for a seamless appearance. Finish with matte or satin paint for a non-reflective surface. Consider adding a protective coat for longevity.
Accent with warm lighting, such as wall sconces or LED strips, to soften the darkness. Layer with textured bedding and cozy throws to balance the bold backdrop. Metallic or brushed hardware adds a luxe touch. Personalize further with artless decor or subtle patterns.
Dark paneling transforms your bedroom into a chic, modern retreat that feels both intimate and stylish. It’s a bold choice that’s surprisingly versatile, fitting many decor styles. With proper lighting and accessories, you’ll create a space that’s both dramatic and inviting. Ready to dare with darks? It’s a striking move.
11. Light-Washed or Whitewashed Wood Panels for Airy Brightness
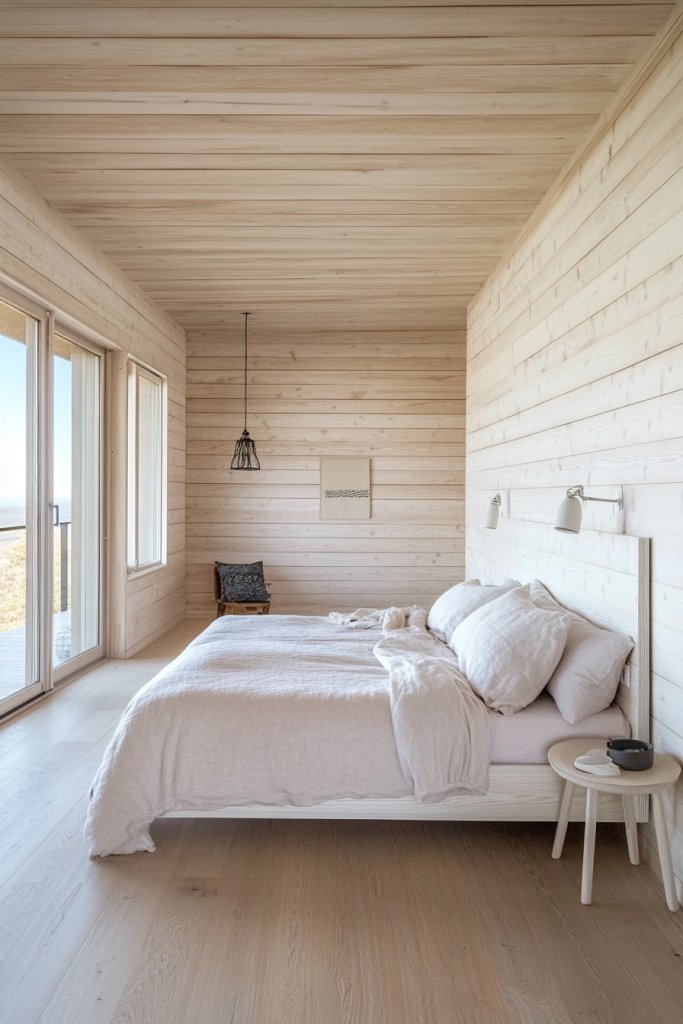
Wish your bedroom felt lighter, brighter, and more Scandinavian-chic? Light-washed or whitewashed wood panels are perfect for creating an airy, fresh vibe. They brighten up dark corners and add a subtle texture that makes your walls feel both natural and serene. If you love minimalism, this is your go-to.
Imagine pale wood panels with a soft white or gray wash, emphasizing the natural grain while maintaining a muted, calming palette. The light finish reflects daylight, making the room appear larger and more open. Pair it with soft textiles, plush rugs, and simple decor for a Scandinavian-inspired retreat. The overall effect is peaceful and inviting.
Choose subtle shades of white, gray, or light beige for a harmonious look. Incorporate contrasting darker furniture or accents for depth, or keep everything light for a monochrome, soothing aesthetic. You can install on all walls or just as an accent behind the bed. Layering textiles enhances the soft, airy feel.
Source pre-washed or whitewashed wood panels or create your own with wood planks and a diluted white paint or stain. Attach panels with nails or adhesive, ensuring they are level. Sand lightly for a smooth finish, and seal with a clear matte or satin finish. Consider adding a protective coat for durability.
Complete the look with cozy, textured bedding and light-colored curtains. Incorporate natural fiber accents like jute or linen for authenticity. Use minimalist art or subtle decorative elements to keep the vibe calm. Personal touches reinforce the Scandinavian aesthetic.
Light-washed or whitewashed panels provide a fresh, timeless backdrop that suits many styles. They’re ideal for creating a calming sanctuary and are DIY-friendly. Brighten your space effortlessly and enjoy a room that feels both spacious and serene. Ready for a fresh start? This look is a breeze to achieve.
12. Framed Panel Sections for Artistic Definition
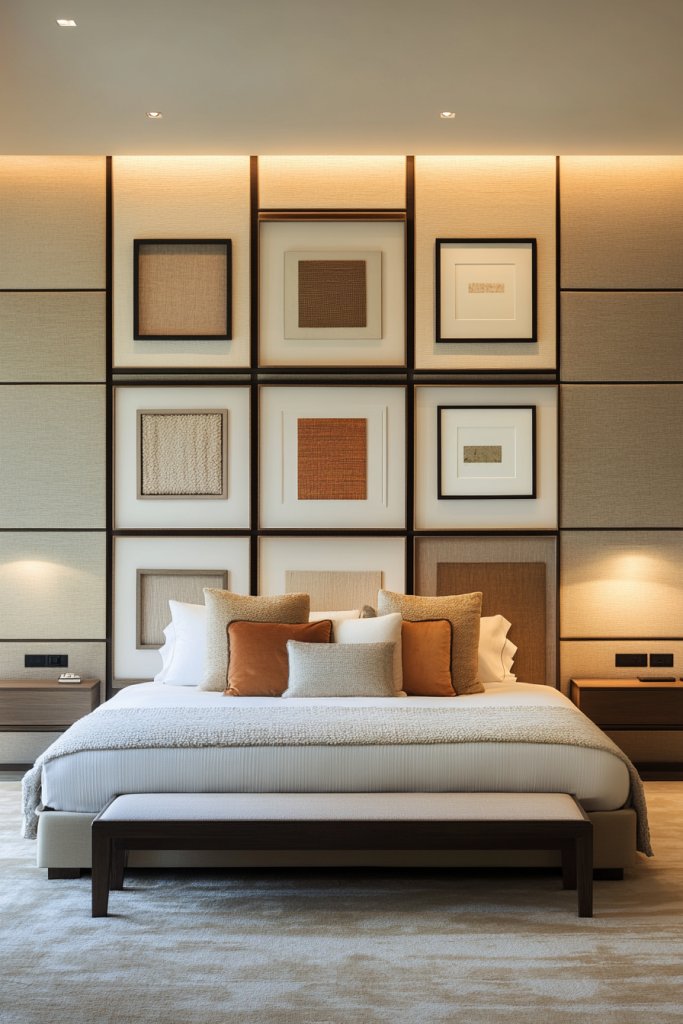
Looking to add a creative and artistic flair to your walls? Framed panel sections break up large expanses into smaller, gallery-like displays that add structure and personality. It’s a way to turn your bedroom into a curated art space without hanging a single picture. Who says walls can’t be art?
Visualize a wall divided into rectangular or square panels, each framed with decorative molding or painted borders. Inside each frame, you can leave the surface smooth or add textured finishes, paint patterns, or subtle colors. The framed sections create a sense of order and sophistication while allowing for creative variation.
Use contrasting paint colors inside the frames for a bold effect, or keep it monochrome for elegance. Incorporate different sizes and shapes for visual interest. You can also fill the panels with textured wallpaper or painted patterns. This approach suits both minimalist and maximalist styles.
Measure and mark your wall into sections, then install picture rails or molding to create the frames. Fill with your chosen surface treatment—paint, textured finishes, or wallpaper—and ensure everything is aligned and level. Seal edges with caulk for a clean finish. Add lighting or accent elements if desired.
Personalize with decorative trims, metallic accents, or even small inset mirrors. Use color blocking or geometric patterns within each panel for a modern twist. Incorporate your favorite colors or textures to reflect your personality. This creates a bespoke art-inspired focal wall.
Framed panel sections turn a simple wall into a gallery of your own design. They add artistic definition and a sense of craftsmanship. Easy to customize, this style makes a striking statement that’s uniquely yours. Ready to get creative and frame your space?
13. Curved or Arch-Shaped Paneling for Soft Elegance
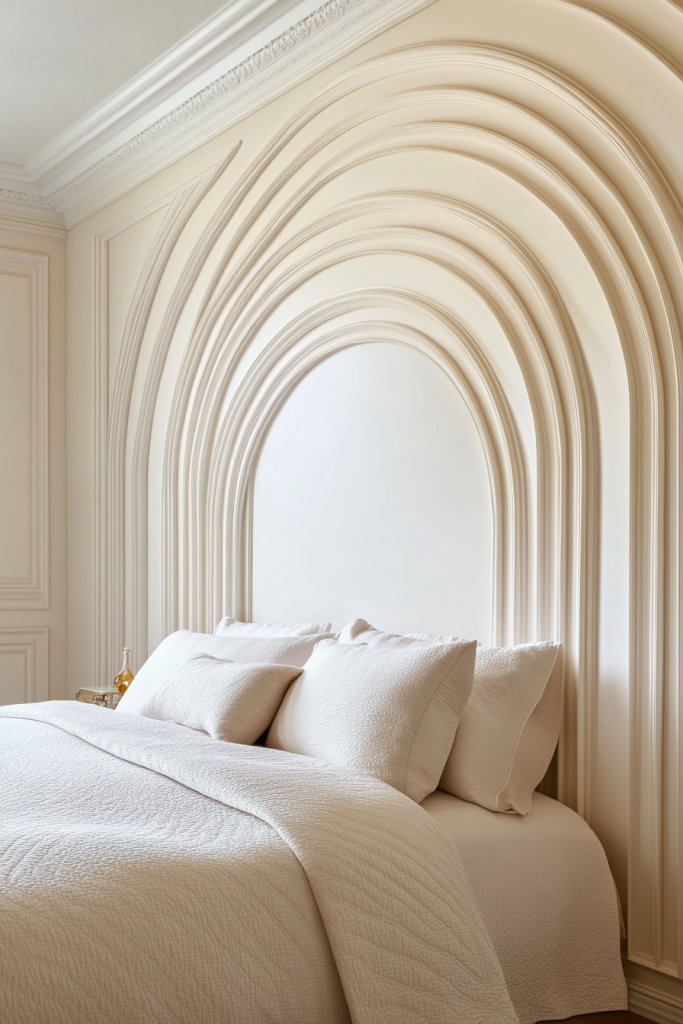
Craving a bedroom that feels romantic and soft? Curved or arch-shaped paneling introduces gentle, flowing lines that soften the room’s architecture. It’s an elegant way to add a vintage or fairy-tale vibe while creating a relaxing atmosphere. Who says walls have to be straight?
Imagine a wall with a series of arches or curved panels painted in pastel shades or neutral tones. The rounded shapes create a sense of movement and harmony, reminiscent of classic architectural details. Soft lighting enhances the curves, casting gentle shadows that add dimension and charm.
Choose from full-arch panels, half-moons, or scalloped shapes to suit your style. Keep the color palette light and airy for a fresh feel or go darker for more drama. Pair with soft textiles, vintage-inspired decor, or delicate lighting to amplify the romantic effect. This look works well in both small and large bedrooms.
Design or purchase pre-made curved or arched panels, or custom-build with flexible molding or foam. Attach panels carefully, ensuring the curves are aligned and smooth. Fill gaps and sand for a seamless surface. Finish with paint or wallpaper that enhances the soft, flowing lines. Consider adding indirect lighting to highlight the arches.
Decorate with sheer curtains or textured fabrics to complement the curves. Incorporate vintage or ornate hardware to elevate the romantic style. Use gentle, pastel-colored bedding and layered textiles. Personal touches like small sconces or delicate trims complete the soft, elegant look.
Curved or arch-shaped paneling adds a touch of magic and softness that transforms your bedroom into a romantic retreat. It’s a creative way to soften sharp angles and add architectural interest. Easy to adapt and install, it’s a stylish upgrade for a dreamy, inviting space. Ready to embrace gentle elegance? This idea might just steal your heart.
14. Layered Paneling with Niches for Practical Storage
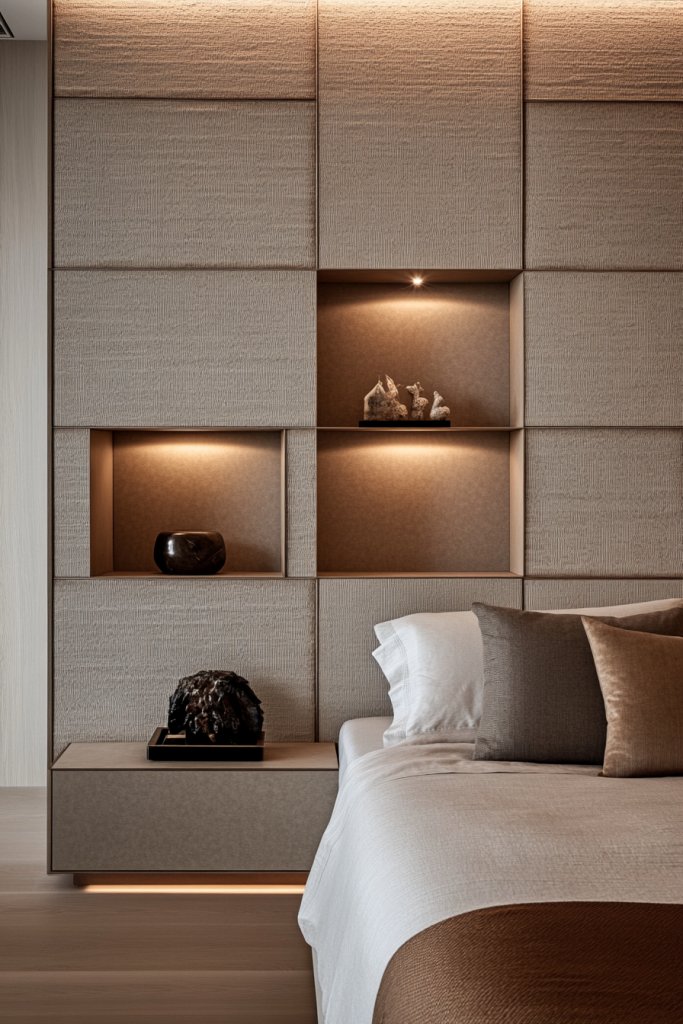
Hate clutter but love a textured, layered look? Layered paneling with built-in niches combines beauty and function seamlessly. It creates a textured wall that also offers practical storage or display space. If you want your bedroom to be both stylish and organized, this idea is a perfect fit.
Picture panels with recessed niches or shelves carved into the wall, framed with decorative molding. The niches can hold books, decorative objects, or lighting elements, adding depth and interest. The layered effect gives a sense of dimension, making the wall a dynamic feature rather than just a backdrop.
Design niches of various sizes and depths to suit your needs. Use contrasting colors inside the niches or add textured finishes for visual interest. Incorporate LED lighting within or behind the niches for a dramatic glow. Keep the panels in neutral tones for a subtle look or bold colors to make a statement.
Plan your wall layout carefully, marking where the niches will go. Build or modify panels to include recessed sections using framing and drywall techniques. Attach panels securely, ensuring niches are level and stable. Finish with paint, wallpaper, or textured finishes. Install lighting fixtures or decorative elements inside the niches.
Decorate niches with artwork, plants, or personal collections for a curated look. Use textured or patterned wallpaper inside the recesses. Incorporate soft lighting to highlight stored or displayed items. Personal touches turn functional storage into a design feature.
Layered paneling with niches transforms your wall into a stylish, functional masterpiece. It’s perfect for adding depth and practicality without sacrificing style. DIY-friendly with careful planning, it elevates your bedroom into a personalized sanctuary. Ready to get creative and organize in style? Let your wall do the talking.
15. Two-Tone Paneling for Visual Depth
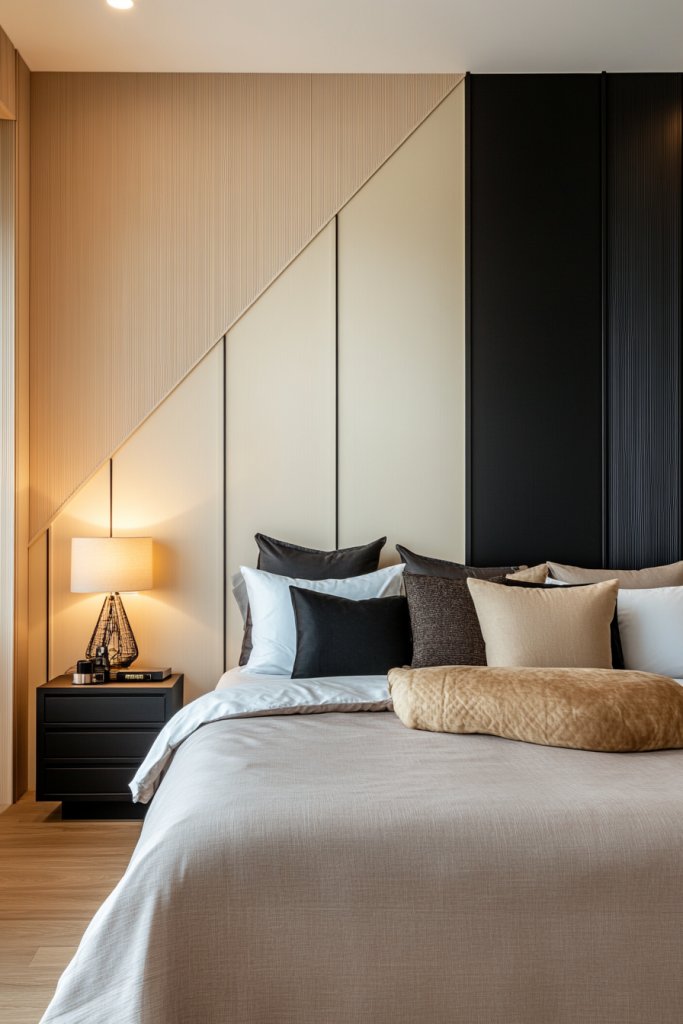
Feeling like your walls are flat and uninspiring? Two-tone paneling introduces contrast and depth that instantly energize your space. It’s a clever way to add dimension without cluttering the room. If you love bold design statements, this approach will excite you.
Imagine a wall where the upper panels are painted a light, neutral hue, while the lower panels are a darker, richer color. The contrast creates a visual break, emphasizing the panel shape and adding a sense of layered depth. The split can be straight, curved, or asymmetrical for different effects. It’s a striking, modern twist on classic paneling.
Choose complementary or contrasting colors for a dramatic look or subtle shades for sophistication. Use different textures or finishes—matte, gloss, or satin—to add further depth. Incorporate decorative molding or trim to accentuate the two-tone effect. This technique adapts well to various room sizes and styles.
Paint or wallpaper the top and bottom sections separately, using painter’s tape for clean lines. Ensure your panels are installed evenly and securely. Use different finishes or textured paints as desired. Finishing details like metallic or painted trims can further enhance the contrast. Add lighting to emphasize the layered effect.
Personalize with decorative trims, stenciled patterns, or accent colors inside the panels. Layer with textiles, rugs, or bedding that complement the color scheme. Use lighting to highlight the contrast and depth of the panels. This approach is versatile and customizable to suit your style.
Two-tone paneling creates a sophisticated, layered look that adds visual interest and depth. It’s a simple yet bold way to redefine your walls. Easy to execute with basic tools, it’s a smart upgrade for a modern, stylish bedroom. Ready to add contrast and dimension? This idea is a game-changer.
16. Minimalist Flat Paneling for Sleek Modernity
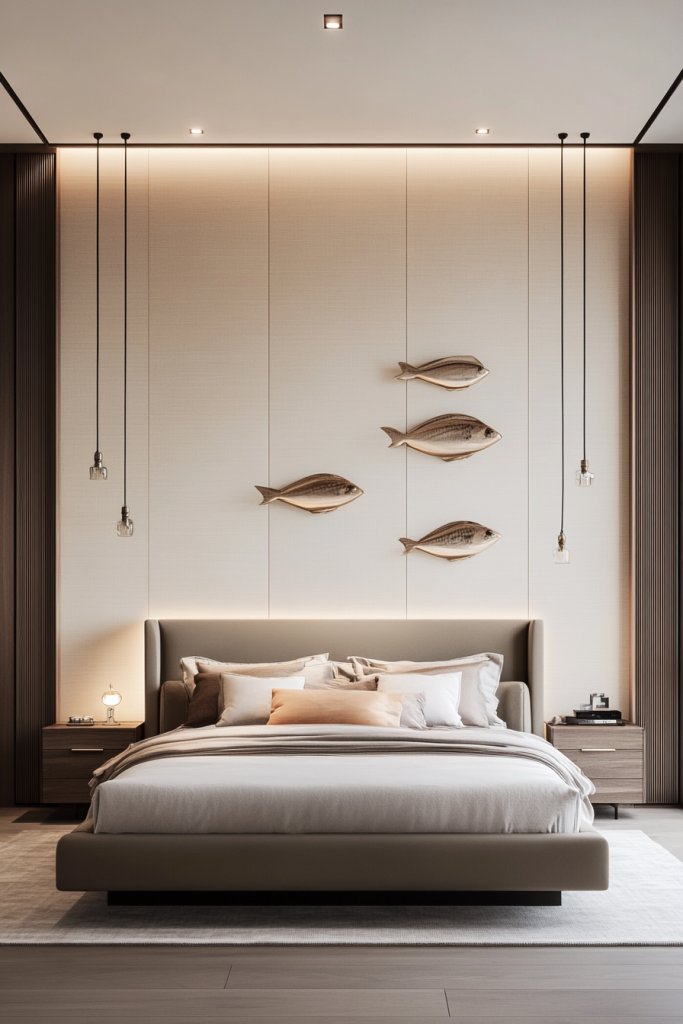
Craving a bedroom that feels clean, simple, and modern? Flat paneling with smooth, uninterrupted surfaces offers a sleek and minimalist aesthetic. It emphasizes simplicity and sophistication while providing a textured backdrop that’s easy to maintain. If you prefer less clutter and more calm, this is your style.
Picture large, flat panels in neutral tones or monochrome finishes, seamlessly aligned across the wall. The lack of ornate details highlights the purity of the design. The smooth surfaces reflect light softly, creating a calm, spacious environment. Minimalist lighting fixtures or integrated LED strips add subtle accents.
Opt for matte or high-gloss finishes based on your preference. Keep the color palette monochromatic or add a slight contrast for depth. install panels on a single accent wall or across the entire room for uniformity. Pair with modern furniture and simple textiles to enhance the minimalist vibe.
Measure your wall and cut large, flat panels accordingly. Attach panels using adhesive, nails, or clips designed for clean, flush mounting. Fill seams or gaps with caulk or joint compound, then sand smoothly. Finish with paint or laminate for a sleek, durable surface. Consider built-in lighting or hidden fixtures for a seamless look.
Use subtle textured paints or matte finishes for added depth without visual clutter. Incorporate minimal decor and monochrome textiles to keep the look cohesive. Personalize with sleek hardware or integrated shelving that maintains the minimalist aesthetic. Less is more—let your wall speak volumes.
Flat paneling epitomizes modern sophistication through simplicity. It’s an easy, elegant way to upgrade your bedroom’s style without overwhelming the senses. Perfect for a clutter-free, calm retreat that’s easy to maintain. Thinking minimal? This style might just be your new best friend.
Conclusion
Explore a diverse collection of bedroom panelling wall ideas that range from timeless to contemporary styles, showcasing different textures, materials, and finishes. These ideas are perfect for anyone looking to add visual interest and sophistication to their personal sanctuary. Don’t hesitate to try these inspiring ideas in your own home—your dream bedroom is just a panel away! Embrace the transformation and make your space truly yours.
Leave a Reply