Looking to transform your bedroom into a versatile and stylish space? Bedroom dividers have become a go-to solution for creating privacy, defining zones, or adding a touch of personality without sacrificing openness. Their popularity lies in how effortlessly they can change the vibe of a room—whether for work, relaxation, or guest space—making your home more adaptable and functional.
In this article, you’ll discover a wide array of innovative bedroom divider ideas that suit every style and need. From sleek screens to DIY solutions, these ideas will inspire you to reimagine your space creatively and practically. Get ready to explore options that can enhance your room’s layout and reflect your personality—because a flexible, well-designed bedroom is just a divider away!
1. Sleek Movable Room Screens for Instant Privacy
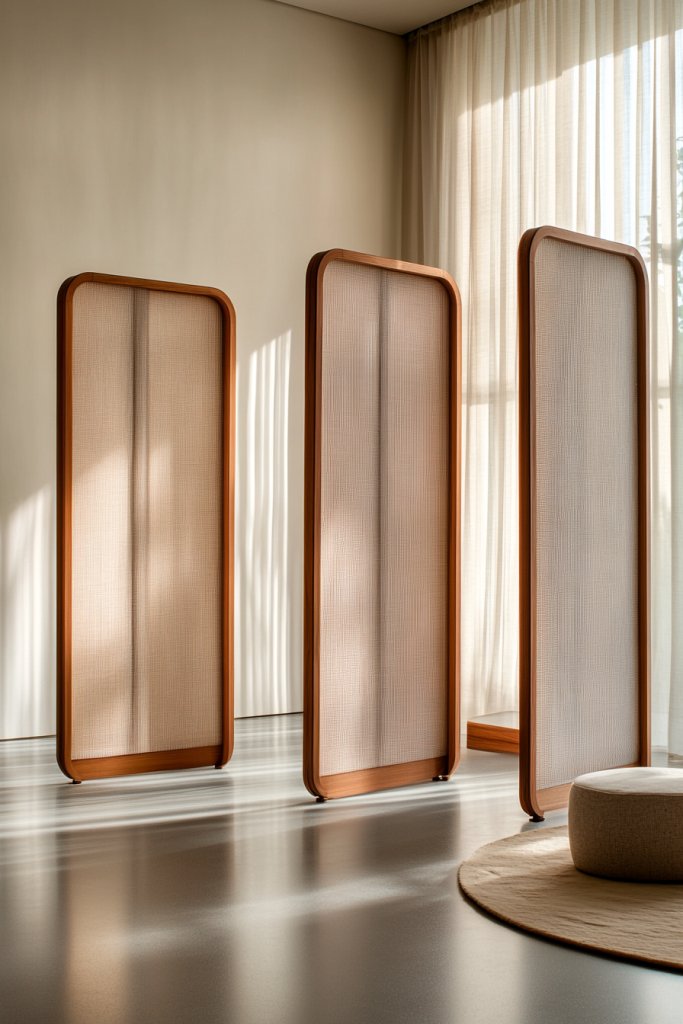
Ever wish you could instantly create privacy in your room without dedicating a permanent wall? Movable room screens offer a flexible way to divide space on demand. They’re perfect if your layout changes frequently or if you want to hide clutter temporarily. Plus, they add a stylish element that can elevate your decor.
Picture a lightweight screen made of warm-toned wood slats, a colorful fabric panel, or sleek metal panels that fold neatly when not in use. Imagine positioning it to block off a cozy corner or to create a private dressing area. The texture and color contrast beautifully with your existing furniture, adding visual interest. When you need open space, simply fold or slide the panels aside.
Choose from a variety of materials—bamboo for a natural vibe, fabric for softness, or metal for an industrial look. You can also opt for screens with decorative cutouts or patterns to add personality. For seasonal changes, swap out fabric panels with lighter or heavier textiles. In smaller rooms, use narrow screens to create subtle divisions, while larger spaces can handle wide, statement screens.
Start by selecting a lightweight, foldable design that fits your space. Measure the area where you want to position the screen, ensuring it folds or slides smoothly. You can find ready-made options online or DIY with materials like plywood, fabric, or repurposed items. Place the screen on the floor or mount it on a track for easier movement. If you want stability, add non-slip pads or weights at the base.
Personalize your screens with paint, stencils, or decorative hardware. Add small hooks or pockets for extra functionality, like holding accessories or notes. Incorporate contrasting textiles or patterns to make it a focal point. You could also attach fairy lights or fabric trims for a cozy, custom look that matches your style.
Movable screens provide a versatile way to redefine your space without permanent changes. They’re budget-friendly, easy to update, and endlessly customizable. Whether you want a boho vibe or sleek modern aesthetic, this solution adapts to your needs, making your space both functional and fabulous.
2. Open-Shelving Units as Functional Dividers
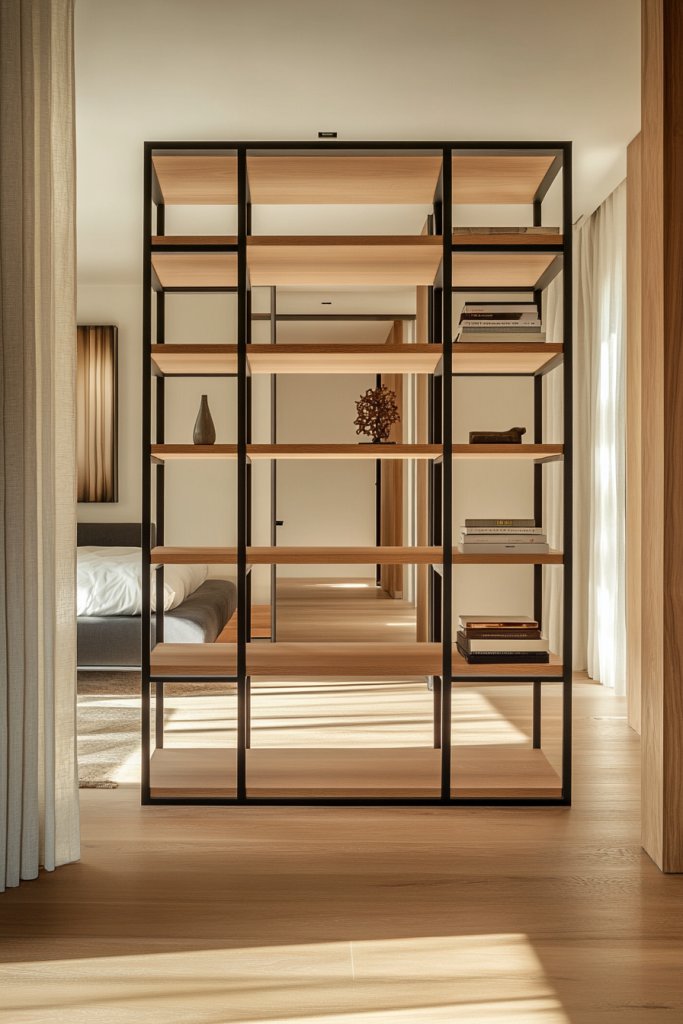
Struggling to keep clutter out of sight while still wanting your space to look stylish? Open-shelving units serve as practical room dividers that double as storage and display areas. They help organize your essentials without feeling bulky or heavy. Plus, they add an open, airy vibe that keeps your room feeling spacious.
Imagine a tall, sleek bookshelf made of light-colored wood or matte black metal, filled with books, baskets, or decorative boxes. Visualize it acting as a barrier between your sleeping and lounging zones while still allowing glimpses through the open slats. The shelves can be styled with a mix of textures—smooth ceramics, woven baskets, or cozy fabric bins—adding layers of visual interest. When placed strategically, it creates a cozy nook or a distinct zone.
Choose open shelving with adjustable tiers for flexibility. Use floating shelves for a minimalist look or chunky, industrial-style units for a bold statement. Incorporate different heights and depths to create visual rhythm. For a more personalized touch, paint or stain the wood to match your decor. You can also add decorative accents like small sculptures or framed prints—avoiding wall art—on the shelves.
Select a sturdy shelving unit that fits your room dimensions. Position it along the boundary of your space, making sure it’s anchored securely if tall or heavy. Use brackets or wall mounts for extra stability, especially if placed near high-traffic areas. Style the shelves with a mix of functional storage and decorative items, keeping the clutter to a minimum. Regularly rotate or update the contents to keep it fresh and functional.
Customize your shelves with paint or wallpaper backing for added flair. Incorporate baskets or boxes with unique patterns to contain smaller items. Add LED strip lighting underneath or along the edges for a soft glow—no fancy pendant lights needed. You can also hang small decorative elements like paper lanterns or fabric banners nearby to add personality, avoiding wall art.
Open-shelving units are a smart way to create visual separation while staying organized. They’re versatile, easy to update, and can evolve with your style. With the right styling, they become a centerpiece that reflects your personality and keeps your space inviting and functional.
3. Glass Partition Walls for Modern Transparency
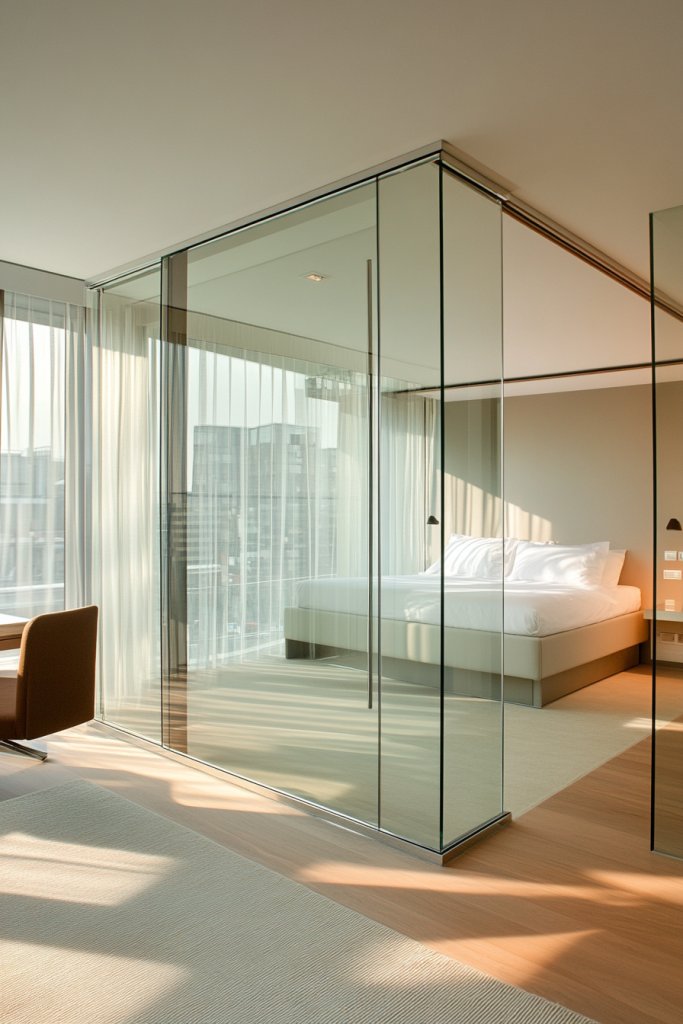
Want to separate your space without sacrificing natural light or an open feel? Glass partition walls offer a sleek, modern solution that maintains visual connectivity. They’re ideal if you crave privacy but also want to keep your room feeling spacious and airy. Plus, they add a luxurious touch that elevates your decor.
Imagine clear or frosted glass panels stretching from floor to ceiling, framing your sleeping area or workspace. The transparency creates a seamless transition between zones, while frosted options provide privacy without blocking light. Think about the soft glow filtering through, casting gentle reflections and adding a sense of calm. The glass’s smooth surface contrasts beautifully with textured textiles and warm lighting, creating a sophisticated atmosphere.
Choose from clear, frosted, or tinted glass depending on your privacy needs and style preferences. Frameless designs lend a minimalist vibe, while framed panels add a structural detail. For seasonal variations, add decorative films or decals for different effects. You can also incorporate sliding or bi-fold mechanisms for easy access and flexibility.
Start by measuring your space and selecting tempered, safety glass panels suitable for interior use. Hire a professional for precise installation—this isn’t a DIY project if you want a polished look. Mount the panels with sleek metal or minimal framing, ensuring they’re level and secure. Seal all edges with weatherproof or decorative trim, and consider adding soft rubber or silicone to prevent noise or vibration. Regular cleaning keeps the glass looking pristine.
Personalize your glass with etched patterns, geometric designs, or colored films for a custom look. Add decorative hardware like sleek handles or minimalistic frames to complement your decor. Incorporate LED lighting behind or along the edges for a subtle glow. The key is balancing transparency with privacy, creating a space that feels open yet defined.
Glass partitions combine style and function, making your space feel larger and more refined. They’re a long-term investment that adds value and modern appeal. Once installed, they require minimal upkeep and adapt effortlessly to your evolving decor style, giving you confidence to create a truly contemporary room layout.
4. Half-Wall Partitions with Built-In Niches
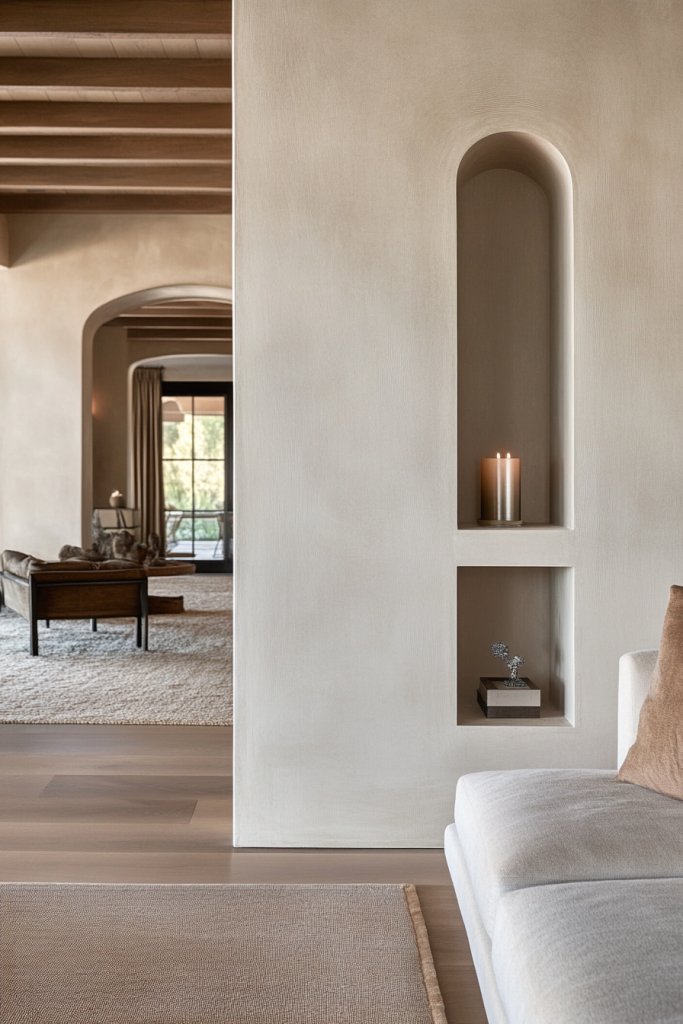
Looking for a subtle way to divide your room without losing openness? Half-wall partitions provide a gentle boundary that still allows light and airflow. They’re perfect for defining zones like sleeping and lounging areas while maintaining a sense of spaciousness. Plus, they add architectural interest that elevates your space.
Visualize a sleek, painted drywall or wood half-wall reaching about halfway up, with a built-in niche or shelf embedded within. Imagine placing decorative baskets, books, or personal items in the niches to create focal points. The clean lines and layered textures add depth, making the partition both functional and decorative. When lit softly, the niches become eye-catching accents that add warmth.
Choose materials that match your decor—painted drywall for a seamless look or natural wood for warmth. Incorporate niches at different heights or depths for visual variety. For seasonal flair, add removable panels or decorative accents like fabric inserts or LED lighting inside the niches. The height of the partition can vary based on space and style preferences.
Build or install a sturdy half-wall using drywall, wood, or MDF panels, ensuring proper reinforcement. Frame out recesses or niches during construction or retrofit with pre-made shelves. Finish with paint, stain, or veneer to match your decor. Secure the structure to the floor and ceiling for stability. Add built-in lighting if desired, but avoid cluttering the niches—keep them simple and functional.
Decorate niches with themed accents, such as nautical, boho, or minimalist styles, depending on your taste. Use removable inserts like fabric or decorative panels to change the look seasonally. Incorporate small LED strip lights or puck lights to highlight the niches. Personal touches like framed photos or sculptural objects can make the space uniquely yours.
Half-wall partitions with niches blend form and function, giving your room a polished, architectural vibe. They’re adaptable and easy to update over time. This subtle division helps create zones without closing off the room, making it perfect for open-concept living while maintaining privacy and style.
5. Sliding Barn Doors for Rustic Charm

Want a room divider that adds character and saves space at the same time? Sliding barn doors combine rustic charm with practicality. They slide smoothly along tracks, eliminating the need for swing clearance. Plus, they serve as a statement piece that instantly elevates your decor.
Imagine a reclaimed wood door with a distressed finish, mounted on industrial-style black metal tracks. When closed, it creates a warm, inviting barrier with a touch of farmhouse elegance. When opened, it reveals a seamless, open space with a hint of vintage or industrial flair. The combination of textures—rough wood, metal hardware—adds depth and authenticity.
Choose from solid wood, painted MDF, or mixed materials for different aesthetics. Incorporate decorative hardware or motifs for personalized style. For seasonal updates, repaint or stain the wood, or add decorative ironwork. You can also customize the size and track style to suit small or large openings, adapting to your space needs.
Install sturdy tracks on the ceiling or wall, ensuring they can support the door’s weight. Use high-quality reclaimed or engineered wood for durability. Hang the door with heavy-duty rollers or wheels designed for smooth sliding. Ensure proper clearance on either side for easy opening. Seal the edges with weatherstripping or decorative trim to prevent drafts and noise. Regular maintenance involves checking the hardware and cleaning the tracks.
Add decorative ironwork, stenciling, or painted patterns for a custom look. Incorporate vintage hardware or handles that match your room’s style. For a modern twist, combine rustic wood with sleek metal accents. You can also hang textiles or decorative elements on the door for seasonal or thematic updates. Keep it simple but personalized.
Sliding barn doors are a beautiful way to bring rustic charm into modern spaces. They’re functional, stylish, and highly customizable. Once installed, they require minimal upkeep and make a bold statement, transforming your room into a cozy, inviting retreat with little effort.
6. Vertical Garden Walls for Green Privacy (Using Faux Plants)
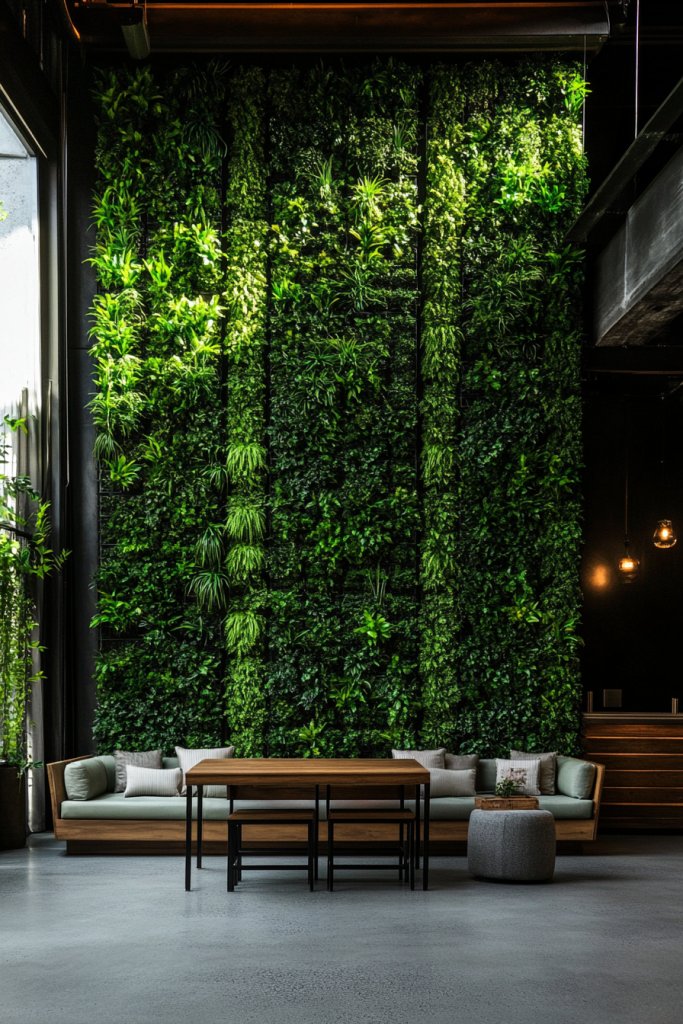
Looking to add a splash of greenery without the maintenance? Faux plant walls or panels give you the lush look of a garden with none of the fuss. They’re perfect for creating privacy and bringing a lively touch to your space. Plus, they fit well in rooms where real plants struggle to thrive.
Picture a wall covered with lush, vibrant faux greenery—think faux ivy, succulents, or ferns—crafted from durable materials. The textures range from soft, feathery leaves to thick, sculptural foliage, adding depth and color. The wall acts as a vibrant backdrop that softens the room’s edges and creates a natural, calming vibe. When lit with warm ambient lighting, they look remarkably real and inviting.
Choose from panels, tiles, or large hanging mats that can be arranged vertically or in geometric patterns. Mix different types of faux plants for a more dynamic look. For seasonal variation, add decorative elements like faux flowers or seasonal ornaments. You can also incorporate small shelves or hooks into the panels for additional functionality, avoiding wall art.
Select high-quality faux greenery panels or tiles, ensuring they’re UV-resistant if placed near windows. Mount them securely on a sturdy backing or directly onto the wall using adhesive or hooks. Arrange them in a pattern that complements your space, and use clips or ties for extra stability. Regular dusting or cleaning keeps them looking fresh, requiring minimal effort.
Add decorative elements like fairy lights or small ornaments among the faux foliage for seasonal flair. Incorporate textured panels or different shades of green to mimic real plant diversity. Use decorative planters or containers at the base for added visual interest, all while avoiding actual vases or wall art.
Faux greenery walls are a stylish way to introduce nature-inspired decor without upkeep worries. They’re a budget-friendly, customizable option that instantly livens up your space. With realistic textures and easy installation, you can enjoy a vibrant, green privacy screen year-round.
7. Hanging Rope or Cable Dividers with Connectors
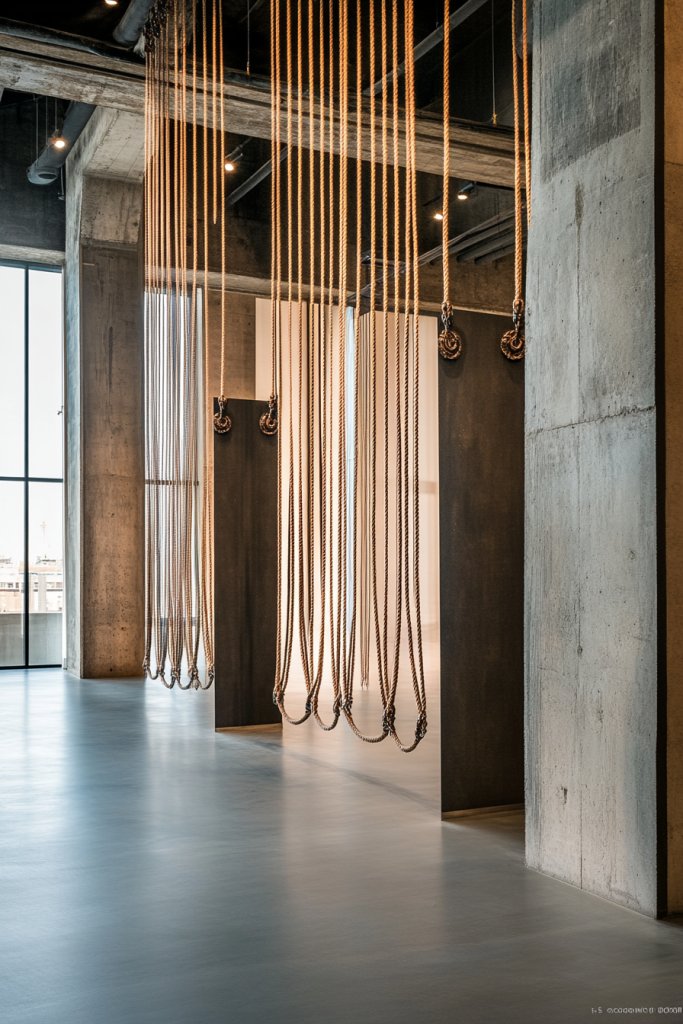
Want a lightweight, industrial-inspired way to partition your room? Hanging ropes or cables with decorative connectors create a dynamic, flexible divider. They’re perfect for adding a touch of modern minimalism while allowing you to hang fabrics, lighting, or accessories. Plus, they’re super easy to install and reconfigure.
Imagine several sturdy cables stretched across your room, anchored to the ceiling and floor or walls, with sleek connectors or hooks. From these, hang lightweight fabric panels, scarves, or decorative textiles that sway gently as you move. The combination of raw materials and flowing fabrics creates a contrast that’s both contemporary and cozy. It’s like a mobile art installation that divides space effortlessly.
Use different thicknesses and textures of ropes or cables for visual interest. Incorporate decorative metal or wood connectors for a refined look. For seasonal updates, swap fabrics or add string lights for a cozy glow. You can also hang small accessories or lightweight decor items, avoiding wall art, to personalize your divider.
Mount anchor points securely into the ceiling and floor or wall, ensuring they can support the weight of the fabrics or accessories. String cables or ropes taut between anchors, and attach connectors or hooks at intervals. Hang your chosen fabrics or textiles with clips or tie them directly to the connectors. Adjust tension to keep the divider stable, and test for movement or sway. Regularly check hardware for wear.
Tie different fabrics or textiles in varying colors and patterns for a layered look. Incorporate decorative knots or tassels for extra flair. Use LED fairy lights along the cables to add ambiance at night. Keep the overall aesthetic simple but fun, avoiding wall-mounted decor to stay true to the concept.
This hanging system offers a playful, customizable way to define your space with minimal effort. It’s adaptable for different room sizes and styles, giving you confidence to experiment with textures and layouts. Once set up, it’s a versatile, eye-catching feature that makes your room feel fresh and modern.
8. Modular Cubes or Storage Units for Customizable Zones
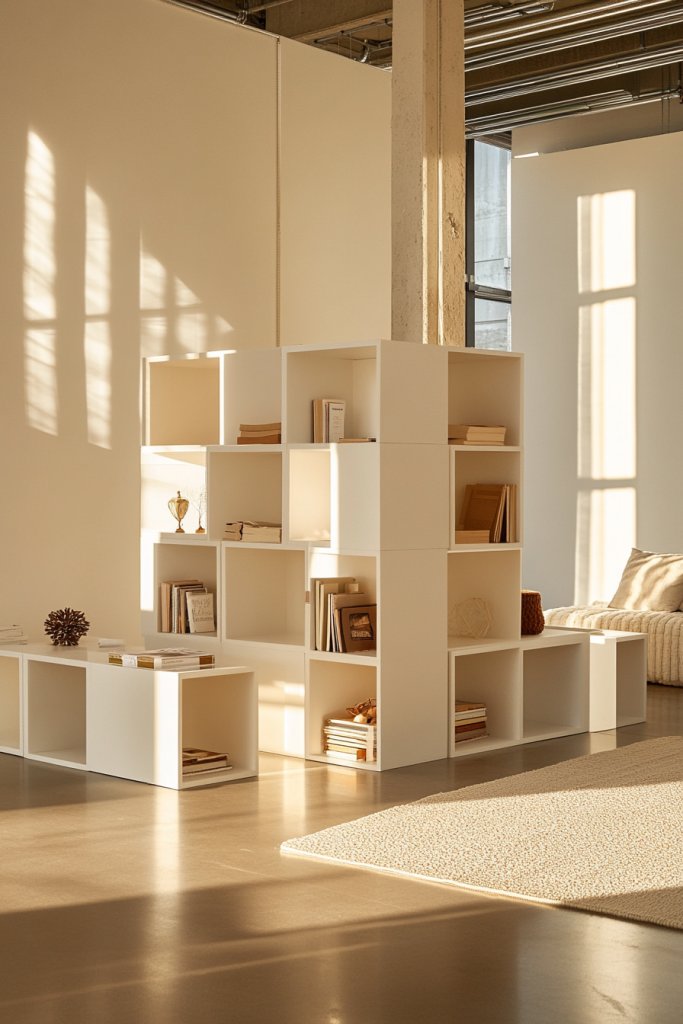
Feeling limited by fixed furniture in your room? Modular cubes or storage units offer a flexible way to create zones without permanent walls. They’re easily reconfigured to suit your changing needs or style. Plus, they add functional storage that keeps your space tidy.
Visualize a grid of open or closed cubes in natural wood tones or bold colors, arranged to define a sleeping corner from a workspace. Each cube can serve as a seat, a shelf, or a display area, creating a visually interesting mosaic. When filled with books, baskets, or decorative boxes, the units become both a divider and an organizational hub. The modular design allows you to change layouts or add more units as needed.
Mix and match different sizes and finishes for a personalized look. Use open cubes for display, while closed units hide clutter. Incorporate wheels or casters for easy mobility. For seasonal updates, change out the contents or reconfigure the arrangement for a fresh feel.
Choose durable, lightweight materials like plastic, wood, or engineered composites. Arrange the cubes in a pattern that fits your space and lifestyle—stacked, staggered, or linear. Secure units together with connectors or brackets for stability. Place them along a boundary or in the middle of your room to create separate zones. Fill with functional storage containers and decorative items.
Decorate with colorful bins, patterned textiles, or themed accessories to reflect your personality. Use removable labels or tags to keep things organized. For a cozy touch, add cushions or soft throws on top of some cubes—no vases or wall art needed. Change the arrangement seasonally or for special occasions.
Modular cubes are a versatile and playful way to customize your space. They grow with you, adapting easily to new needs. With a little creativity, you can turn an ordinary room into a highly functional, personalized haven that’s easy to update and maintain.
9. Artistic Room Dividers with Patterned Panels
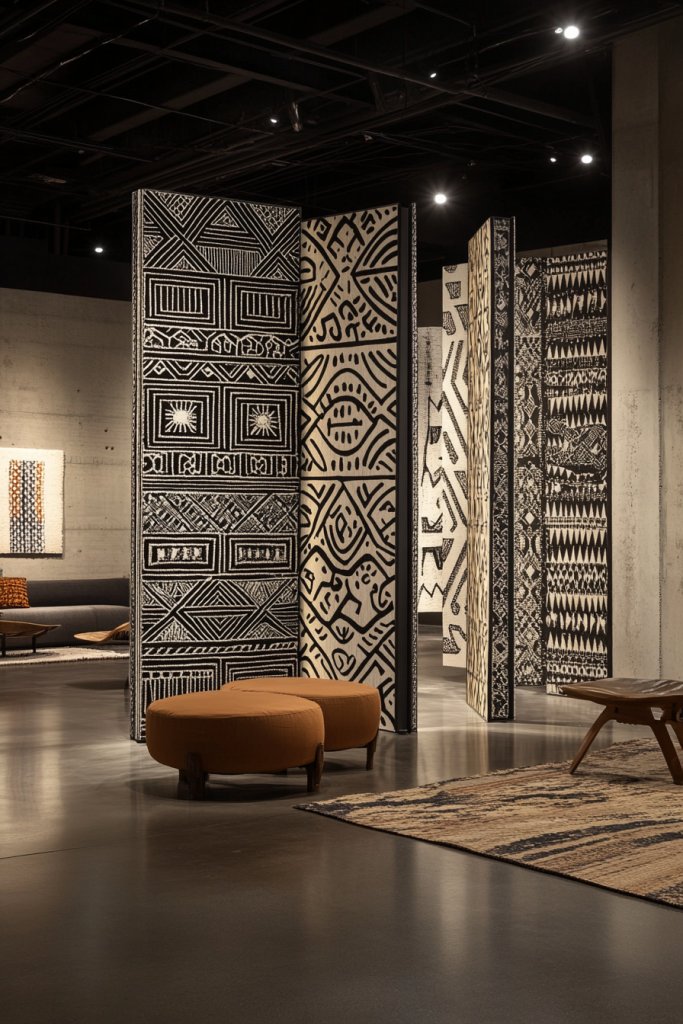
Looking for a room divider that’s both functional and eye-catching? Artistic patterned panels add personality and visual interest to any space. They serve as focal points while subtly separating zones. Plus, they’re easy to customize to match your decor and mood.
Imagine a screen or panel with bold geometric patterns, intricate motifs, or textured surfaces. The colors and designs can evoke a specific style—boho, modern, or eclectic. When placed strategically, these panels create a visual boundary that catches the eye and defines space. The textured or patterned surface adds depth, making your room feel curated and lively.
Choose from materials like painted MDF, textured wood, or fabric-covered panels for different effects. Incorporate metallic accents or layered patterns for added dimension. For seasonal updates, swap out panel coverings or change the placement for a fresh look. Use them as standalone pieces or combine multiple panels for a larger statement.
Select a sturdy frame or track to hold your panels securely. Mount or lean the panels against walls or use freestanding bases for flexibility. Ensure the panels are lightweight enough for easy repositioning. For added stability, use clamps or brackets. Style the panels with your chosen patterns, and periodically update the design with paint or new coverings.
Personalize your panels with stenciled designs, textured paints, or fabric overlays. Incorporate metallic or glitter accents for a touch of glam. Use removable decals or overlays to change themes seasonally. Keep the overall look dynamic by mixing various patterns and textures—no wall art needed.
Artistic panels turn simple room dividers into statement pieces that showcase your style. They’re a creative way to add color and texture without clutter. With a little DIY or professional help, you can craft a space that feels uniquely yours and visually stunning.
10. Lofted Bed with Under-Storage as a Divider
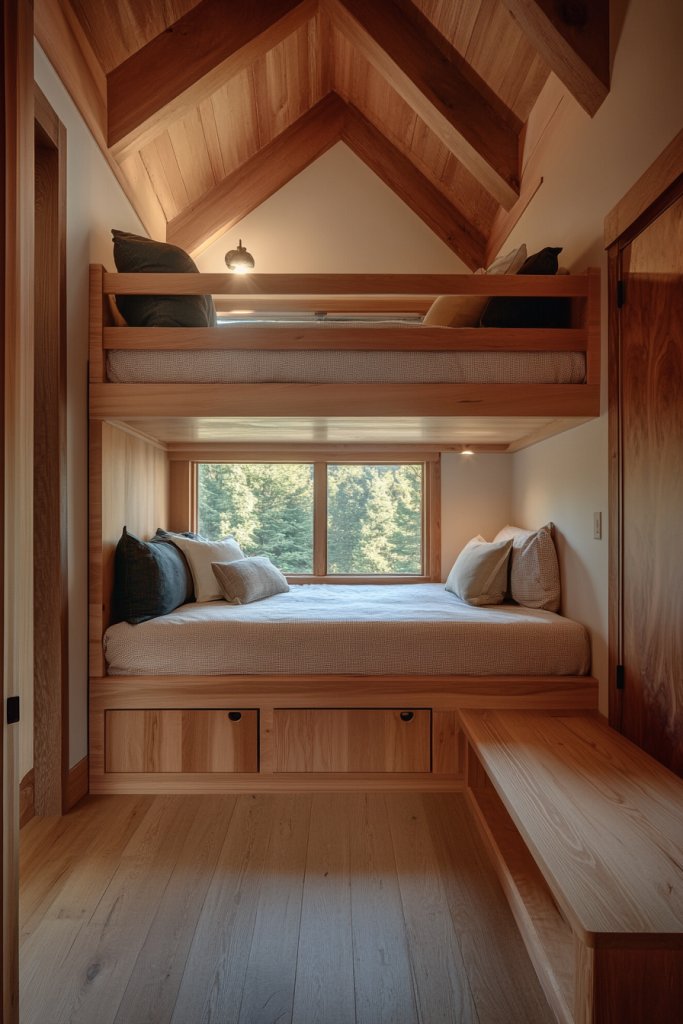
Small room? No problem. Lofted beds with under-storage create a cozy sleeping area while freeing up space below for other functions. They’re perfect for defining zones without sacrificing style or openness. Plus, they add a fun, youthful vibe that makes your space feel playful.
Imagine a sleek loft bed with a sturdy frame, elevated to expose a versatile space underneath. The area beneath can serve as a workspace, lounge, or storage zone, separated visually by the bed’s structure. You might add curtains or fabric panels around the lower area for privacy or to soften the look. The overall effect is a layered, multi-dimensional space where sleeping and living areas coexist comfortably.
Choose from metal, wood, or mixed materials for the frame to match your decor style. Use colorful or patterned curtains underneath to add visual interest or privacy. Incorporate built-in shelves or drawers into the structure for seamless storage. Seasonal swaps include swapping out bedding or adding decorative cushions and textiles underneath.
Ensure your ceiling and floor can support the weight of a loft bed. Select a sturdy, safety-rated frame and secure it properly into the wall or floor. Add a comfortable mattress, and organize the space below with storage bins, a desk, or seating. Use curtains or fabric panels to define the area further if desired. Regularly check hardware for safety.
Decorate the space underneath with a soft rug, cushions, or a cozy chair—no vases or wall art needed. Use colorful or patterned textiles to add personality. For seasonal updates, change curtains or add string lights for ambiance. Keep the space functional but inviting, making it your personal retreat.
A loft bed with under-storage maximizes vertical space and creates a playful, efficient zone. It’s adaptable to various decor styles and room sizes. Once set up, it offers a stylish way to combine sleep and activity zones, making your room feel larger and more organized.
11. Tension Wire Dividers with Hanging Accessories
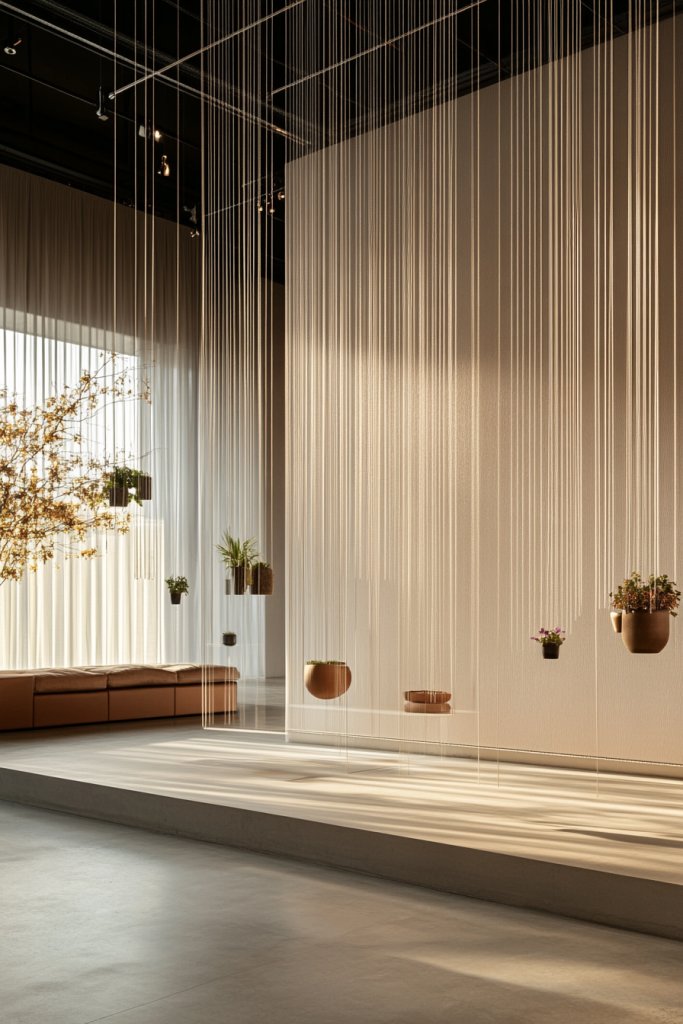
Looking for a flexible, minimalist room divider that’s easy to install? Tension wires offer a sleek, modern solution for creating visual separation without bulk. They’re perfect for hanging lightweight fabrics, scarves, or decorative elements, giving your space a dynamic, personalized feel.
Imagine a set of sturdy, taut cables stretched tightly across your room, anchored at strategic points. From these, hang flowing fabrics or textured textiles that add movement and color. The wires create a subtle boundary that doesn’t block light or sightlines, maintaining an open feel. Accentuate with decorative knots, tassels, or small ornaments that sway gently as you move.
Use different thicknesses and materials for the wires—stainless steel for a sleek look or coated cables for softer textures. Hang fabrics with clips or hooks, choosing colors and patterns that match your decor. For seasonal updates, swap fabrics or add decorative elements like faux feathers or beads. You can also incorporate fairy lights for a cozy glow.
Install anchor points on walls or ceiling joists capable of supporting the tension. Stretch the wires tightly, then secure with locking hardware or fittings. Attach your fabrics or textiles with clips, ensuring they hang evenly. Adjust tension periodically to prevent sagging. This setup requires minimal tools and can be easily moved or reconfigured.
Layer different fabrics or textiles for a textured, layered look. Incorporate decorative knots, tassels, or charms for added flair. Use seasonal fabrics or colors to keep the space feeling fresh. You can also hang lightweight accessories like paper lanterns or mobiles, avoiding wall art or vases.
Tension wire dividers are a practical, stylish way to partition space with minimal effort. They’re highly customizable and adaptable for different room styles. Once installed, they give your room a creative, modern edge that’s easy to update and maintain.
12. Reclaimed Wood Panel Dividers for Rustic Appeal
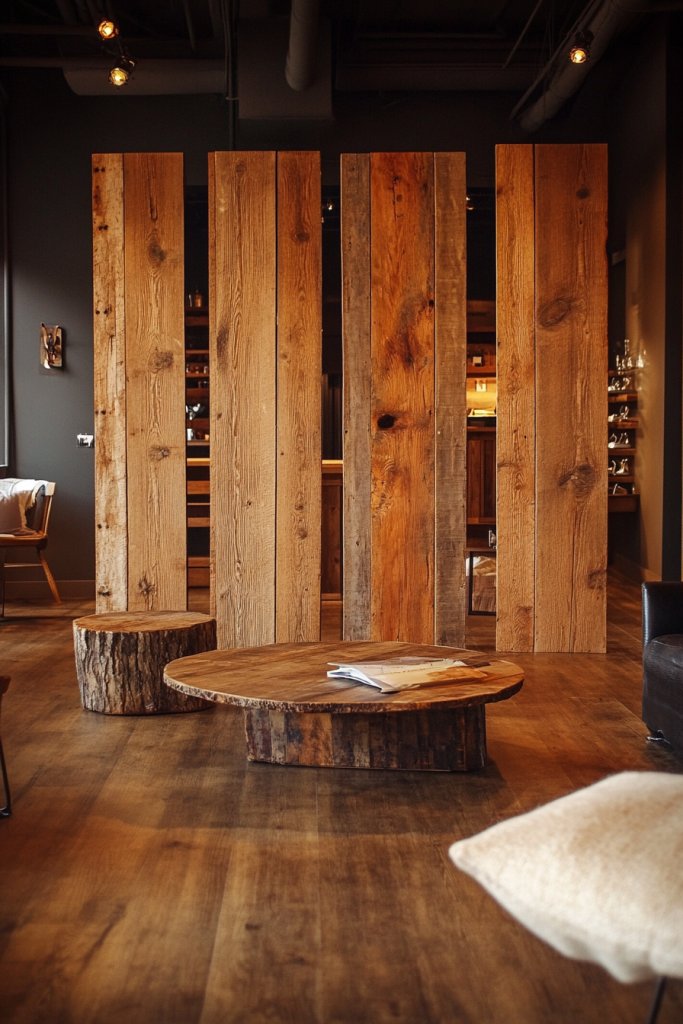
Craving a cozy, rustic vibe in your space? Reclaimed wood panels bring warmth and texture while serving as excellent room dividers. They add character and eco-friendly charm, making your room feel inviting and authentic. Plus, they’re a sustainable way to define zones stylishly.
Imagine a series of weathered, textured wood panels arranged vertically or horizontally, creating a natural barrier. The rich grains and imperfections tell a story—each piece has a history, adding depth to your decor. When placed in an open room, they create a visual separation that feels organic and warm. Paired with soft textiles and warm lighting, they evoke a cozy, cabin-like atmosphere.
Select wood with varying finishes—natural, stained, or painted—to match your aesthetic. Arrange panels in a staggered or uniform pattern, depending on your style. Incorporate decorative hardware, like wrought iron brackets, for an industrial touch. For seasonal updates, add decorative paint or stain, or swap panels for different textures.
Source reclaimed wood from local suppliers or repurpose old pallets or barn doors. Cut and treat the wood to ensure safety and durability. Secure panels together with heavy-duty brackets or hinges, and mount them on a sturdy frame or directly onto the floor or ceiling. Align the panels for stability, and consider sealing or finishing the surface for longevity. Regular maintenance involves cleaning and checking hardware.
Add decorative metal accents, carvings, or painted details to personalize each panel. Incorporate LED strip lighting behind or along the edges for a warm glow. Use textiles or woven accents to soften the look if desired. Keep the rustic charm intact, avoiding overly modern or polished finishes.
Reclaimed wood panels create a warm, inviting atmosphere that’s both stylish and eco-conscious. They’re a timeless choice that adds texture and depth. With some DIY effort, you can craft a unique room divider that’s both functional and full of character, making your space feel grounded and personal.
13. Foldable Accordion Partitions for Temporary Separation
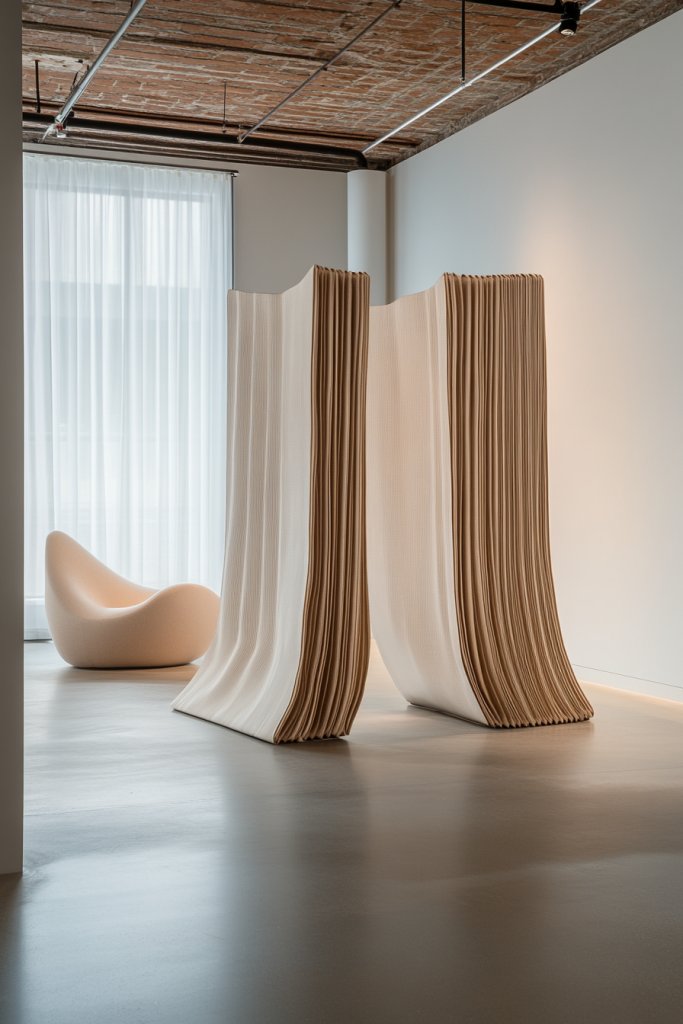
Need a quick and temporary way to partition a room? Accordion-style foldable screens are your best bet. They’re portable, easy to set up, and can be expanded or collapsed in seconds. Perfect for changing your space on a whim or creating privacy for guests.
Picture a lightweight, fabric or cardboard panel that folds into a compact form when not in use. When expanded, it forms a full-height barrier, instantly transforming your space. The accordion design makes it easy to tuck away behind furniture or into a closet when not needed. When set up, it adds a playful, flexible element that complements many decor styles.
Choose from various fabrics—neutral linen, bold prints, or textured weaves—to match your aesthetic. Use lightweight materials for easy handling or more durable options for frequent use. For seasonal updates, swap out fabric covers or add decorative trims. Customize the height and width to fit your space, making it as subtle or bold as desired.
Unfold the accordion panel and position it where you need separation. Anchor the ends if stability is an issue, especially on uneven floors. For a more permanent look, attach hinges or hooks to secure the panels temporarily or permanently. Use lightweight fabric or vinyl covers that are easy to clean. The setup is simple and requires minimal tools—perfect for DIY projects.
Decorate the panels with fabric paint, stencils, or trims to match your decor. Add removable hooks or pockets for storage or decorative accessories. Change the fabric seasonally for a fresh look. Keep it playful with bright colors or sophisticated with neutral tones—your choice.
Accordion partitions are a versatile, budget-friendly solution for temporary room division. They’re easy to store and move, making your space adaptable and fun. Once set up, they provide instant privacy and can be styled to suit any mood or occasion, boosting your confidence to experiment with room layouts.
14. DIY Pallet Walls with Colorful Accents
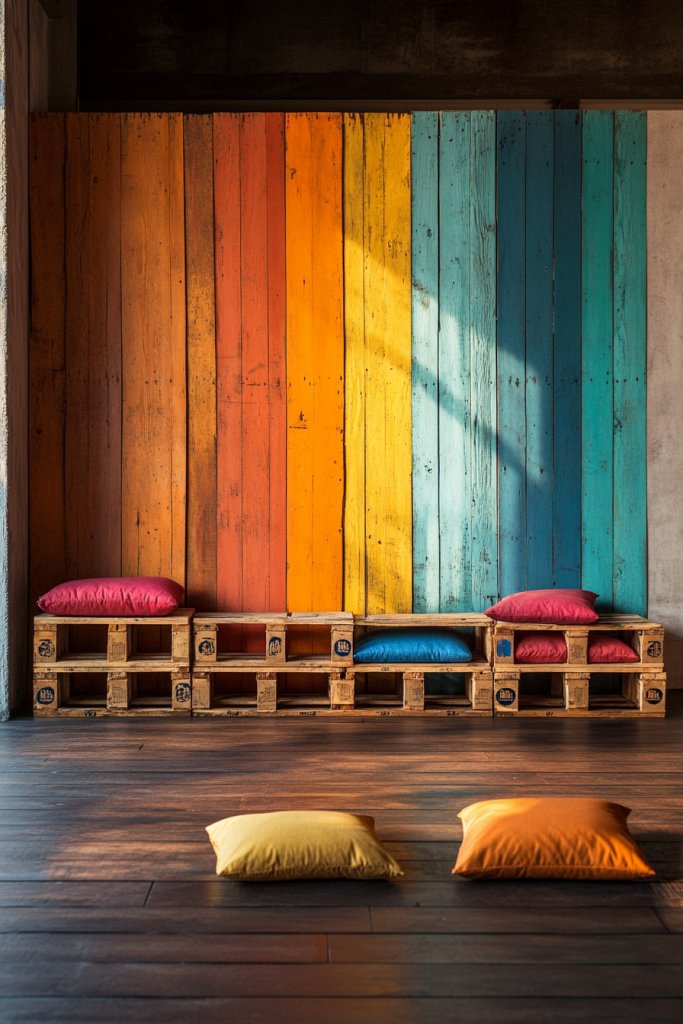
Want a cost-effective, creative way to divide your room? DIY pallet walls offer a rustic, customizable solution that’s easy on the wallet. They add texture and color, transforming a plain space into a vibrant, cozy haven. Plus, building your own gives you a sense of pride and personal touch.
Visualize a wall constructed from repurposed wooden pallets, painted in bright or neutral colors. The uneven textures and natural grain create a warm, inviting backdrop. When placed strategically, they define zones without feeling heavy or oppressive. Add string lights, fabric drapes, or decorative accents to enhance the visual appeal and make it uniquely yours.
Paint or stain the pallets in colors matching your decor—think pastel shades or bold hues. Arrange them horizontally, vertically, or in a staggered pattern for visual interest. For seasonal updates, repaint or add decorative elements like stencils or decals. Incorporate shelves or hooks into the pallets for extra functionality, avoiding traditional wall art.
Source recycled pallets from local suppliers or warehouses. Prepare them by cleaning, sanding, and sealing for safety. Attach pallets to each other with nails or screws, and secure the entire structure to the wall or floor. Use spacers or gaps for a modern look. Finish with a protective coating to prevent damage and ensure longevity. Regular maintenance involves cleaning and touch-ups.
Decorate the pallets with hand-painted designs, stencils, or seasonal motifs. Add decorative hardware like handles or hooks for hanging accessories or small decor. Incorporate fabric or textile accents for softness and color. Change the look seasonally by repainting or adding new decorative elements—your creation, your style.
DIY pallet walls are an affordable way to bring warmth and charm into your space. They’re highly customizable and eco-friendly, giving you confidence to craft a unique room divider that reflects your personality. Once finished, they become a focal point that combines craftsmanship with style, making your space truly yours.
Conclusion
With a variety of stylish, functional, and creative bedroom divider ideas at your fingertips, you’re equipped to redefine your space with confidence. Whether you prefer modern, rustic, or DIY solutions, these ideas can easily be tailored to fit your unique style and needs. Don’t hesitate to experiment and make your bedroom a true reflection of your lifestyle—your perfect flexible space awaits!
Leave a Reply